
Automatic conversion for E57 files
E57 files can contain 360° images in various formats, including cube maps and equirectangular (spherical) projections. If a 360° image is in a format other than a cube map, the extraction process will try to convert it to the cube map format. This conversion may require additional processing time and result in a slight quality loss compared to images that are already in cube map format. See E57 files with 360° images for upload instructions.Manual conversion for other file formats
If you have equirectangular images in other file formats (not E57), convert them to cube maps before uploading to CDF:- Use a conversion tool such as py360convert to convert your images to cube map format.
- Upload the converted cube maps following the steps in Upload 360° images programmatically.
Before you start
Access capabilities
See access capabilities to add the necessary capabilities to upload and view 360° images.Limitations
3D API processing now supports extracting 360° images from E57 files for a 3D model with adata set when starting from a script.
The extracted 360° image files will be stored in the same data set as the 3D model. If the 3D model doesn’t have a data set, the 3D API will also check and use any data set associated with the source file specified for the revision.
If you want the extracted 360° images to be available in a different data set, change the data set association for the files after processing is complete using file update requests.
If a data set is used in a modelId or source fileId, specify a dmsInstancesSpaceId value in the indexingOptions for the revision’s request body. See Upload 360° images programmatically for how to trigger extraction from a script. This specifies the space where the data model instances for 360° images are stored.
Get started
You can upload 360° images to CDF in two ways:- By uploading E57 files with 360° images, if you have a point cloud file in the E57 file format that includes both 360° images and point cloud data. A zip file of E57 files is also supported. This is only supported for the asset-centric 3D models.
- By uploading other formatted 360° images, if you have 360° images and related custom metadata in separate, other (not E57) formatted files.
E57 files with 360° images
Follow the steps to upload the E57 files to CDF, trigger point cloud filtering and indexing, and opt-in to 360° image extraction.1
Upload your E57 files to CDF
If these files are large:
- Upload the files in the ZIP format using the file extractor.
- Or, upload them as individual E57 files, referenced through a JSON file using a custom Python script.
2
Copy the main/primary file ID
Individual E57, ZIP, or JSON.
3
Upload a new model
Navigate to Data fusion > Configure > 3D > Upload model.
4
Enter model details
Enter a model name, leave the data set field empty, and then select Upload new model.
5
Upload the file
Upload the file, if needed, or select Choose existing uploaded file to process to create a 3D model and enter the file ID (from step 2).
6
Start processing the point cloud
Select Upload and process.
7
Wait for processing to complete
For smaller files, this can take a few minutes. For larger files, this might take several hours or days. Refresh the page if necessary.
8
Configure filtering and indexing
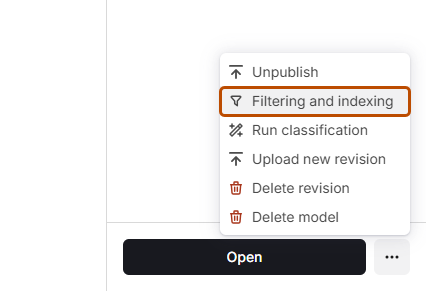
- Once the model’s status changes to Done, select the model > … > Filtering and indexing.
- Select Use the file ID from the previous revision.
- Select Extract 360° images and clear Generate tiles option.
- Optional: Expand the Filtering section and manage more settings.
- Select OK to start the point cloud processing.
Add 360° images to the scene
To see the 360° images in CDF programs and applications using the Reveal 3D viewer, add 360° images to the scene. For the E57 file (set) with both point cloud and 360° images, add 3D data when you configure or edit the scene. See Unified 3D contextualization for more information.The 360° images extracted from the E57 file set will be put in a 360° image collection named
site-<modelId>-<revisionId>. For example, site-111-222, where 111 is the model ID and 222 is the revision ID.