Before you start
- Assign access capabilities for the extractor to write data to the respective CDF destination resources.
- If the database you’re connecting to requires the extractor to use ODBC, download and install the ODBC drivers for your database.
Navigate to Data management > Integrate > Extractors > Cognite DB extractor in CDF to see all supported sources and the recommended approach.
- Review the server requirements for the extractor.
- Create a configuration file according to the configuration settings. The file must be in YAML format.
Connect to a database
Native
The extractor has native support for some databases and doesn’t require any additional drivers.
ODBC
To connect via ODBC, you must install an ODBC driver for your database system on the machine where you’re running the extractor.
Here are links to ODBC drivers for some source systems:
- MS SQLServer
- MySQL
- Oracle
Consult the documentation for your database or contact the vendor if you need help finding ODBC drivers.
ODBC connection strings
ODBC uses connection strings to reference databases. The connection strings contain information about which ODBC driver to use, where to find the database, sign-in credentials, etc.
Set up a Data Source Name (DSN)
We recommend setting up a DSN for the database if you’re running the extractor against an ODBC source on Windows. The Windows DSN system handles password storage instead of keeping it in the configuration file or as an environment variable. In addition, the connection strings will be less complex.
Open ODBC Data Sources tool
Open the ODBC Data Sources tool on the machine you’re running the extractor from.
Add ODBC driver
Select Add and the ODBC driver you want to use. In this example, we’re configuring a PostgreSQL database.
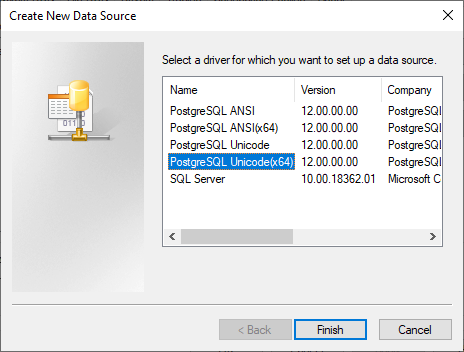
 Complete the setup
Select Finish.
Enter connection information
Enter the connection information and the database name.
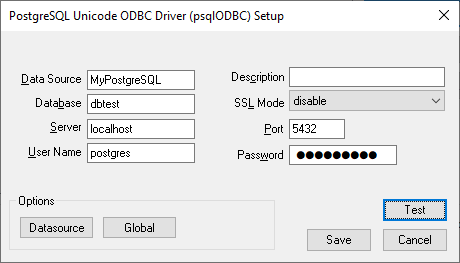
The configuration dialog may differ depending on which database type you are configuring a DSN for.
Test and save
Select Test to verify that the information is correct, then Save.
Use the connection string
Use the simplified connection string in your configuration file:databases:
- name: my-postgres
connection-string: 'DSN=MyPostgreSQL'
Windows executable
Windows service
Docker
Download the executable
Download the dbextractor-standalone-{VERSION}-win32.exe file via the download links available from the Cognite DB extractor section on the Extract data page in CDF.
Save the file
Save the file in a folder.
Run the extractor
Open a command line window and run the file with a configuration file as an argument.In this example, the configuration file is named config.yml and saved in the same folder as the executable file:dbextractor-standalone-<VERSION>-win32.exe ./config.yml
Download the service executable
Download the dbextractor-service-{VERSION}-win32.exe file via the download links available from the Cognite DB extractor section on the Extract data page in CDF.
Save with configuration file
Save the file to the same directory as a configuration file named config.yml. This must be the exact name of the file.
Install the service
As an administrator, open the command line window in the folder you placed the executable file and the configuration file and run the following command:.\dbextractor-winservice-<VERSION>-win32.exe install
Open Services app
Open the Services app in Windows and find the Cognite DB Extractor Executor service.
Configure the service
Right-click the service and select Properties. Configure the service according to your requirements.
Use a Docker container to run the DB extractor on Mac OS or Linux systems. This article describes how to create file-specific bindings with the container. You should consider sharing a folder if a deployment uses more than one file, for example, logs and local state files.ODBC only: Create a custom docker image
If you’re using ODBC to connect to your database, you first need to create a docker image that contains the ODBC driver for your database. Cognite ships a base image for the DB extractor that contains the extractor and ODBC libraries, but not specific drivers.This example uses a PostgreSQL database.This example uses PostgreSQL since the driver is easily available in Debian’s package repository. When you’re connecting to a PostgreSQL database, use the native PostgreSQL support in the DB extractor.
Create a Dockerfile
Create a Dockerfile and extend the cognite/db-extractor-base image. We recommend locking the version to a major release. Then, install your ODBC drivers. For example, for PostgreSQL:FROM cognite/db-extractor-base:3
RUN apt-get update \
&& apt-get install -y odbc-postgresql \
&& apt-get clean -y \
&& rm -rf /var/lib/apt/lists/* \
&& rm -rf /tmp/*
Save the Dockerfile
Save the Docker file with a descriptive name. In this example, we use postgres.Dockerfile.
Build the Docker image
Build the Docker image. Give the image a tag with the -t argument to make it easy to refer to the image.docker build -f postgres.Dockerfile -t db-extractor-postgres .
Replace postgres.Dockerfile with the name of your Docker file.Replace db-extractor-postgres with the tag you want to assign to this Docker image. Run the Docker container
Run this image to create a Docker container:docker run <other options in here, such as volume sharing and network config> db-extractor-postgres
Replace db-extractor-postgres with the tag you created above. Run on a local host on DockerWhen a Docker container runs, the localhost address points to the container, not the host. This creates an issue if the container runs against a local database. For development and test environments, you can use the host.docker.internal DNS name to resolve to the host. Don’t use this approach for production environments.You also need the local database to accept connections from outside the localhost for the container to access the database connection.
Load data incrementally
If the database table has a column containing an incremental field, you can set up the extractor to only process new or updated rows since the last extraction. An incremental field is a field that increases for new entries, such as time stamps for the latest update or insertions if the rows never change, or a numerical index.
To load data incrementally for a query:
Configure state store
Include the state-store parameter in the extractor section of the configuration.
Set incremental parameters
Include the incremental-field and initial-start parameters in the query configuration.
Update SQL query
Update the SQL query with a WHERE statement using {incremental-field} and {start-at}. For example:SELECT * FROM table WHERE {incremental-field} >= '{start-at}' ORDER BY {incremental-field} ASC
If the query returns many rows, consider paging the results with the LIMIT statement. Be aware that this demands a well-defined paging strategy. Consider this example:
SELECT * FROM data WHERE {incremental-field} >= '{start-at}' ORDER BY {incremental-field} ASC LIMIT 10
Multiple rows with identical values in the incremental fieldIf 10 or more rows have the same time, the start-at field won’t be updated since the largest value of the incremental field didn’t increase in the run. The next run will start with the same value, and the extractor is stuck in a loop. However, changing the query from >= to > can cause data loss if many rows have the same value for the incremental field.Therefore, set a sufficiently high limit if there are duplicates in the incremental field and you’re using result paging.
There might be a slight boost in the extractor runtime if the database has an index on the incremental field. However, for a standard run of the DB extractor, network delays are often the main bottleneck for performance, so usually, the difference is minimal.