Configure, build, and deploy CDF modules
With the CDF Toolkit, you first configure access to the CDF project(s) you'll administer. Next, you define and configure the modules you want to build and deploy. Then, you run the cdf-tk build command to build the necessary artifacts to deploy the modules.
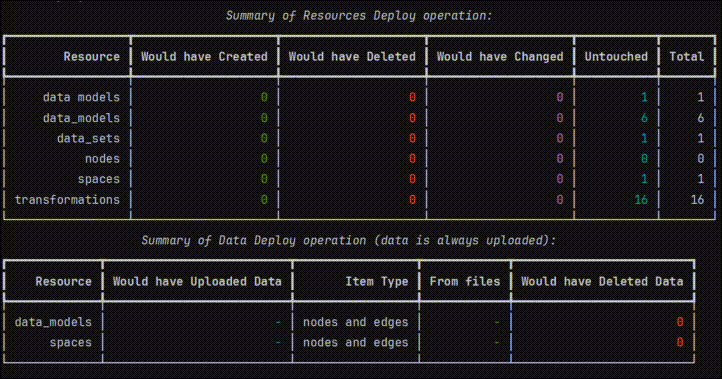
Before you deploy the artifacts, we recommend that you always do a dry-run deployment to verify that the configurations and deployment perform as expected.
When you've verified the configuration, you run the cdf-tk deploy command to deploy the artifacts to the CDF project using the CDF SDK and APIs.
Step 1: Configure access to the CDF project
You must set up authentication for the CDF Toolkit to access the CDF project you'll administer. Follow the steps below to configure the necessary access and create an environment file, .env, for the configuration.
Configuration prerequisites
Before you configure the CDF Toolkit to access the CDF project, make sure these steps have been completed:
-
Add the CDF toolkit registration to an admin group.
The CDF Toolkit must be a member of a group that has a minimum of these capabilities in CDF:
projects:listandprojects:readgroups:list,groups:read,groups:create,groups:update, andgroups:delete
Configure the CDF Toolkit authentication
Follow these steps to configure the CDF Toolkit and make sure that it has access to the CDF project:
-
Collect the values for the environment variables you need to configure:
Description Environment variable The cluster where your CDF project is running (for example, westeurope-1).CDF_CLUSTERThe CDF project name (e.g. myproject).CDF_PROJECTThe client ID of the application/service principal you created in your identity provider. IDP_CLIENT_IDThe client secret of the application/service principal you created in your identity provider.1 IDP_CLIENT_SECRETThe token URL of your identity provider.2 IDP_TOKEN_URL1Set
LOGIN_FLOW=interactiveto use an interactive sign-in-flow. You'll be prompted to sign in through a browser instead of using a client secret.2If you use Microsoft Entra ID as your IdP, you only need to specify the ID for your Entra ID tenant by replacing
IDP_TOKEN_URLwithIDP_TENANT_ID.informācijaThe CDF Toolkit supports the
CDF_TOKENenvironment variable. If you have already created an OAuth2 token, for instance with Postman, you can use that token in theCDF_TOKENenvironment variable, and only set theCDF_CLUSTERandCDF_PROJECTvariables. -
In a terminal, run this command to set up the authentication:
cd <proj_dir>
cdf-tk auth verify --interactive
The CDF Toolkit prompts you for the necessary information and asks you to store the information in a local
.envfile.
You can also use the .env.tmpl file to configure the environment variables manually, and then run the cdf-tk auth verify command without the --interactive flag to verify that you've set up the authentication correctly.
The .env files can contain secrets — don't check them into version control repositories. The .env extension is added to the .gitignore file created in your project directory.
Step 2: Configure modules
To configure the modules to deploy to a CDF project:
-
Navigate to your CDF Toolkit directory, and make a copy of one of the sample config.<env>.yaml files. Use the templates for the dev and prod environments as your starting point.
piezīmeYou need one config.<env>.yaml file for each CDF project you deploy to. For example, if you have
prod,staging, anddevprojects/environments, you need config.prod.yaml, config.staging.yaml, and config.dev.yaml configuration files. -
Open the copied configuration file, and edit the
projectproperty to match the name of your CDF project (line 3 in this example):environment:
name: dev
project: <customer-dev>
type: dev
selected:
- cdf_demo_infield
- cdf_oid_example_data -
In the
selectedproperty, list the modules you want to deploy (lines 6-7 above).You can list any of the modules in the cognite_modules, custom_modules, or modules sub-directories.
-
Update the variables in the
variablessection to match the CDF project you're deploying to, for example, to change the name of your default location.importantMake sure that you update all the variables that are set to <change_me>. If not, the module won't be deployed correctly.
- Save the configuration file.
Step 3. Build deployment artifacts
To build the artifacts to deploy for the modules you have configured:
-
In a terminal, run these commands:
cd <proj_dir>
cdf-tk build --env=dev
The
--env=<env>parameter specifies which configuration file to use, in this example config.dev.yaml.
The CDF Toolkit substitutes the variables in the templates and creates a build/ output directory with the artifacts to deploy.
Step 4: Deploy to the CDF project
To deploy the configured artifacts to your CDF project:
-
In a terminal, run these commands to do a dry-run of the deployment:
cd <proj_dir>
cdf-tk deploy --dry-run -
Inspect the output from the dry run and verify that the configurations and deployment perform as expected.
-
Run this command to deploy the artifacts to your CDF project:
cdf-tk deploy
To ensure that history and logs are not overwritten, the CDF Toolkit deploys only configurations that have changed since the last run, and updates the configurations in the CDF project.
Clean up configurations and data
To deploy from a clean state, you can remove configurations and data before you deploy.
Use these commands with caution to be sure that you do not accidentally delete configurations and data. Always run the commands first with the --dry-run option to inspect the potential impact.
Remove and redeploy configurations and data
To remove and redeploy configurations, but keep the data, run this command:
cdf-tk deploy --drop
To also remove and redeploy the data, add the --drop-data option:
cdf-tk deploy --drop --drop-data
To delete everything in your project that is managed by your configurations:
cdf-tk clean --dry-run
Next steps: Set up a CI/CD pipeline
When you have configured and deployed to your CDF project, the next step is to set up a CI/CD pipeline to script and deploy to the different projects/environments as part of your development workflow.
When you have provisioned a project with the YAML configuration files, you can continue to manage the governed parts of your projects with the same configuration files. The CDF Toolkit only targets the CDF resources that are specified with their external IDs in the YAML configuration files.