Create templates and checklists
Use the Templates tab to create and plan tasks that the field workers perform at regular intervals, such as weekly installation operator rounds.
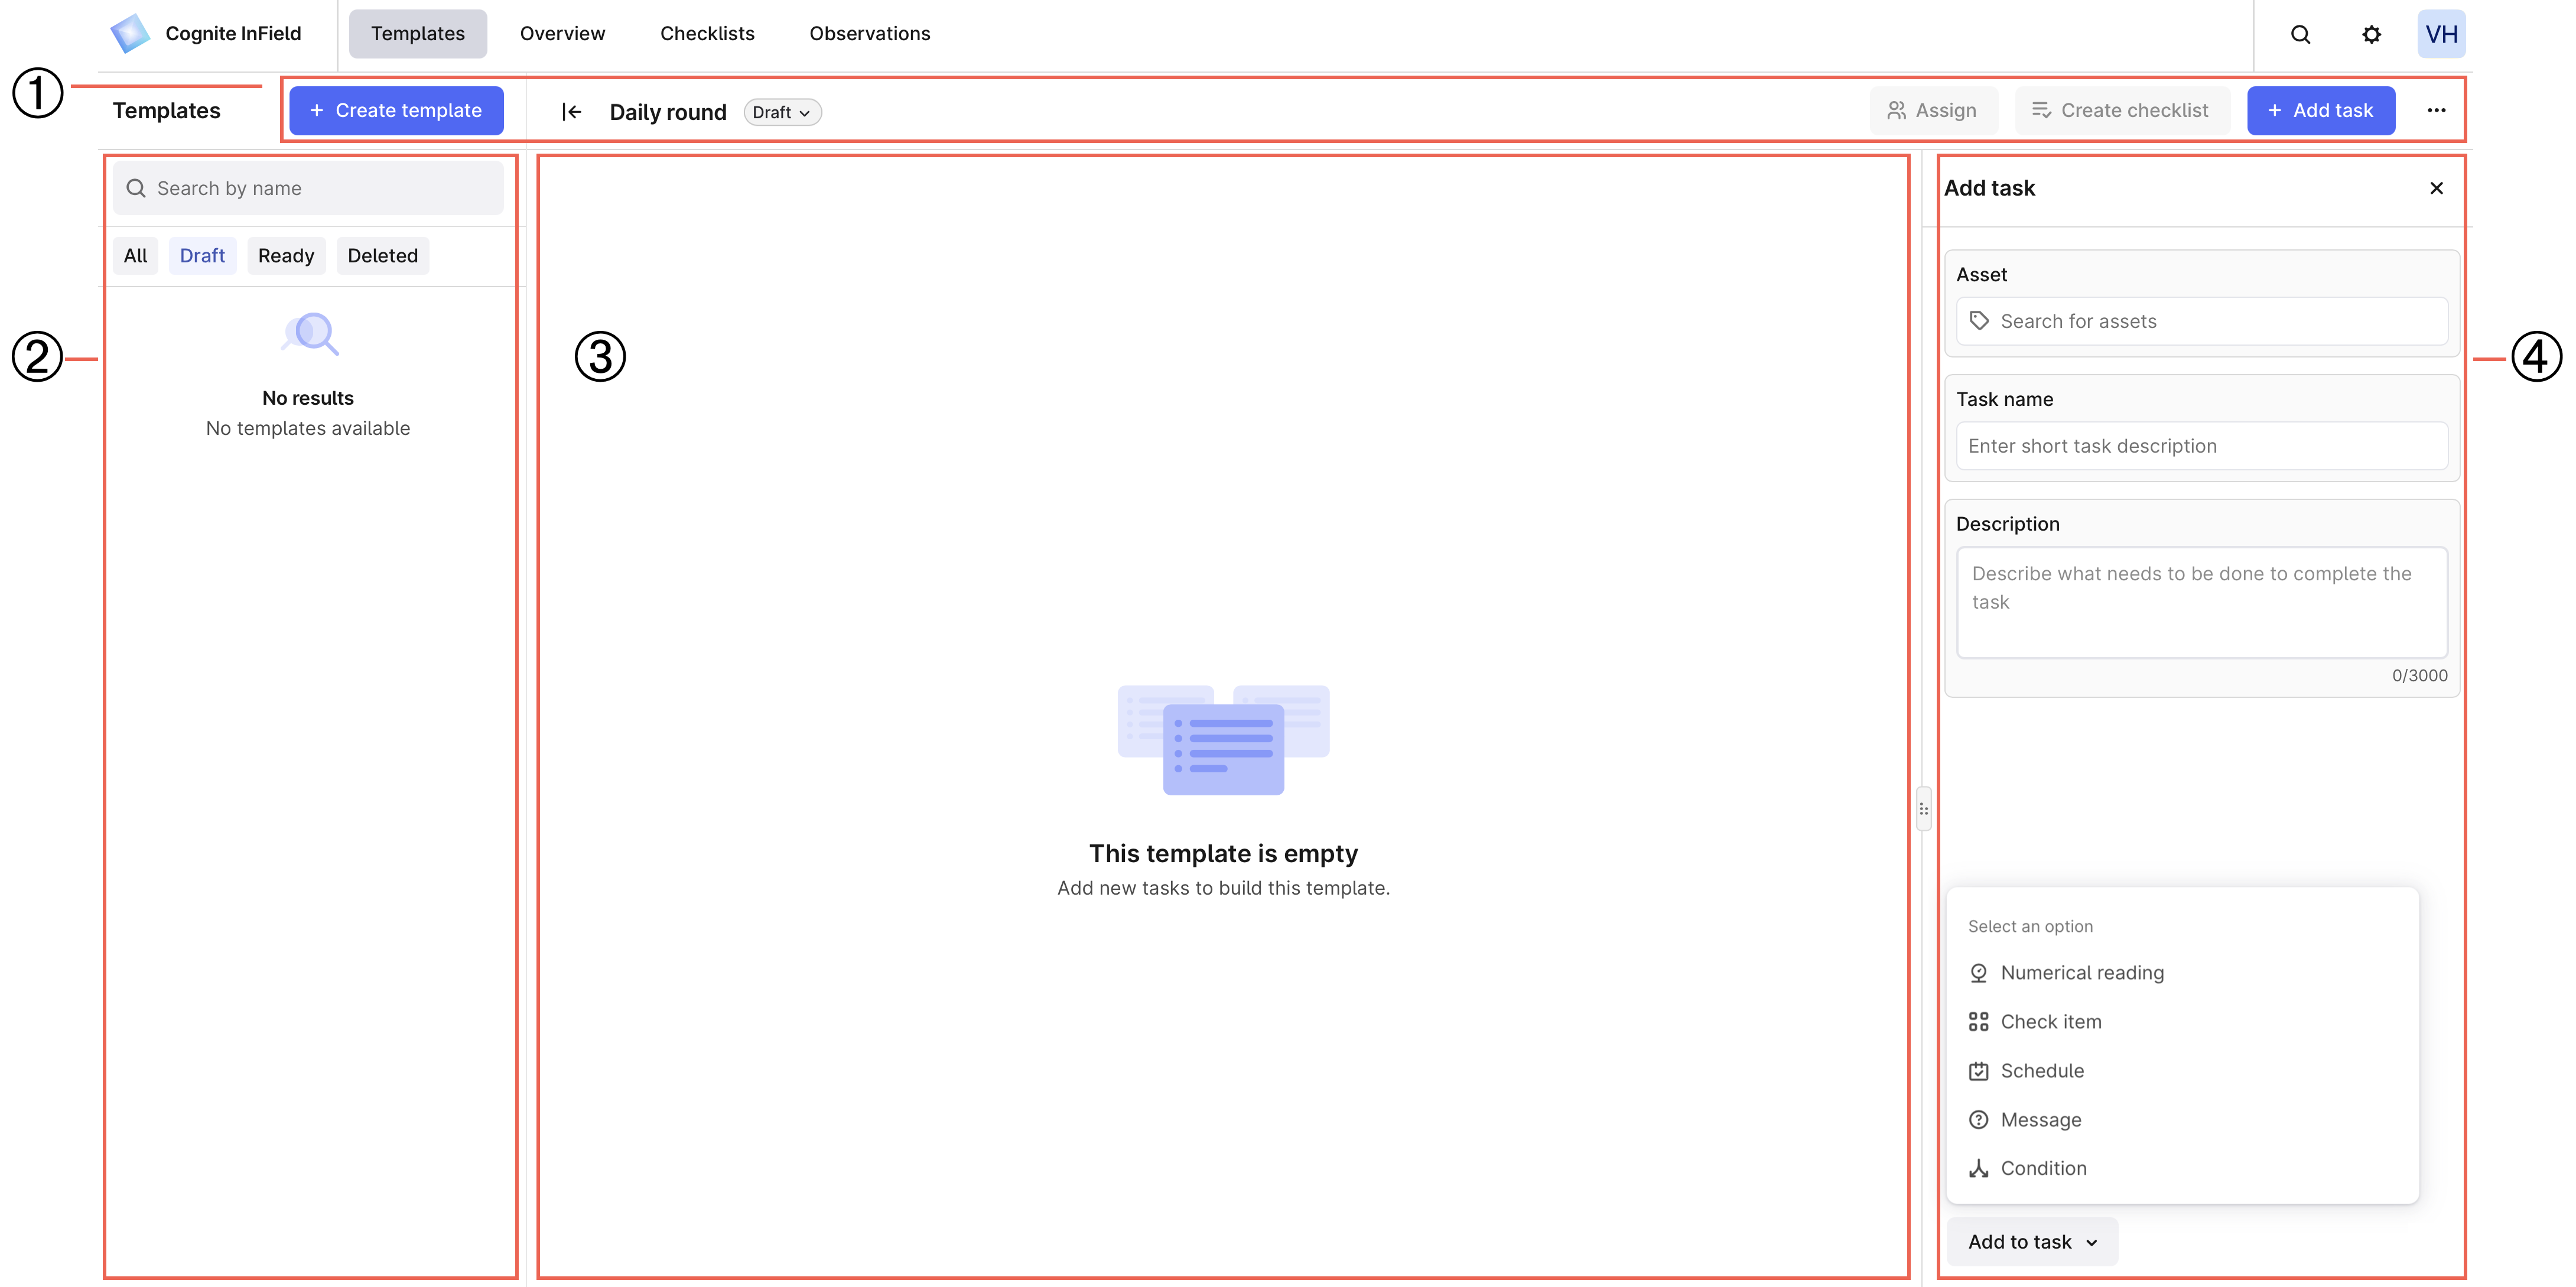
➀ Action menu — create templates, add tasks, change the template's status, assign and create checklists, and more (...).
➁ Templates list — view the list of templates, search by name, and switch between statuses.
➂ Tasks list — view and interact with the list of tasks in your template.
➃ Add task — fill out your tasks with the required details to perform the work in the field.
Step 1. Create templates
- Select + Create template and name the template.
- Enter task details, such as name and description, and, optionally, link the task to an asset.
A description can be a step-by-step instruction for the task with links where necessary. - Optional. Select Add to task and then select:
- Numerical reading
- Check item
- Schedule
- Message
- Condition
Ask field workers to add measurement readings from equipment. You can set the measurement unit, for example, bar for pressure readings and minimum and maximum values. You can search and connect time series created in InField only.
InField stores the measurements as time series in CDF, and you can trend and analyze the values using Charts.
If you've removed a numerical reading from a checklist, it's still available as a time series.
To create a numerical reading:
- Select + and fill out the required fields to create the time series.
- Optional. Link the time series to a specific asset, otherwise, the time series is linked to the root asset.
- Optional. Enter the description for the time series. If provided, the description is used as the numerical reading name in checklists.
Add to the task an item that requires a check, verification, inspection, etc.
- Add a description of what needs to be done.
- Enter the button name, select its color, and link the button to the task status. The task will change its status based on the button field workers select. For example:
- When field workers work on the checklist and select the button with the linked OK status, their task status changes to OK.
- If there's a numerical reading that's out of range (Not OK) and field workers select the button with the linked OK status, the task status will change to Not OK as this task requires attention. In this example, field workers should fill out all numerical readings and items to check for the status to change automatically.
- Select + Add button to add another possible response to the description.
Schedule tasks to automatically create them as checklists at regular intervals. You can set checklists to open automatically on specific days, every two weeks, twice a month on Mondays, once a year, etc.
To schedule a task:
- Set the time range when the field workers should complete the task. The initial start time is 6 AM in the computer's local time zone. You can change the start time to half-hour intervals.
- Optional. Select the time zone (⚙).
- Specify how often you want field workers to work on this task. For intervals other than daily, weekly, monthly, and yearly, set the start date when to create the first checklist from the task. By default, the date of adding a task is used.
Ask field workers to give a written response to a request, question, message, etc.
Set what subtask field workers need to perform if a checklist task gets a certain status. For example, if the task's status changes to Not OK, field workers need to explain the reason in free text.
-
Select + Add task to add another task.
NoteOne template has a limit of 500 tasks. However, to make it easy for the field worker to navigate them in the field, keep them as short as possible.
-
Set the template to Ready. Ready templates can be assigned to disciplines or users and can be created as checklists manually and automatically.

The templates left in Draft will remain templates and won't appear as checklists.
You need extended access to plan and schedule tasks, and you need to assign activities using the InField desktop version, not mobile.
Step 2. Manage tasks
To work with several tasks at once, you can:
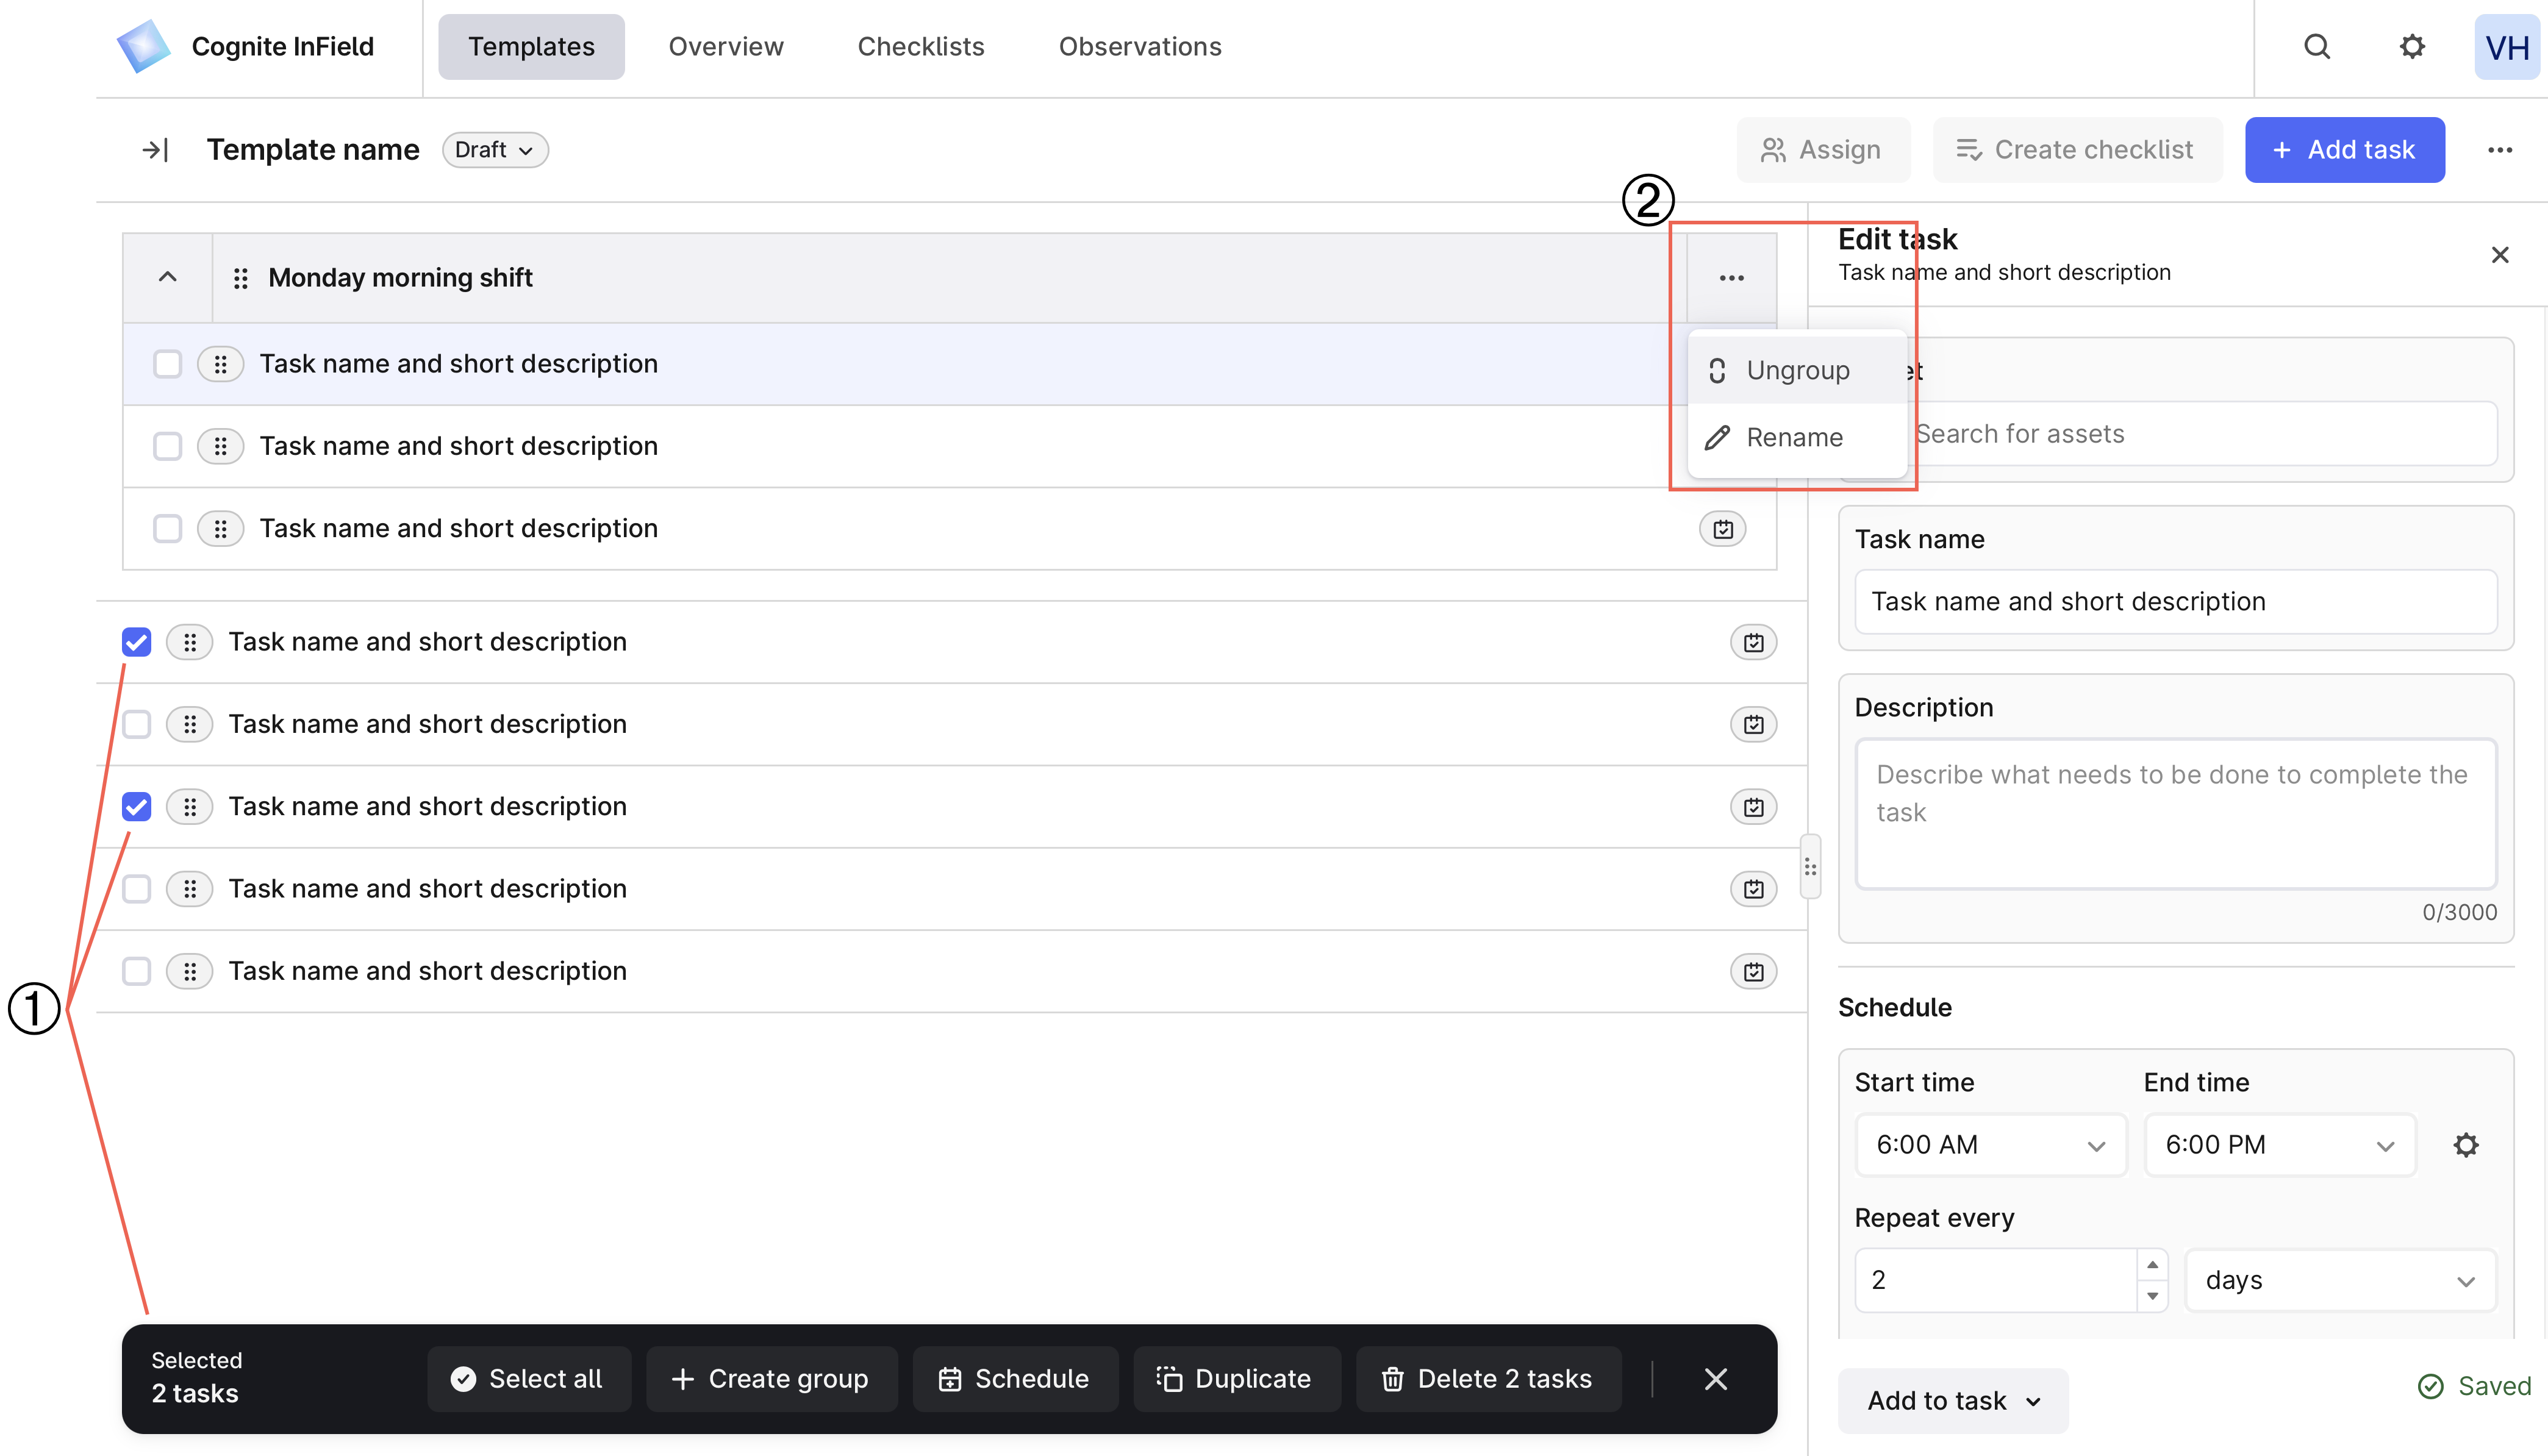
➀ Select tasks — to create task groups, schedule several tasks at once, duplicate, and delete tasks.
➁ Edit a group — select More options (...) to ungroup the tasks or rename the group.
Step 3. Create checklists
A checklist is a task or a list of tasks generated from a template or a work order. On the Templates tab, you can create a checklist from a template or its tasks in two ways:
- Manually. Select a template in the Ready status and, on the right, select Create checklist. Suggest a start and end date and confirm the creation. The dates are used for sorting only. You'll create a checklist that's a copy of the template, even if some tasks are scheduled for a different date and time.
Field workers can also create checklists on their mobile devices.
- Automatically. Once you add a schedule to a task or a group of tasks, the tasks automatically appear in the created checklist based on the schedule. Remember to move the templates to Ready, otherwise, the schedule won't start. Template tasks that aren't scheduled won't be included in the checklist created from the scheduled tasks.
Automatic scheduling creates checklists with a delay unless you create them before the task start time.
Delete and restore templates and tasks
To delete a template, select More options (…) to the right of + Add task > Delete template.
To restore a template, select Deleted in the left panel > More options (…) to the right of the template you want to restore > Restore template.
You can't restore a task that has been deleted from a template.