> ## Documentation Index
> Fetch the complete documentation index at: https://docs.cognite.com/llms.txt
> Use this file to discover all available pages before exploring further.
# Set up Postman with Cognite API
> Step-by-step guide to configure Postman with OpenID Connect authentication to test Cognite API requests and verify responses.
We recommend downloading, installing, and using **[Postman](https://www.getpostman.com)** to test API requests and verify responses.
## Try with Open Industrial Data (no admin setup)
To explore the API with sample data without Entra ID administrator access, use [Open Industrial Data](https://hub.cognite.com/open-industrial-data-211). Sign up at [Cognite Hub](https://hub.cognite.com) and get credentials from [OpenID Connect on Open Industrial Data](https://hub.cognite.com/open-industrial-data-211/openid-connect-on-open-industrial-data-993).
Use these values when setting up your Postman environment:
| Variable | Value |
| --------- | ----------------------------------------------------------- |
| tenant-id | From the Hub article |
| token | Leave blank |
| baseUrl | `https://api.cognitedata.com/api/v1/projects/publicdatacdm` |
| project | `publicdatacdm` |
For the full quickstart with Open Industrial Data, see the [Development quickstart](/dev/quickstart).
## Connect to your CDF project
To use the different grant types (Implicit, Authorization code (with PKCE)) with your own CDF project, you need to grant access to a multi-tenant app in Entra ID. You must be an **Entra ID tenant administrator**.
Follow the steps in [How to register Cognite API](/cdf/access/entra/guides/configure_cdf_azure_oidc#step-11-permit-the-cognite-api-to-access-user-profiles-in-azure-ad) to register the app. When you have registered the app, you can sign in with your Entra ID credentials.
Before you set up authorization in Postman, configure your **Entra ID** application:
Go to **Entra ID** and find your **Tenant ID** and **Application (client) ID** in the overview page.
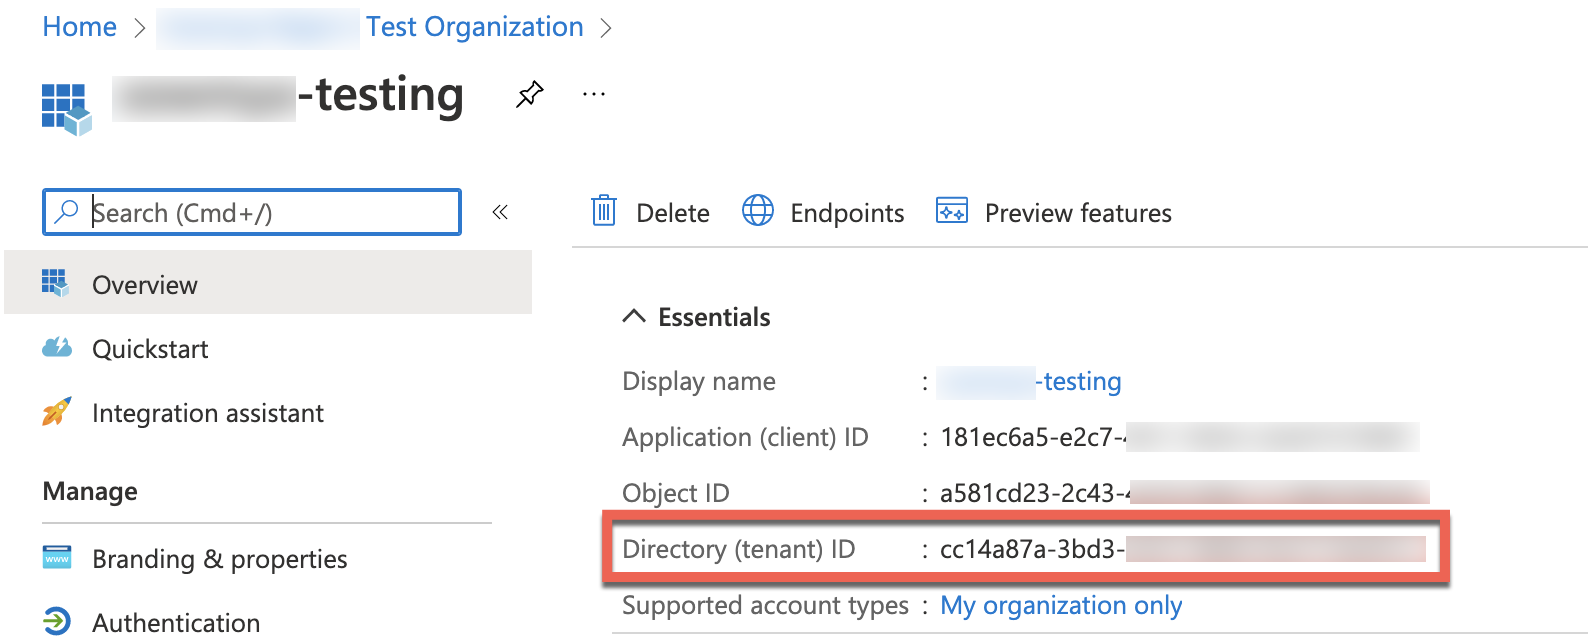 Save these IDs as you'll need them when configuring Postman authorization.
In the **App registrations** section, create a **New client secret** under **Certificates & secrets** in the left menu.
Select **+ New client secret**, enter a description, choose an expiry period, and select **Add**.
Save these IDs as you'll need them when configuring Postman authorization.
In the **App registrations** section, create a **New client secret** under **Certificates & secrets** in the left menu.
Select **+ New client secret**, enter a description, choose an expiry period, and select **Add**.
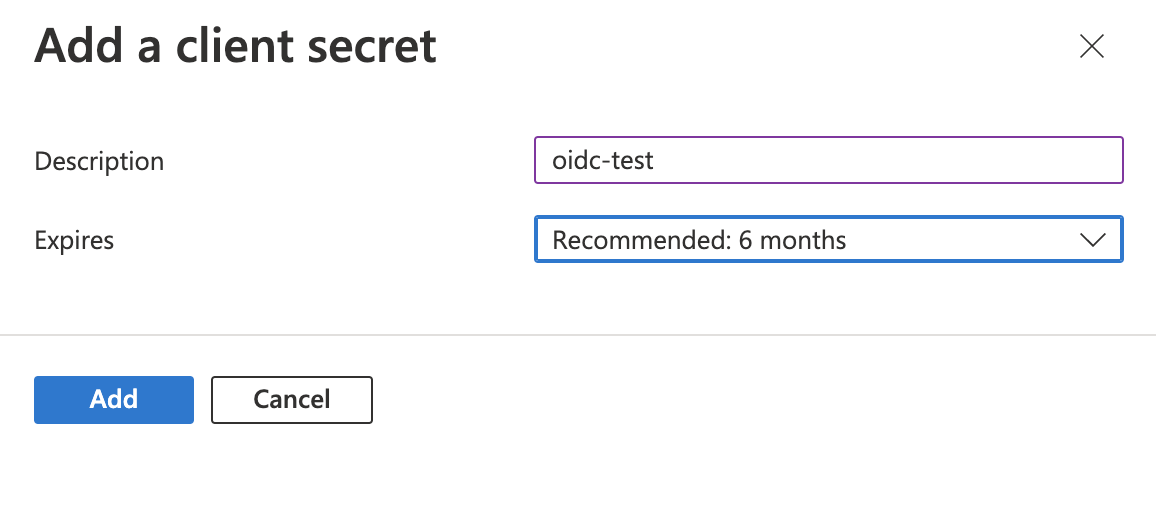 Copy the client secret value immediately after creation. It won't be visible again once you navigate away from this page.
Add the **Redirect URL** in your Entra ID application settings to allow Postman to receive authentication callbacks.
Your Entra ID application is now configured for use with Postman.
## Set up Postman
Download the [**Cognite OpenAPI specification**](/api-reference/concepts/20230101/api-description).
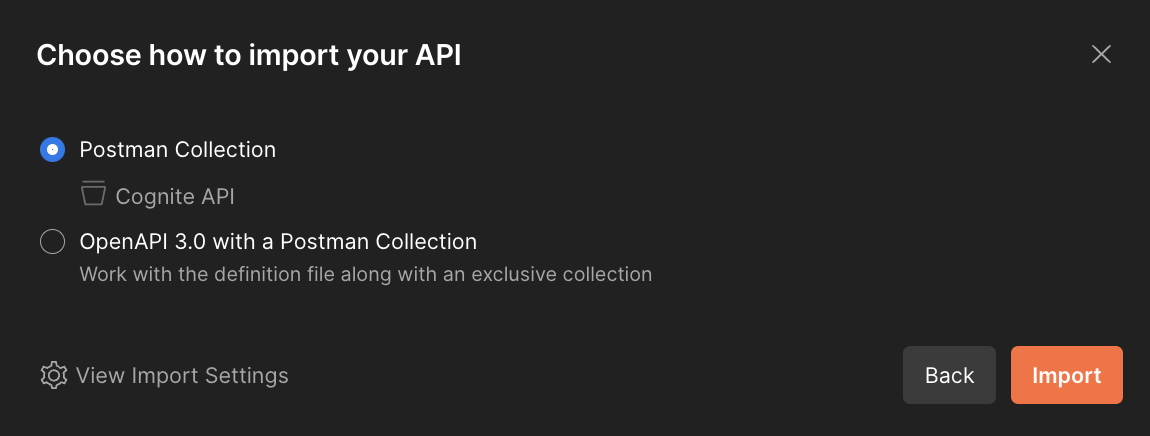
In Postman, select **Import** and drag the file to the import modal.
In **View Import Settings**, configure the import:
* Set **Folder organization** to **Tags**
* Turn **off** the **Enable optional parameters** option
* Turn **on** the **Always inherit authentication** option
Copy the client secret value immediately after creation. It won't be visible again once you navigate away from this page.
Add the **Redirect URL** in your Entra ID application settings to allow Postman to receive authentication callbacks.
Your Entra ID application is now configured for use with Postman.
## Set up Postman
Download the [**Cognite OpenAPI specification**](/api-reference/concepts/20230101/api-description).
In Postman, select **Import** and drag the file to the import modal.
In **View Import Settings**, configure the import:
* Set **Folder organization** to **Tags**
* Turn **off** the **Enable optional parameters** option
* Turn **on** the **Always inherit authentication** option
 Select **Continue** > **Import** to complete the import.
The Cognite API collection is now available in your Postman workspace.
Navigate to **Environments** on the left sidebar and select **+ Create new Environment**. Give your environment a descriptive name.
Select **Continue** > **Import** to complete the import.
The Cognite API collection is now available in your Postman workspace.
Navigate to **Environments** on the left sidebar and select **+ Create new Environment**. Give your environment a descriptive name.
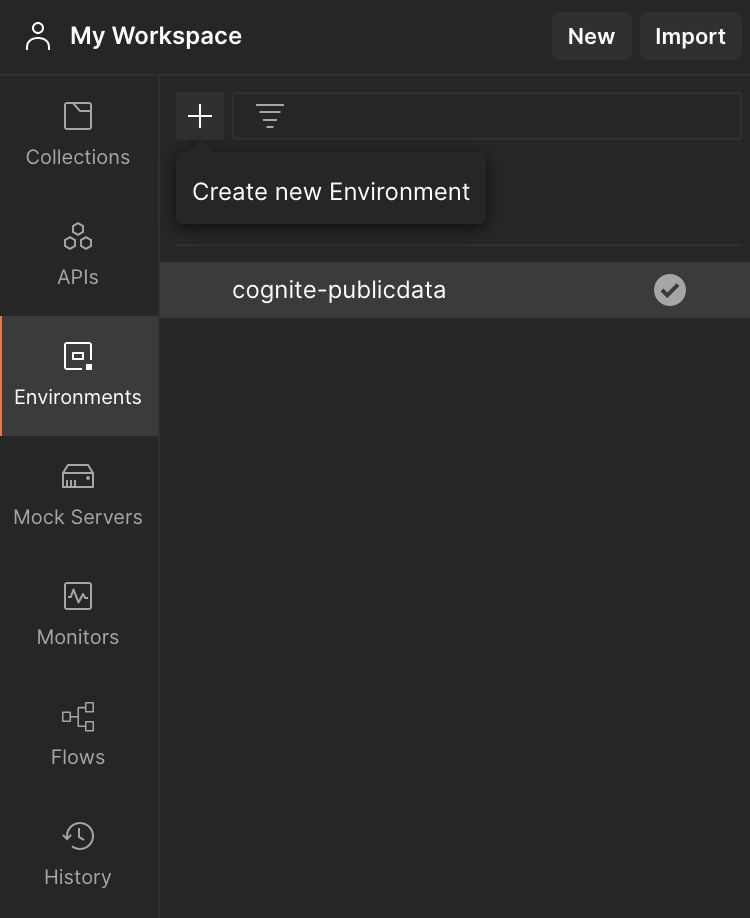 Add the following variables to your environment:
* **tenant-id**: Your Directory (tenant) ID from Entra ID.
* **token**: Leave this blank. OAuth 2.0 will populate it automatically when you authenticate.
* **baseUrl**: Set to `https://{{cluster}}.cognitedata.com/api/v1/projects/{{project}}` where *cluster* is your CDF instance location. If you don't know the cluster name, contact [Cognite support](mailto:support@cognite.com). For Open Industrial Data, use `api`.
* **project**: Your CDF project name.
We recommend working with the current value of variables to prevent sharing sensitive information with your team.
Your environment is configured and ready to use with the Cognite API collection.
With OAuth 2.0, you retrieve an API access token and use it to authenticate future API requests.
Navigate to the **Authorization** tab in the collection overview and configure:
* Set **Type** to **OAuth 2.0**
* Set **Add authorization data to** to **Request Headers**
Choose the OAuth 2.0 grant type that matches your use case: [**Implicit**](#implicit) or [**Authorization Code (With PKCE)**](#authorization-code-with-pkce). For more details on authentication flows, see [Configure applications and the authentication flows](/cdf/access/entra/guides/configure_apps_oidc).
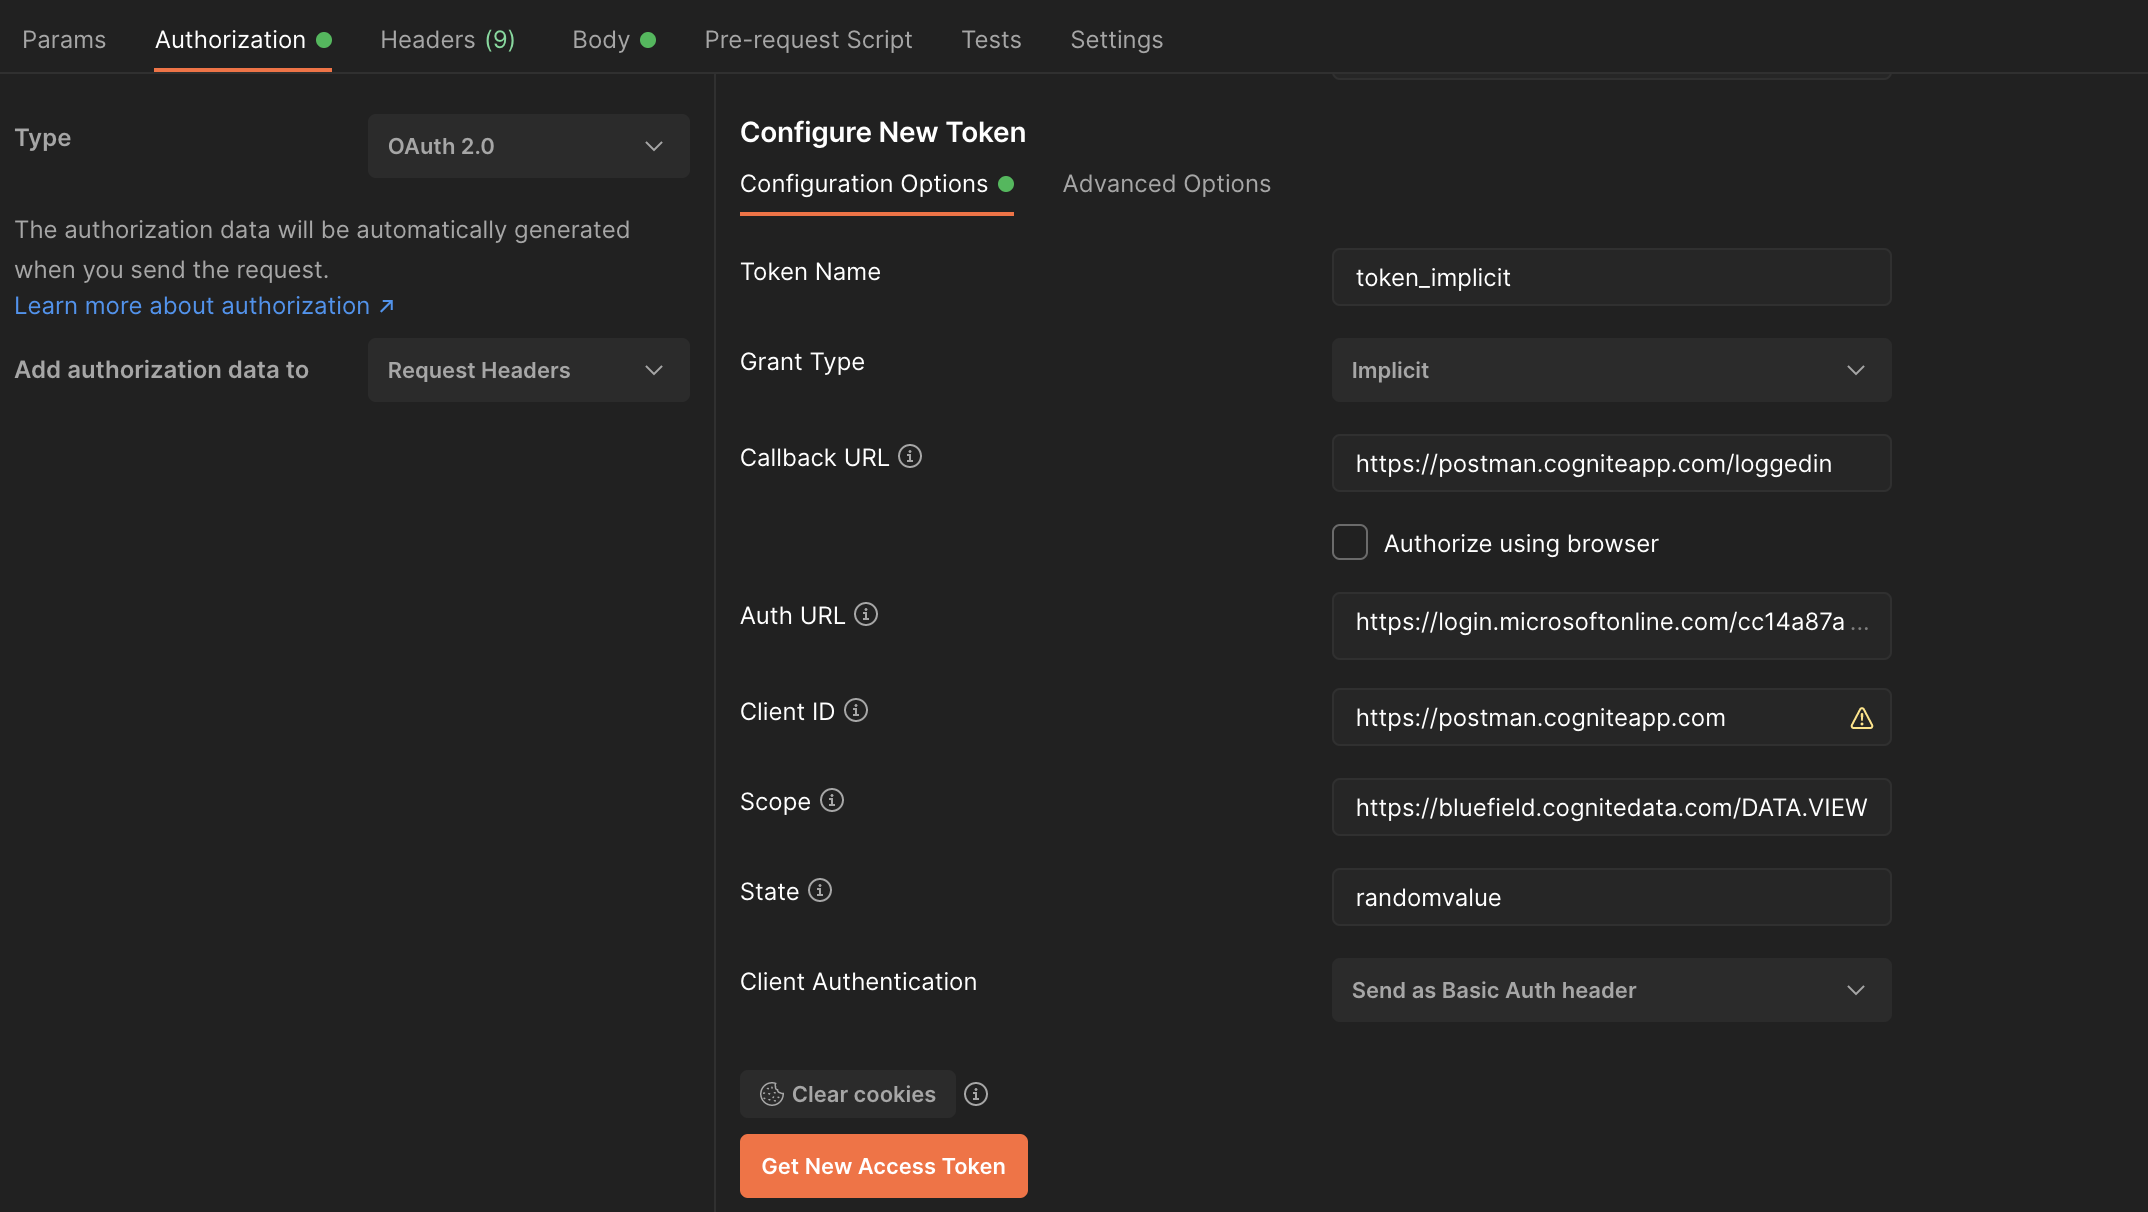
### Implicit
Select **Configure New Token** and specify these configuration options:
* **Token Name**: Enter a descriptive name for your token.
* **Grant Type**: Select **Implicit**.
* **Callback URL**: Enter `https://postman.cogniteapp.com/loggedin`.
If you select the **Authorise using browser** checkbox, the Callback URL auto-populates. Once your application is authorized, you'll be redirected to this URL.
* **Auth URL**: Enter `https://login.microsoftonline.com/{{tenant-id}}/oauth2/v2.0/authorize` (replace `{{tenant-id}}` with your tenant ID).
* **Client ID**: Enter `https://postman.cogniteapp.com`.
* **Scope**: Enter `https://{{cluster}}.cognitedata.com/` followed by one of: `default`, `user_impersonation`, `DATA.VIEW`, or `IDENTITY`.
The `user_impersonation` scope grants all permissions assigned to the user. The `DATA.VIEW` scope grants read-only access to CDF resources like files, time series, and RAW. Learn more about [Access token scopes](/cdf/access/concepts/access_token_scopes).
When using a scope for the first time, an admin must define it explicitly and grant consent.
* **Client Authentication**: Select **Send as Basic Auth header**.
Add the following variables to your environment:
* **tenant-id**: Your Directory (tenant) ID from Entra ID.
* **token**: Leave this blank. OAuth 2.0 will populate it automatically when you authenticate.
* **baseUrl**: Set to `https://{{cluster}}.cognitedata.com/api/v1/projects/{{project}}` where *cluster* is your CDF instance location. If you don't know the cluster name, contact [Cognite support](mailto:support@cognite.com). For Open Industrial Data, use `api`.
* **project**: Your CDF project name.
We recommend working with the current value of variables to prevent sharing sensitive information with your team.
Your environment is configured and ready to use with the Cognite API collection.
With OAuth 2.0, you retrieve an API access token and use it to authenticate future API requests.
Navigate to the **Authorization** tab in the collection overview and configure:
* Set **Type** to **OAuth 2.0**
* Set **Add authorization data to** to **Request Headers**
Choose the OAuth 2.0 grant type that matches your use case: [**Implicit**](#implicit) or [**Authorization Code (With PKCE)**](#authorization-code-with-pkce). For more details on authentication flows, see [Configure applications and the authentication flows](/cdf/access/entra/guides/configure_apps_oidc).
### Implicit
Select **Configure New Token** and specify these configuration options:
* **Token Name**: Enter a descriptive name for your token.
* **Grant Type**: Select **Implicit**.
* **Callback URL**: Enter `https://postman.cogniteapp.com/loggedin`.
If you select the **Authorise using browser** checkbox, the Callback URL auto-populates. Once your application is authorized, you'll be redirected to this URL.
* **Auth URL**: Enter `https://login.microsoftonline.com/{{tenant-id}}/oauth2/v2.0/authorize` (replace `{{tenant-id}}` with your tenant ID).
* **Client ID**: Enter `https://postman.cogniteapp.com`.
* **Scope**: Enter `https://{{cluster}}.cognitedata.com/` followed by one of: `default`, `user_impersonation`, `DATA.VIEW`, or `IDENTITY`.
The `user_impersonation` scope grants all permissions assigned to the user. The `DATA.VIEW` scope grants read-only access to CDF resources like files, time series, and RAW. Learn more about [Access token scopes](/cdf/access/concepts/access_token_scopes).
When using a scope for the first time, an admin must define it explicitly and grant consent.
* **Client Authentication**: Select **Send as Basic Auth header**.
 Select **Get New Access Token** > **Proceed** > **Use Token**.
You have configured a new token using the **Implicit** grant type.
### Authorization Code (With PKCE)
Select **Configure New Token** and specify these configuration options:
* **Token Name**: Enter a descriptive name for your token.
* **Grant Type**: Select **Authorization Code (With PKCE)**.
* **Callback URL**: Enter `https://oauth.pstmn.io/v1/callback`.
* **Auth URL**: Enter `https://login.microsoftonline.com/{{tenant-id}}/oauth2/v2.0/authorize` (replace `{{tenant-id}}` with your tenant ID).
* **Access Token URL**: Enter `https://login.microsoftonline.com/{{tenant-id}}/oauth2/v2.0/token` (replace `{{tenant-id}}` with your tenant ID).
* **Client ID**: Enter your application's client ID from Entra ID.
* **Client Secret**: Enter the client secret you created earlier.
* **Code Challenge Method**: Choose either `SHA-256` or `Plain` algorithm.
* **Code Verifier**: Leave blank to auto-generate, or enter a 43-128 character string to connect the authorization request to the token request.
* **Scope**: Enter `https://{{cluster}}.cognitedata.com/` followed by one of: `default`, `user_impersonation`, `DATA.VIEW`, or `IDENTITY`.
* **State**: Enter a random value to prevent cross-site request forgery attacks.
* **Client Authentication**: Select **Send as Basic Auth header**.
Select **Get New Access Token** > **Proceed** > **Use Token**.
You have configured a new token using the **Implicit** grant type.
### Authorization Code (With PKCE)
Select **Configure New Token** and specify these configuration options:
* **Token Name**: Enter a descriptive name for your token.
* **Grant Type**: Select **Authorization Code (With PKCE)**.
* **Callback URL**: Enter `https://oauth.pstmn.io/v1/callback`.
* **Auth URL**: Enter `https://login.microsoftonline.com/{{tenant-id}}/oauth2/v2.0/authorize` (replace `{{tenant-id}}` with your tenant ID).
* **Access Token URL**: Enter `https://login.microsoftonline.com/{{tenant-id}}/oauth2/v2.0/token` (replace `{{tenant-id}}` with your tenant ID).
* **Client ID**: Enter your application's client ID from Entra ID.
* **Client Secret**: Enter the client secret you created earlier.
* **Code Challenge Method**: Choose either `SHA-256` or `Plain` algorithm.
* **Code Verifier**: Leave blank to auto-generate, or enter a 43-128 character string to connect the authorization request to the token request.
* **Scope**: Enter `https://{{cluster}}.cognitedata.com/` followed by one of: `default`, `user_impersonation`, `DATA.VIEW`, or `IDENTITY`.
* **State**: Enter a random value to prevent cross-site request forgery attacks.
* **Client Authentication**: Select **Send as Basic Auth header**.
 Select **Get New Access Token** > **Proceed** > **Use Token**.
You have configured a new token using **Authorization Code (With PKCE)** grant type. You're now ready to use Postman with OIDC as the authentication method.
Select **Get New Access Token** > **Proceed** > **Use Token**.
You have configured a new token using **Authorization Code (With PKCE)** grant type. You're now ready to use Postman with OIDC as the authentication method.