> ## Documentation Index
> Fetch the complete documentation index at: https://docs.cognite.com/llms.txt
> Use this file to discover all available pages before exploring further.
# Transform data
> Move or enrich data from source systems, between data models, or from the staging area into Cognite Data Fusion (CDF) by transforming data into the Cognite Core Data Model or user-defined data models.
* For coordinated pipelines, prefer [Data workflows](/cdf/data_workflows/index) over time-based schedules.
* You can also transform data using the [Cognite API](/api-reference/concepts/20230101/transformations), and the [Cognite Python SDK](https://cognite-sdk-python.readthedocs-hosted.com/en/latest/transformations.html).
* Use the [Cognite Toolkit](/cdf/deploy/cdf_toolkit) when you want to manage transformations as code. The Toolkit lets you define transformations, schedules, and notifications in YAML (with optional SQL files) and deploy them through CI/CD.
You can [set a schedule](#step-4-schedule-transformations) for transformation runs and monitor transformation by activating [automatic email notifications](#step-5-monitor-transformations).
## Before you start
Make sure you've completed [these steps](/cdf/integration/guides/transformation/admin_oidc) to register an app for the transformation in your identity provider (IdP) and to set up the necessary folders and capabilities to run or schedule transformations.
* The data you want to transform must conform to the structure defined by the data model.
* [Capabilities](/cdf/access/guides/capabilities#transform-data) limit which resource types your transformation can read and write when it runs. They do not determine which options appear under **Action** while you configure the transformation.
## Step 1: Create a transformation
Navigate to Data fusion > Integrate > Transformations.
Select **Create**, and enter a unique **name** and a unique **external ID**.
Associate the transformation to an existing **data set** to restrict who can access the transformation.
Select **Next**.
Select the target data model that contains the target resource type.
* **CDF resource types** - select this model to ingest data into an [asset hierarchy](/dev/concepts/resource_types).
* If you're ingesting data into the **Assets** resource type, make sure a parent asset already exists in CDF.
* If you're ingesting data into **Sequence rows**, specify the external ID for the sequence you want to write to. This defines the target schema.
* **CDF staging area** - select this model to ingest data into the [CDF staging area](/cdf/integration/guides/interfaces/postgres_gateway/ingest_into_raw). You must specify the target database and table.
* **User defined data models** - select this model to ingest data in a user defined data model. Enter the target space you want to write data to and the version of the data model. CDF sets the default space from the data model. You can ingest data into a type or a relationship.
Use RAW as a staging layer, then write to structured targets when the data is ready for consumption. See [Transformation design patterns](/cdf/integration/guides/transformation/best_practices).
The available action types depend on the target data model and target resource type you selected in the previous step. Some resource types support the full set of action types while others support only a subset.
Under **Action**, select if you want to *create*, *update*, *delete*, or *create or update* the target data. If you're updating existing data, you must specify how the transformation should set null values:
* Select **Keep existing values** to *not* update existing data. This is the default setting.
* Select **Clear existing values** to set existing values to null, for example, when a piece of equipment is removed for maintenance. Use this option to disassociate the asset from its parent in the asset hierarchy.
To delete existing rows in a CDF staging table, you must use the [Transformations API](/api-reference/concepts/20230101/transformations).
## Step 2: Map source and target data
In the editor pane, you can create transformations with the mapping editor or enter [Spark SQL queries](/cdf/integration/guides/transformation/write_sql_queries). Typically, you would use the mapping editor to copy data from source to target resource types and use SQL queries to perform more complex transformations.
For query optimization patterns, see [SQL patterns and best practices](/cdf/integration/guides/transformation/sql_patterns).
### Using the mapping editor
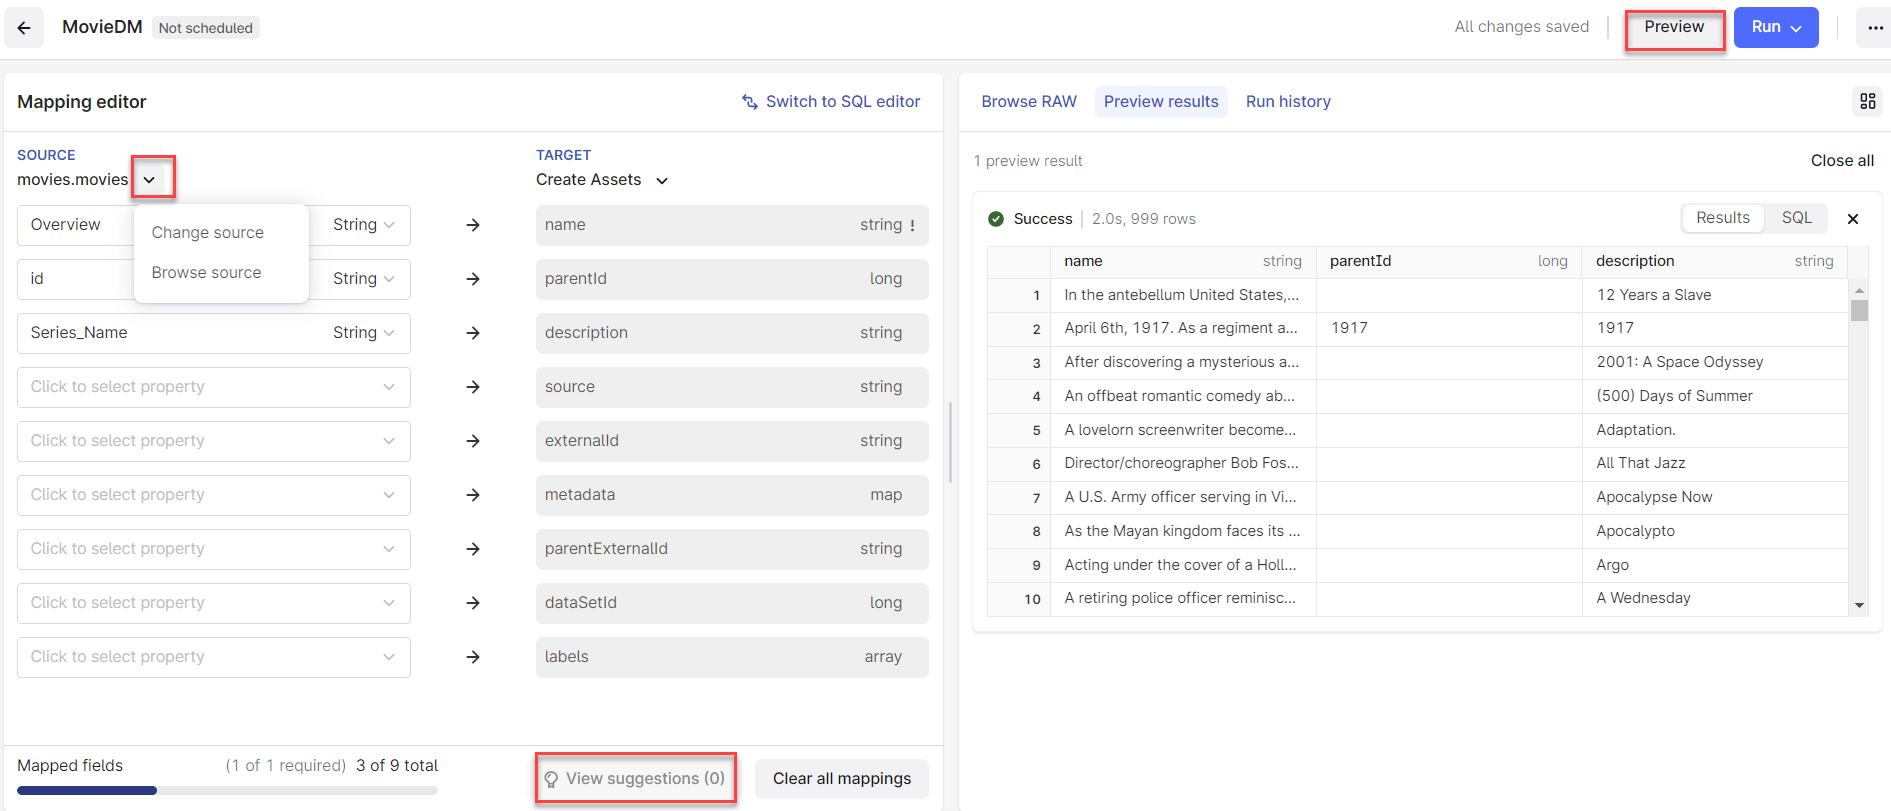
Select the source table and map source fields to the target fields.
If you're unsure about the mappings, select **View suggestions** to get help. This is especially useful for larger data types with many attributes.
Select **Preview** to verify that the transformation produces the expected output.
 ### Using Spark SQL
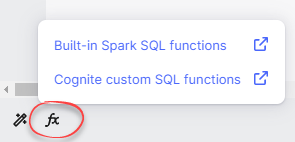
Select **Switch to SQL editor** to create a transformation in Spark SQL. The SQL editor offers built-in code completion with built-in Spark SQL functions and Cognite custom SQL functions. See [SQL syntax and functions](/cdf/integration/guides/transformation/write_sql_queries) for reference.
### Using Spark SQL
Select **Switch to SQL editor** to create a transformation in Spark SQL. The SQL editor offers built-in code completion with built-in Spark SQL functions and Cognite custom SQL functions. See [SQL syntax and functions](/cdf/integration/guides/transformation/write_sql_queries) for reference.
 Your changes won't be kept if you switch from the SQL editor to the mapping editor.
## Step 3: Transform data
Select **Run** to start a transformation, or follow the steps in [schedule transformations](#step-4-schedule-transformations) to run your transformation at regular intervals.
Select **Run with client credentials** and specify **Client ID** and the **Client secret** for the app you [registered for the transformation](/cdf/integration/guides/transformation/admin_oidc) in Microsoft Entra ID. CDF automatically refills the remaining fields.
You can also select **Run as current user** when you want to run one-time transformations, for instance, to create the root node in an asset hierarchy, create a new RAW table from other RAW tables, or add data manually. We recommend using **Run with client credentials**.
Add the capability `sessions:create` to enable the **Run as current user** option.
You can select the **Advanced** authentication method to specify separate credentials for reading and writing data, for instance, if you want to transform data between different projects. If you don't know what values to enter in these fields, contact your internal help desk or the CDF admin for help.
To edit credentials, schedules, and notifications for a transformation, navigate to **More options (...)** at the top of the page.
## Step 4: Schedule transformations
Select **Run** > **Set schedule**.
The first time you schedule a transformation, you must enter your **Client ID** and the **Client secret**.
Specify when and how often you want the transformation should run. Select a predefined schedule or specify a [cron expression](https://en.wikipedia.org/wiki/Cron).
For example, `45 23 * * *` will run the transformation at 23:45 (11:45 PM) every day.
Your changes won't be kept if you switch from the SQL editor to the mapping editor.
## Step 3: Transform data
Select **Run** to start a transformation, or follow the steps in [schedule transformations](#step-4-schedule-transformations) to run your transformation at regular intervals.
Select **Run with client credentials** and specify **Client ID** and the **Client secret** for the app you [registered for the transformation](/cdf/integration/guides/transformation/admin_oidc) in Microsoft Entra ID. CDF automatically refills the remaining fields.
You can also select **Run as current user** when you want to run one-time transformations, for instance, to create the root node in an asset hierarchy, create a new RAW table from other RAW tables, or add data manually. We recommend using **Run with client credentials**.
Add the capability `sessions:create` to enable the **Run as current user** option.
You can select the **Advanced** authentication method to specify separate credentials for reading and writing data, for instance, if you want to transform data between different projects. If you don't know what values to enter in these fields, contact your internal help desk or the CDF admin for help.
To edit credentials, schedules, and notifications for a transformation, navigate to **More options (...)** at the top of the page.
## Step 4: Schedule transformations
Select **Run** > **Set schedule**.
The first time you schedule a transformation, you must enter your **Client ID** and the **Client secret**.
Specify when and how often you want the transformation should run. Select a predefined schedule or specify a [cron expression](https://en.wikipedia.org/wiki/Cron).
For example, `45 23 * * *` will run the transformation at 23:45 (11:45 PM) every day.
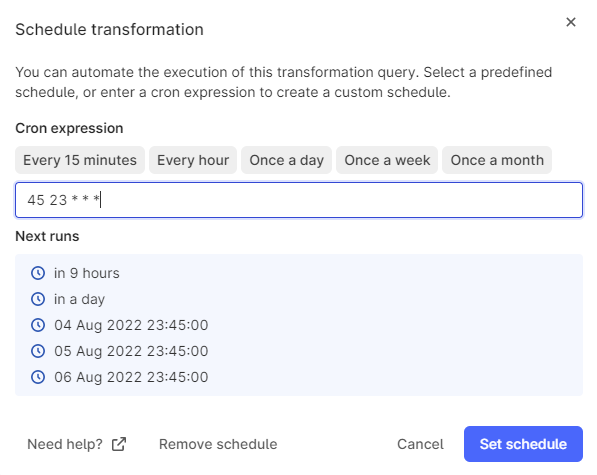 Select **Set schedule** to activate the schedule. CDF sets the transformation to read-only to prevent unintentional changes to future scheduled jobs.
Check the run history to evaluate performance. For data model write jobs, the **No operations (no-op)** metric shows write operations skipped because identical data already exists in CDF. A high no-op count suggests opportunities to implement incremental data loads.
For incremental processing, RAW usage, and load management guidance, see [Operations and performance](/cdf/integration/guides/transformation/operations_and_performance).
When using the Transformations API, you can create up to 1000 schedules or notification subscriptions per request. Job listings return up to 1000 items per request (default 100).
CDF will block transformations from running after five consecutive failed runs or if the client credentials have changed or expired. Re-enter the read or write credentials or contact your CDF admin.
## Step 5: Monitor transformations
To **monitor the transformation process** and solve any issues before they reach the data consumer, you can subscribe to email notifications if a transformation fails.
If runs fail or behave unexpectedly, see [Troubleshooting transformations](/cdf/integration/guides/transformation/troubleshooting).
Navigate to the **More options (...)** and select **Monitor**.
Enter email addresses that will receive notifications if this transformation fails.
Select **Set schedule** to activate the schedule. CDF sets the transformation to read-only to prevent unintentional changes to future scheduled jobs.
Check the run history to evaluate performance. For data model write jobs, the **No operations (no-op)** metric shows write operations skipped because identical data already exists in CDF. A high no-op count suggests opportunities to implement incremental data loads.
For incremental processing, RAW usage, and load management guidance, see [Operations and performance](/cdf/integration/guides/transformation/operations_and_performance).
When using the Transformations API, you can create up to 1000 schedules or notification subscriptions per request. Job listings return up to 1000 items per request (default 100).
CDF will block transformations from running after five consecutive failed runs or if the client credentials have changed or expired. Re-enter the read or write credentials or contact your CDF admin.
## Step 5: Monitor transformations
To **monitor the transformation process** and solve any issues before they reach the data consumer, you can subscribe to email notifications if a transformation fails.
If runs fail or behave unexpectedly, see [Troubleshooting transformations](/cdf/integration/guides/transformation/troubleshooting).
Navigate to the **More options (...)** and select **Monitor**.
Enter email addresses that will receive notifications if this transformation fails.