> ## Documentation Index
> Fetch the complete documentation index at: https://docs.cognite.com/llms.txt
> Use this file to discover all available pages before exploring further.
# Setup and administration
> Configure OpenID Connect and Microsoft Entra ID to manage access to CDF Transformations using your organization's identity provider.
When you have registered Transformations, users can sign in with their organizational ID to transform data in a CDF project.
CDF projects running in Google Cloud Platform need to be allowlisted to support scheduling of transformations using OpenID Connect (OIDC) credentials. Contact your Cognite representative to be added to the allowlist.
## Before you start
Make sure you have [registered the Cognite API and the CDF application in Microsoft Entra ID](/cdf/access/entra/guides/configure_cdf_azure_oidc) and [set up Microsoft Entra ID and CDF groups](/cdf/access/entra/guides/create_groups_oidc) to control access to CDF data.
To perform the steps below, you need to be an administrator of Azure AD.
## Step 1: Register an app in Microsoft Entra ID to use with Transformations
Sign in to the [Azure portal](https://portal.azure.com) as an admin.
If you have access to multiple tenants, use the Directory + subscription filter in the top menu to select the tenant in which you want to register an application.
Search for and select **Microsoft Entra ID**.
Under **Manage**, select **App registrations** > **New registrations**.
In the **Register an application** window, enter the app name, and then select **Register**.
Copy and make a note of the **Application (client) ID**. This value is required for authentication when reading and writing data in Transformations.
Under **Manage**, select **Certificates & secrets** > **New client secret**.
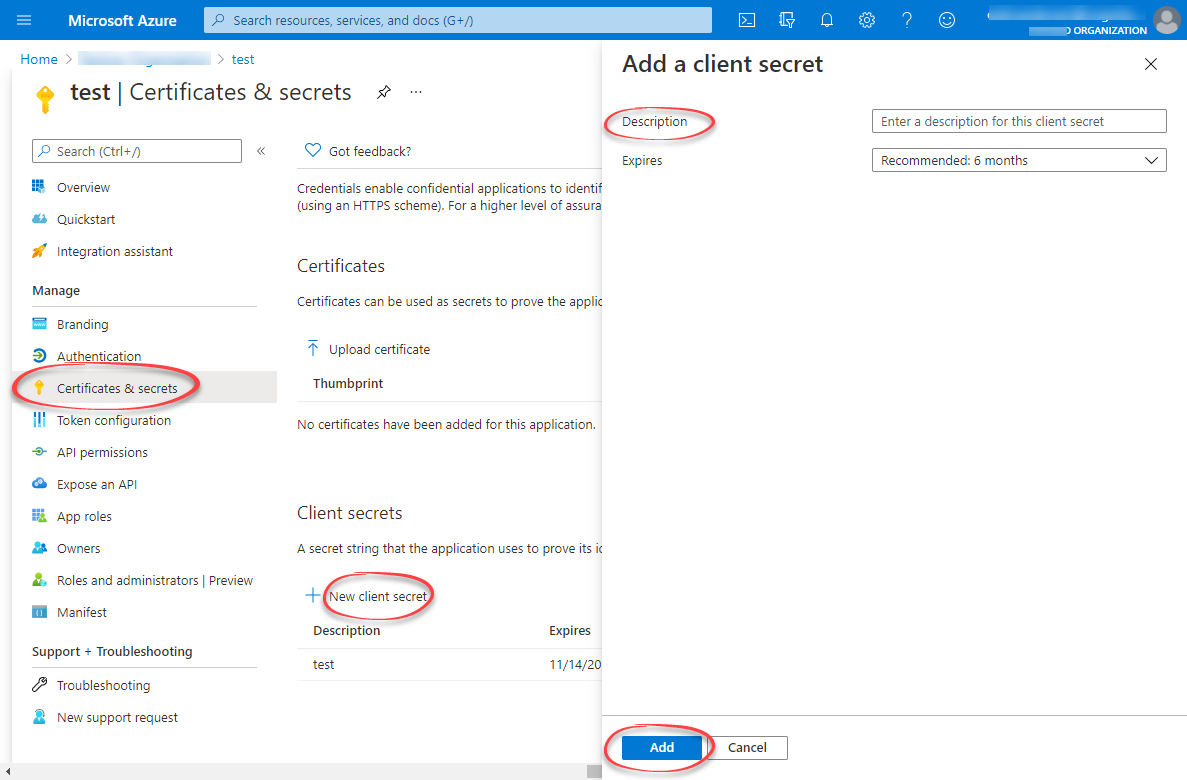 Enter a client secret description and an expiry time, and then select **Add**.
Copy and make a note of the client secret in the **Value** field.
Make sure you copy this value now. This value will be hidden after you leave this page.
## Step 2: Create a group in Azure AD and add the registered app as its member
Open the overview window in Azure AD and select **Manage** > **Groups**.
Create a [group](/cdf/access/entra/guides/create_groups_oidc).
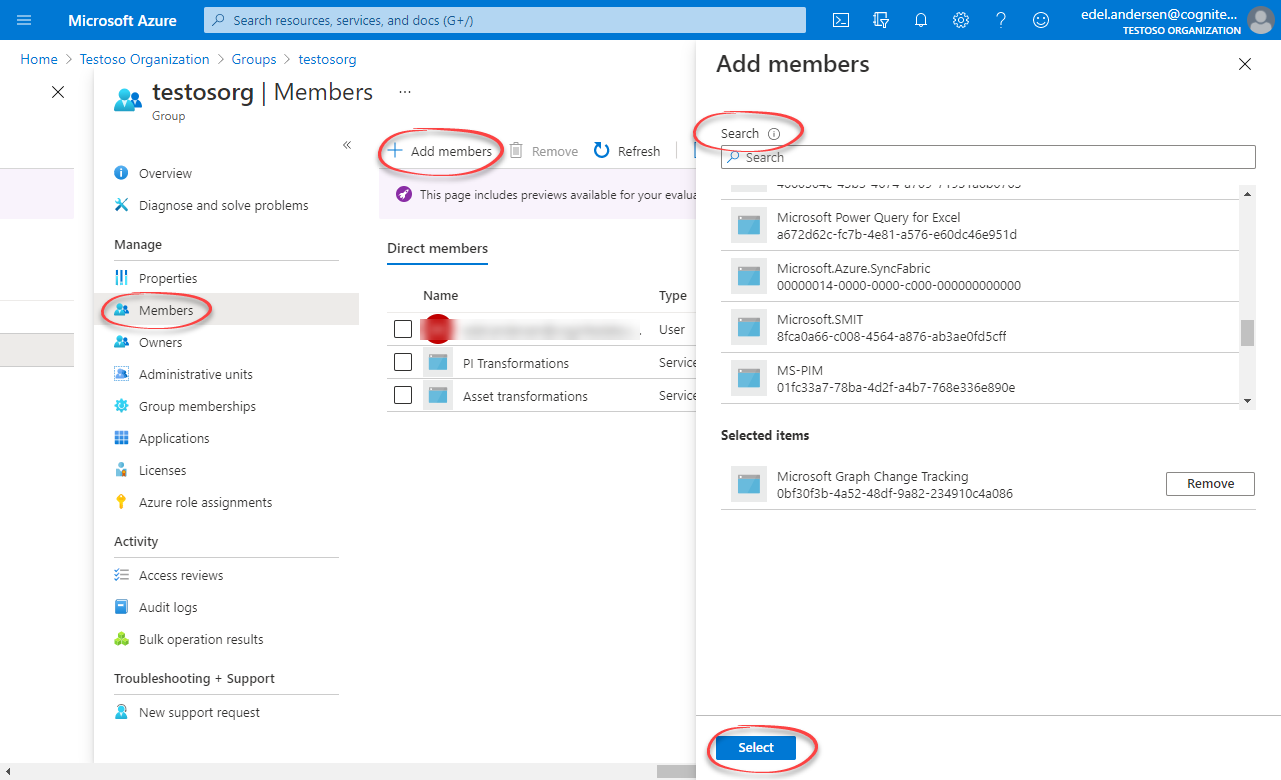
Open the group. Under Manage, select **Members** > **Add members**.
Find the app you created above and click **Select**.
Add all **users** you want to have access to Transformations as members.
Return to the overview, and then copy and make a note of the **Object Id**.
Enter a client secret description and an expiry time, and then select **Add**.
Copy and make a note of the client secret in the **Value** field.
Make sure you copy this value now. This value will be hidden after you leave this page.
## Step 2: Create a group in Azure AD and add the registered app as its member
Open the overview window in Azure AD and select **Manage** > **Groups**.
Create a [group](/cdf/access/entra/guides/create_groups_oidc).
Open the group. Under Manage, select **Members** > **Add members**.
Find the app you created above and click **Select**.
Add all **users** you want to have access to Transformations as members.
Return to the overview, and then copy and make a note of the **Object Id**.
 ## Step 3: Create a group in CDF and link to the Microsoft Entra ID group
Sign into CDF as an admin and navigate to Access > Groups.
Select **Create new group** and enter a **unique** name for the group.
Add `read` and `write` capabilities accordingly for the CDF resources you want to read and write using transformations. For instance, if you are transforming the data in RAW and writing the data to assets, you must add `raw:read` and `asset:write` capabilities.
The **minimum** requirement is to add `projects:list`, `groups:list`, `transformations:read`, `transformations:write`, and `sessions:create`.
Select **Create**.
Open the **OpenID connect** tab and insert your `token_url`. The `token_url` contains the ID of your Microsoft Entra ID tenant. To find your tenant ID, see [this article](https://learn.microsoft.com/en-us/entra/fundamentals/how-to-find-tenant).
To schedule transformations, you must add the capability `sessions:create` and set the `token_url` to maintain access to Transformations for an extended time period.
To enable **Run as current user** for transformations, you must add the `sessions:create` capability.
Link the transformations group to a Microsoft Entra ID group:
1. In the **Source ID** field, enter the **Object Id** for the AAD group exactly as it exists in AAD. You can use the same group Id for multiple transformations.
2. In the **Source name** field, enter the name of the group in Azure AD.
## Step 4: Run transformations
Verify that the configuration is successful by following the steps in [Transform data](/cdf/integration/guides/transformation/transformations).
Transformations with the same Client ID run as the same user with the same access. This ID and the Client secret must be given before a user can schedule and run transformations.
## Step 3: Create a group in CDF and link to the Microsoft Entra ID group
Sign into CDF as an admin and navigate to Access > Groups.
Select **Create new group** and enter a **unique** name for the group.
Add `read` and `write` capabilities accordingly for the CDF resources you want to read and write using transformations. For instance, if you are transforming the data in RAW and writing the data to assets, you must add `raw:read` and `asset:write` capabilities.
The **minimum** requirement is to add `projects:list`, `groups:list`, `transformations:read`, `transformations:write`, and `sessions:create`.
Select **Create**.
Open the **OpenID connect** tab and insert your `token_url`. The `token_url` contains the ID of your Microsoft Entra ID tenant. To find your tenant ID, see [this article](https://learn.microsoft.com/en-us/entra/fundamentals/how-to-find-tenant).
To schedule transformations, you must add the capability `sessions:create` and set the `token_url` to maintain access to Transformations for an extended time period.
To enable **Run as current user** for transformations, you must add the `sessions:create` capability.
Link the transformations group to a Microsoft Entra ID group:
1. In the **Source ID** field, enter the **Object Id** for the AAD group exactly as it exists in AAD. You can use the same group Id for multiple transformations.
2. In the **Source name** field, enter the name of the group in Azure AD.
## Step 4: Run transformations
Verify that the configuration is successful by following the steps in [Transform data](/cdf/integration/guides/transformation/transformations).
Transformations with the same Client ID run as the same user with the same access. This ID and the Client secret must be given before a user can schedule and run transformations.