> ## Documentation Index
> Fetch the complete documentation index at: https://docs.cognite.com/llms.txt
> Use this file to discover all available pages before exploring further.
# Use Azure Data Factory with PostgreSQL gateway
> Create data pipelines in Azure Data Factory to ingest data into Cognite Data Fusion (CDF) through the PostgreSQL gateway.
Ingest data with your existing ETL tool into the CDF staging area, [RAW](/cdf/integration/guides/interfaces/postgres_gateway/ingest_into_raw), or into the CDF data model with the PostgreSQL gateway.
This article shows how to create a **simple** data pipeline in ADF to copy data from a file in Azure blob storage and ingest it to CDF. Based on your data source and your data processing requirements you may need to create more advanced data pipelines in [Azure Data Factory](https://docs.microsoft.com/en-in/azure/data-factory/data-factory-tutorials).
## Before you start
* Make sure you have an Azure subscription and have created [Azure resource groups](https://docs.microsoft.com/en-us/azure/azure-resource-manager/management/manage-resource-groups-portal).
* Make sure you have created an [Azure storage account](https://docs.microsoft.com/en-us/azure/storage/common/storage-account-create).
* Make sure you have the file containing the data to be ingested to CDF in Azure blob storage.
## Step 1: Create a data factory
1. Sign in to the [Azure portal](https://portal.azure.com) as an admin.
2. If you have access to multiple tenants, use the Directory + subscription filter in the top menu to select the tenant in which you want to register a data factory.
Search for and select **Data Factory**.
Select **Create** to open the **Data Factory** page.
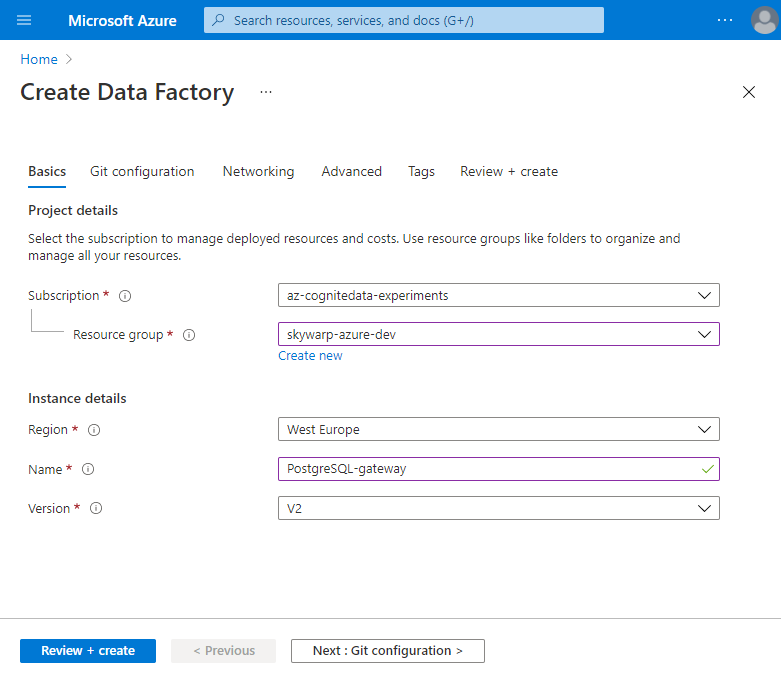 On the **Basics** tab:
* **Subscription:** Select the Azure subscription in which you want to create the data factory.
* **Resource group:** Create or select the Azure resource group you want to use.
* **Region:** Select a location where your ADF metadata will be stored. This list only shows locations that ADF supports.
* **Name:** Enter a globally unique name for the data factory.
* **Version:** Select V2.
Select **Next: Git configuration** and fill in the required fields or select **Configure Git later**.
Select **Review + Create** > **Create**.
After the creation is complete, open the data factory and select the **Author & Monitor** tile to start the Azure Data Factory application in a separate tab.
## Step 2: Create an ADF pipeline and set the source system
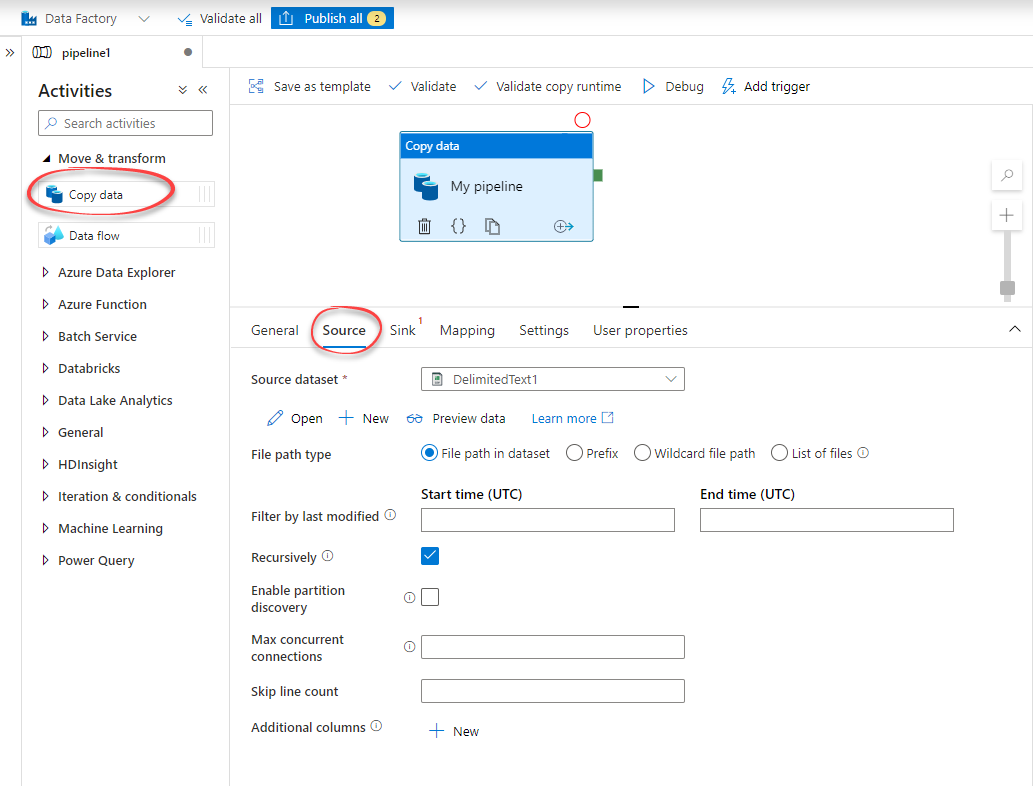
Use the **Copy data** tool to create a pipeline that reads data from a file in your data storage and writes to CDF.
On the **Let's get started** page, select the **Create pipeline** tile.
Open **Activities** > **Move and transform**.
Drag and drop the **Copy data** onto the canvas and enter a unique name in the **Name** field.
Open the **Source** tab > **New**.
Select the **datastore** that references the source system you're extracting from. In this example, we'll extract data from a .csv file in Azure Blob Storage.
Select **Continue**.
On the **Basics** tab:
* **Subscription:** Select the Azure subscription in which you want to create the data factory.
* **Resource group:** Create or select the Azure resource group you want to use.
* **Region:** Select a location where your ADF metadata will be stored. This list only shows locations that ADF supports.
* **Name:** Enter a globally unique name for the data factory.
* **Version:** Select V2.
Select **Next: Git configuration** and fill in the required fields or select **Configure Git later**.
Select **Review + Create** > **Create**.
After the creation is complete, open the data factory and select the **Author & Monitor** tile to start the Azure Data Factory application in a separate tab.
## Step 2: Create an ADF pipeline and set the source system
Use the **Copy data** tool to create a pipeline that reads data from a file in your data storage and writes to CDF.
On the **Let's get started** page, select the **Create pipeline** tile.
Open **Activities** > **Move and transform**.
Drag and drop the **Copy data** onto the canvas and enter a unique name in the **Name** field.
Open the **Source** tab > **New**.
Select the **datastore** that references the source system you're extracting from. In this example, we'll extract data from a .csv file in Azure Blob Storage.
Select **Continue**.
 Create a **new linked service** that links your data store to the data factory.
1. Enter a unique **name** for the service.
2. Select your **Azure subscription** and **storage account**.
3. Select **Test connection** to make sure you are connected to the selected storage account.
4. Select **Create**.
Create a **new linked service** that links your data store to the data factory.
1. Enter a unique **name** for the service.
2. Select your **Azure subscription** and **storage account**.
3. Select **Test connection** to make sure you are connected to the selected storage account.
4. Select **Create**.
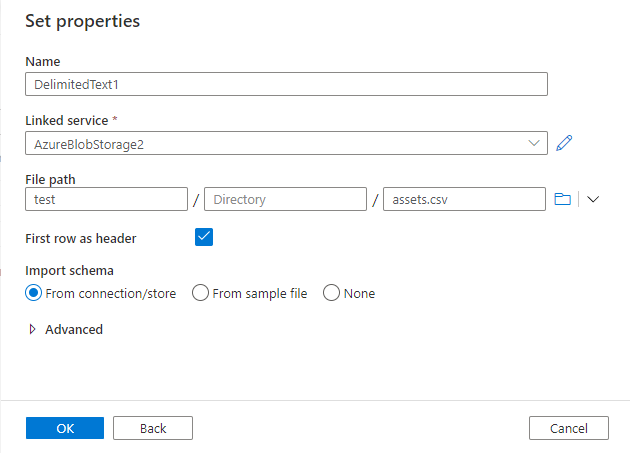 Under **Set properties**, set the file you want to read data from.
1. Enter a unique **name** for the source data set.
2. Browse to the file you want to use.
3. Select **First row as header** to reuse the source file's header columns.
4. Select **OK**.
## Step 3: Set PostgreSQL gateway as sink
In this step, add the PostgreSQL gateway as the destination using a **sink** in ADF.
Open **Copy data** > **Sink** tab.
In the **Sink dataset** field, select **New**.
Select or search for **Azure Database for PostgreSQL**.
Select **Continue**.
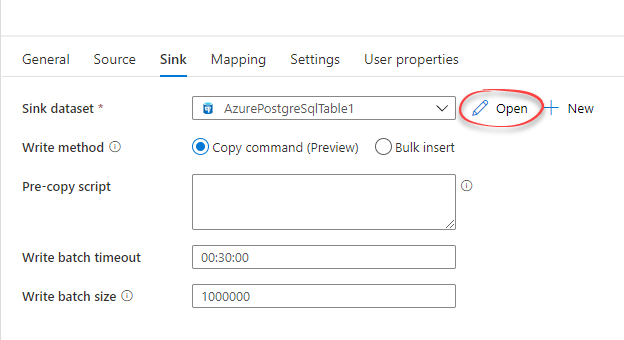
Select **Open** to open the sink data set.
Under **Set properties**, set the file you want to read data from.
1. Enter a unique **name** for the source data set.
2. Browse to the file you want to use.
3. Select **First row as header** to reuse the source file's header columns.
4. Select **OK**.
## Step 3: Set PostgreSQL gateway as sink
In this step, add the PostgreSQL gateway as the destination using a **sink** in ADF.
Open **Copy data** > **Sink** tab.
In the **Sink dataset** field, select **New**.
Select or search for **Azure Database for PostgreSQL**.
Select **Continue**.
Select **Open** to open the sink data set.
 On the **Connection** tab, add a linked service for the sink data set.
1. Select **New** to add a linked service.
2. Under **Account selection method** > **Enter manually**.
3. In the **Fully qualified domain name** field, enter `fdw.{cluster}.cogniteapp.com` where `{cluster}` is where your CDF instance is installed. If you don't know the cluster name, contact [Cognite support](https://cognite.zendesk.com/hc/en-us/requests/new).
4. In the **Port** field, enter 5432, which is the default port for the PostgreSQL gateway.
5. For **Database name** and **User name**, enter the [username returned from the PostgreSQL gateway](/cdf/integration/guides/interfaces/postgres_gateway/postgres_gateway_basics).
6. In the **Password** field, enter the password returned from the PostgreSQL gateway.
7. In the **Encryption method** field, select **SSL**. This ensures that the communication between ADF and CDF are encrypted.
8. Optionally, select **Validate server certificate**.
9. Select **Test connection** to make sure you are connected to the Azure database for PostgreSQL.
Select **Create**.
## Step 4: Set the destination database table
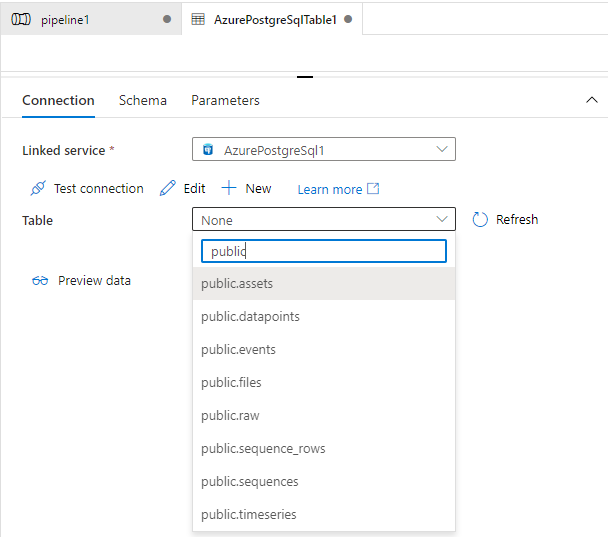
Back on the **Connection** tab, you need to select the destination table from the tables available in your PostgreSQL gateway database. You can choose between several resource types like assets, events, and data points.
In the **Table** field, select the table matching the destination [CDF RAW table](/cdf/integration/guides/interfaces/postgres_gateway/ingest_into_raw) or the CDF resource type `public.`, for instance, *public.assets* or *public.time\_series*.
On the **Connection** tab, add a linked service for the sink data set.
1. Select **New** to add a linked service.
2. Under **Account selection method** > **Enter manually**.
3. In the **Fully qualified domain name** field, enter `fdw.{cluster}.cogniteapp.com` where `{cluster}` is where your CDF instance is installed. If you don't know the cluster name, contact [Cognite support](https://cognite.zendesk.com/hc/en-us/requests/new).
4. In the **Port** field, enter 5432, which is the default port for the PostgreSQL gateway.
5. For **Database name** and **User name**, enter the [username returned from the PostgreSQL gateway](/cdf/integration/guides/interfaces/postgres_gateway/postgres_gateway_basics).
6. In the **Password** field, enter the password returned from the PostgreSQL gateway.
7. In the **Encryption method** field, select **SSL**. This ensures that the communication between ADF and CDF are encrypted.
8. Optionally, select **Validate server certificate**.
9. Select **Test connection** to make sure you are connected to the Azure database for PostgreSQL.
Select **Create**.
## Step 4: Set the destination database table
Back on the **Connection** tab, you need to select the destination table from the tables available in your PostgreSQL gateway database. You can choose between several resource types like assets, events, and data points.
In the **Table** field, select the table matching the destination [CDF RAW table](/cdf/integration/guides/interfaces/postgres_gateway/ingest_into_raw) or the CDF resource type `public.`, for instance, *public.assets* or *public.time\_series*.
 ## Step 5: Map the source and destination tables
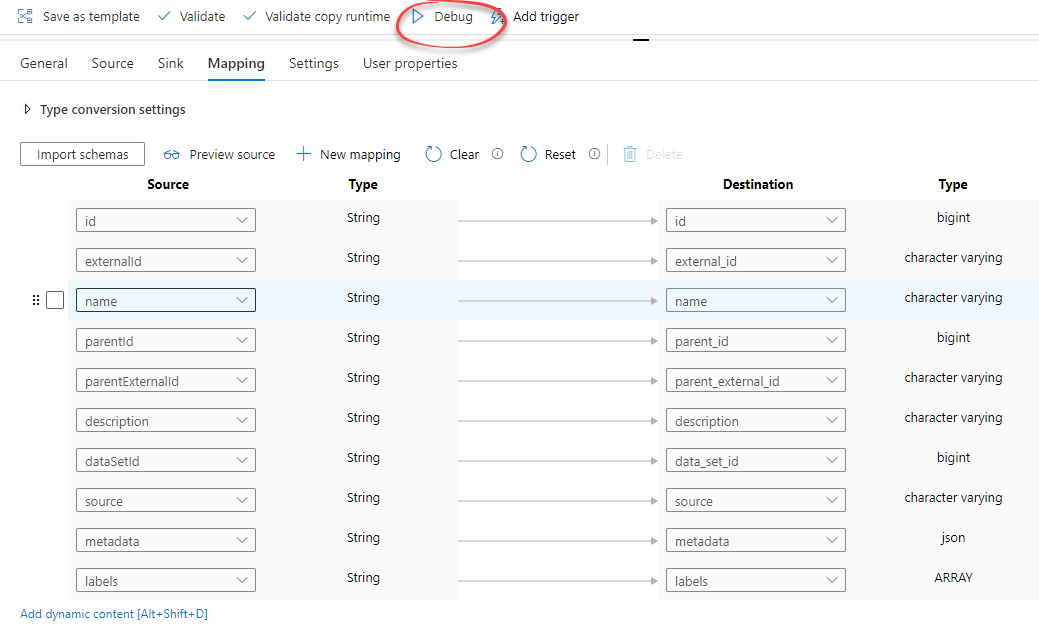
Open the **Mapping** tab on your pipeline.
Select **Import schemas** to import the table columns and remove the lines you won't use.
Map the columns according to your requirements.
Select **Debug** in the top bar to run the PostgreSQL gateway.
## Step 5: Map the source and destination tables
Open the **Mapping** tab on your pipeline.
Select **Import schemas** to import the table columns and remove the lines you won't use.
Map the columns according to your requirements.
Select **Debug** in the top bar to run the PostgreSQL gateway.
 ## Step 6: Report run status for data extractions
Monitor the data integration into CDF to quickly catch failed runs to start troubleshooting and notify data set owners and stakeholders. You can see an overview of all extraction pipelines' status on the [Extraction pipelines](/cdf/integration/guides/interfaces/about_integrations) page. To set up status reporting:
Open Azure Data Factory.
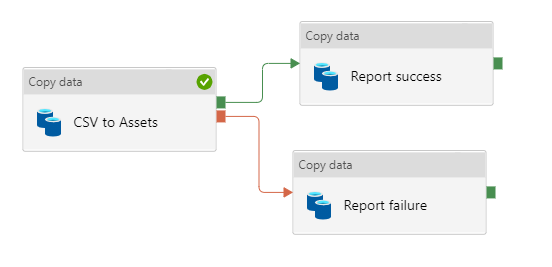
Navigate to the **Copy data** activity created for the extraction pipeline, select the plus (+) sign, and select **Success**.
## Step 6: Report run status for data extractions
Monitor the data integration into CDF to quickly catch failed runs to start troubleshooting and notify data set owners and stakeholders. You can see an overview of all extraction pipelines' status on the [Extraction pipelines](/cdf/integration/guides/interfaces/about_integrations) page. To set up status reporting:
Open Azure Data Factory.
Navigate to the **Copy data** activity created for the extraction pipeline, select the plus (+) sign, and select **Success**.
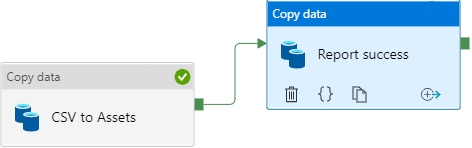 Drag and drop an additional **Copy data** activity onto the canvas and link it to the **Success** activity.
On the **Source** tab:
* Enter a source data set, but note that no data is read from this data set. You can, for instance, enter the data set already used in the previous pipeline.
* Create two additional columns named `integration_status` with content `success` and `integration_external_id` with the [extraction pipeline's](/cdf/integration/guides/interfaces/about_integrations) external ID as content.
Drag and drop an additional **Copy data** activity onto the canvas and link it to the **Success** activity.
On the **Source** tab:
* Enter a source data set, but note that no data is read from this data set. You can, for instance, enter the data set already used in the previous pipeline.
* Create two additional columns named `integration_status` with content `success` and `integration_external_id` with the [extraction pipeline's](/cdf/integration/guides/interfaces/about_integrations) external ID as content.
 On the **Sink** tab:
1. In the **Sink dataset** field, select **New** and reuse the sink and linked service from the previous pipeline.
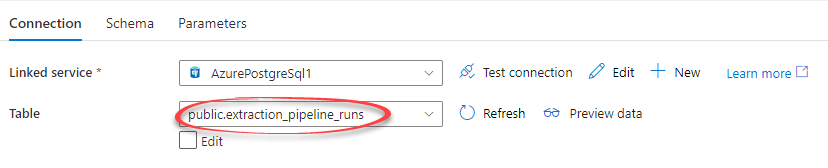
2. In the **Table** field, browse and select the foreign table `public.extraction_pipeline_runs`.
On the **Sink** tab:
1. In the **Sink dataset** field, select **New** and reuse the sink and linked service from the previous pipeline.
2. In the **Table** field, browse and select the foreign table `public.extraction_pipeline_runs`.
 For a large dataset, set the `Write method` to `Copy command`.
On the **Mapping** tab, create two mapping rows:
* Row 1: Enter `integration_external_ID` as **source** and the `externalId` as **destination**.
* Row 2: Enter `integration_status` as **source** and `status` as **destination**.
Navigate back to the **Copy data** activity created for the pipeline, select the plus (+) sign, and select **Failure**.
Drag and drop an additional **Copy data** activity onto the canvas and link to the **Failure** activity.
Follow the steps above, but on the **Source** tab, enter `failure` as content for the `integration_status`column.
For a large dataset, set the `Write method` to `Copy command`.
On the **Mapping** tab, create two mapping rows:
* Row 1: Enter `integration_external_ID` as **source** and the `externalId` as **destination**.
* Row 2: Enter `integration_status` as **source** and `status` as **destination**.
Navigate back to the **Copy data** activity created for the pipeline, select the plus (+) sign, and select **Failure**.
Drag and drop an additional **Copy data** activity onto the canvas and link to the **Failure** activity.
Follow the steps above, but on the **Source** tab, enter `failure` as content for the `integration_status`column.
 ## Troubleshooting
**Invalid token**
If you have a valid token but still get `invalid token` when you create a user in the PostgreSQL gateway, try these solutions:
* The groups in Microsoft Entra ID and CDF are correctly linked in **Manage & Configure** > **Access management** in CDF. See step 3 above.
* The CDF group is set up with the `Project:list` and `Group:list` capabilities in **Manage & Configure** > **Access management** in CDF.
## Troubleshooting
**Invalid token**
If you have a valid token but still get `invalid token` when you create a user in the PostgreSQL gateway, try these solutions:
* The groups in Microsoft Entra ID and CDF are correctly linked in **Manage & Configure** > **Access management** in CDF. See step 3 above.
* The CDF group is set up with the `Project:list` and `Group:list` capabilities in **Manage & Configure** > **Access management** in CDF.