> ## Documentation Index
> Fetch the complete documentation index at: https://docs.cognite.com/llms.txt
> Use this file to discover all available pages before exploring further.
# Setup and administration for PostgreSQL gateway 2.0
> Set up the Cognite PostgreSQL gateway to ingest data into CDF from ETL tools using Microsoft Entra ID authentication.
When you've registered the PostgreSQL gateway, users can sign in with their organizational ID to integrate data in a CDF project.
This section describes how to set up a PostgreSQL gateway 2.0 instance. See the [migration guide](#migrate-to-postgresql-gateway-20) if you're migrating from a previous version.
## Before you start
Make sure you have [registered the Cognite API and the CDF application in Microsoft Entra ID](/cdf/access/entra/guides/configure_cdf_azure_oidc) and
[set up Microsoft Entra ID and CDF groups](/cdf/access/entra/guides/create_groups_oidc) to control access to CDF data.
## Step 1: Register an app in Microsoft Entra ID to use with PostgreSQL gateway
Sign in to the [Azure portal](https://portal.azure.com) as an admin.
If you have access to multiple tenants, use the Directory + subscription filter in the top menu to select the tenant in which you want to register an application.
Search for and select **Microsoft Entra ID**.
Under **Manage**, select **App registrations** > **New registrations**.
In the **Register an application** window, enter the app name, and then select **Register**.
Copy and make a note of the **Application (client) ID**. This value is required to create user credentials for the PostgreSQL gateway.
1. Under **Manage**, select **Certificates & secrets**.
2. Select **New client secret**.
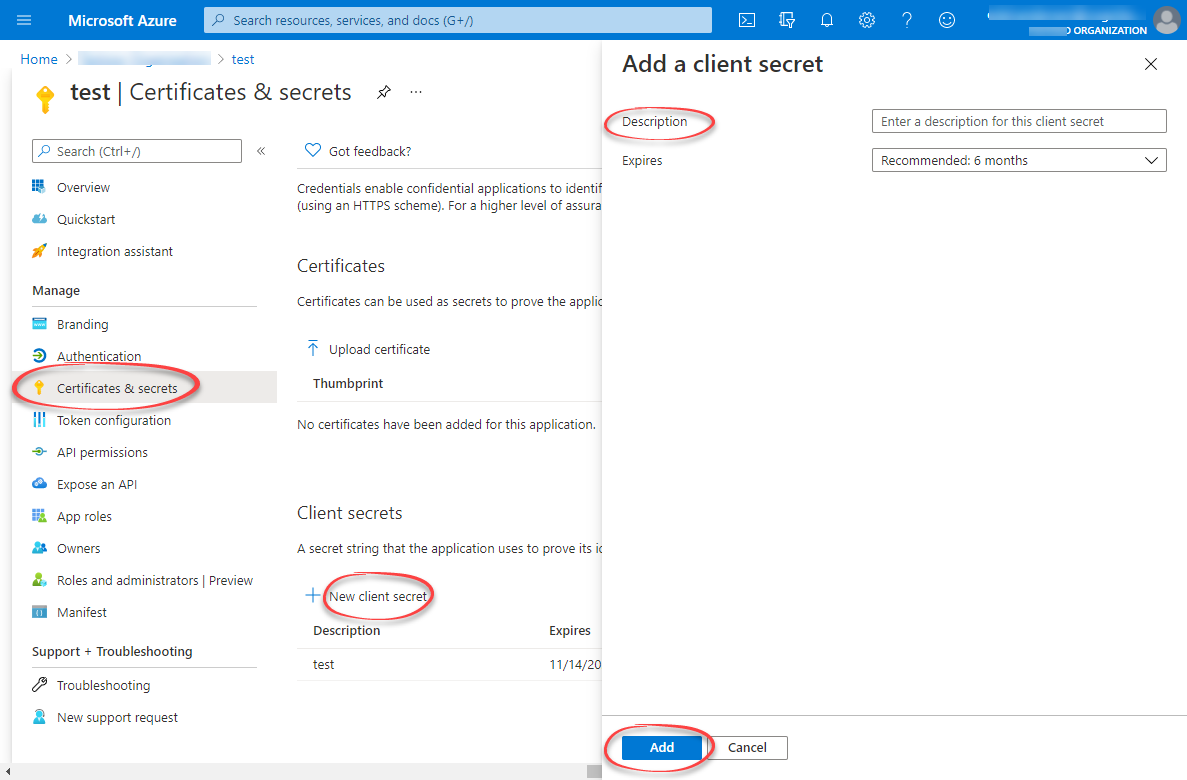 3. Enter a client secret description.
4. Select an expiry time.
5. Select **Add**.
Copy and make a note of the client secret in the **Value** field.
Make sure you copy this value now. This value will be hidden after you leave this page.
## Step 2: Create a group in Microsoft Entra ID and add the registered app as its member
Open the overview window in Microsoft Entra ID and select **Manage** > **Groups**.
Create a group, read more [here](/cdf/access/entra/guides/create_groups_oidc).
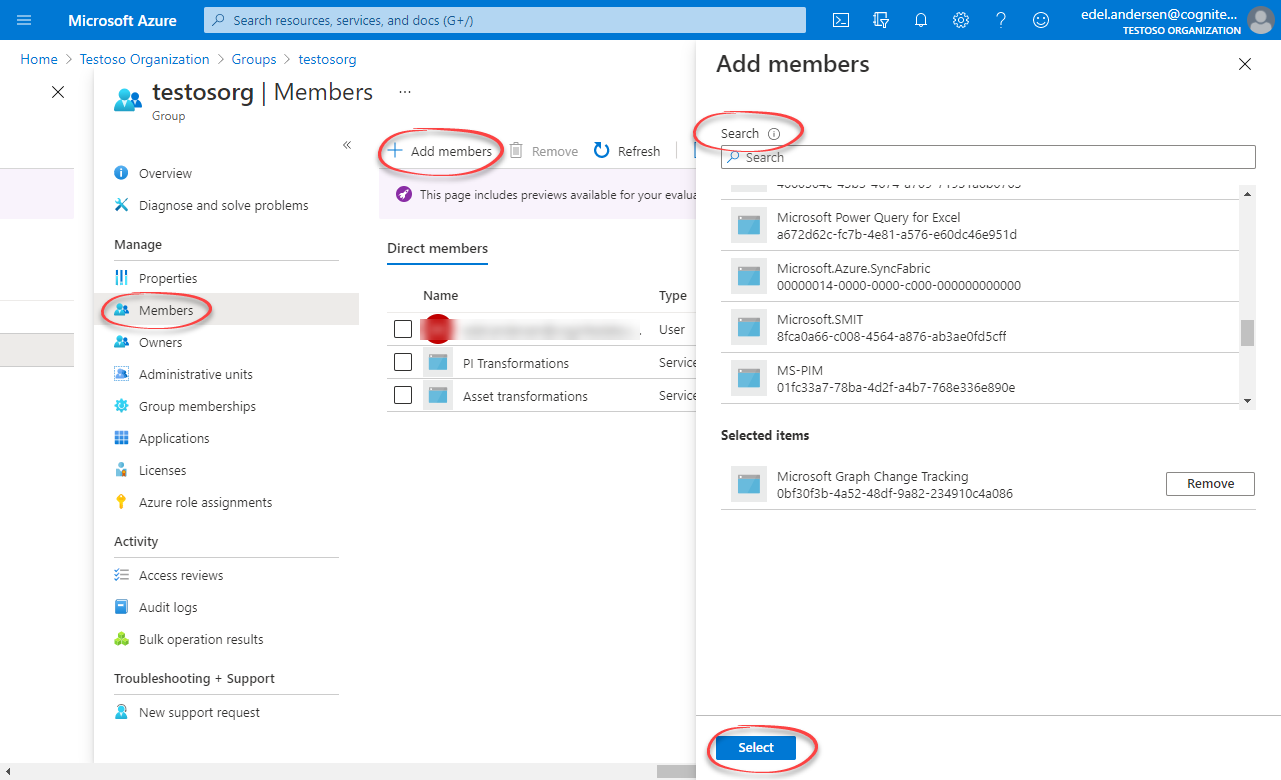
1. Open the group. Under **Manage**, select **Members** > **Add members**.
2. Find the app you created above and click **Select**.
Return to the overview, and then copy and make a note of the **Object Id**.
3. Enter a client secret description.
4. Select an expiry time.
5. Select **Add**.
Copy and make a note of the client secret in the **Value** field.
Make sure you copy this value now. This value will be hidden after you leave this page.
## Step 2: Create a group in Microsoft Entra ID and add the registered app as its member
Open the overview window in Microsoft Entra ID and select **Manage** > **Groups**.
Create a group, read more [here](/cdf/access/entra/guides/create_groups_oidc).
1. Open the group. Under **Manage**, select **Members** > **Add members**.
2. Find the app you created above and click **Select**.
Return to the overview, and then copy and make a note of the **Object Id**.
 ## Step 3: Create a group in CDF and link to the Microsoft Entra ID group
Sign in to CDF as an admin and naviate to Admin > Groups > Create new group.
## Step 3: Create a group in CDF and link to the Microsoft Entra ID group
Sign in to CDF as an admin and naviate to Admin > Groups > Create new group.
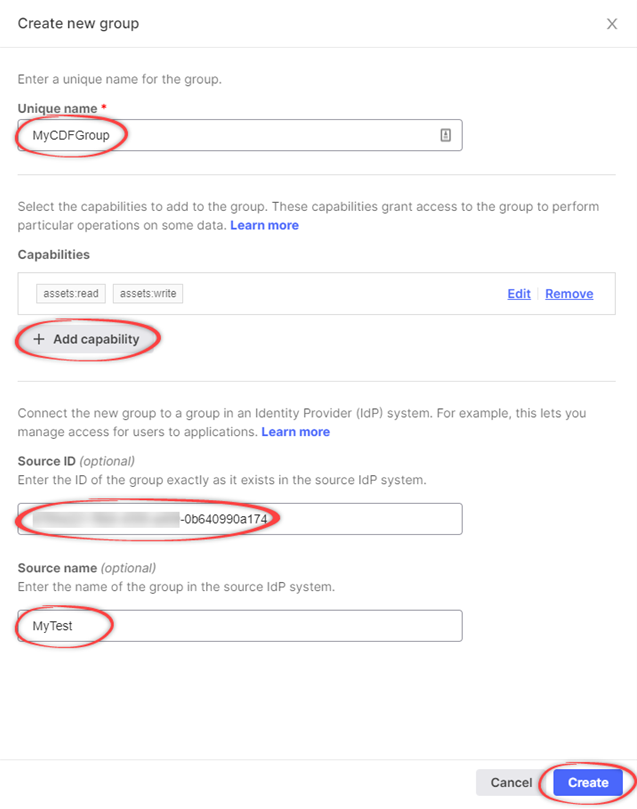 In the **Create a new group** window, enter a **unique name** for the group.
Add relevant capabilities. The **minimum** required capabilities are:
* `postgresGateway:READ`
* `postgresGateway:WRITE`
* `project:list`
* `groups:list`
* `session:CREATE`
The created user will also need `read` and/or `write` capabilities for the CDF resources you want to ingest data into. For instance, if you're ingesting **assets**, add `asset:read` and `asset:write`.
If you revoke the capabilities in the CDF group, you also revoke access for the PostgreSQL gateway.
Link the CDF group to a Microsoft Entra ID (ME-ID) group:
1. In the **Source ID** field, enter the **Object Id** for the ME-ID group exactly as it exists in ME-ID.
2. In the **Source name** field, enter the name of the group in Microsoft Entra ID.
Select **Create**.
## Step 4: Create user credentials for the PostgreSQL gateway
Send a **POST request** to `https://{cluster}.cognitedata.com/api/v1/projects/{project}/postgresgateway` [API](/api-reference/concepts/20230101/postgres-gateway-users).
Where:
* `cluster` is where your CDF instance exists. If you don't know the cluster name, contact [Cognite support](https://cognite.zendesk.com/hc/en-us/requests/new).
* `project` is the organization name of your CDF instance.
Get a **Bearer token** from your identity provider for authentication. To get a bearer token from Postman, see the illustration below.
Get the sessions **nonce** using the Cognite API using the **Bearer token** obtained from above.
**nonce** will expire after 1 minute, and must be used immediately.
Provide the **nonce** to the API endpoint:
```json theme={"languages":{"custom":["/_languages/kuiper.json","../_languages/kuiper.json"]}}
{
"items": [
{
"credentials": {
"nonce": ""
}
}
]
}
```
The service returns, among other things, a **username** and **password** with the same CDF capabilities as the group you created in CDF. Make sure to keep these, as they are required when you set up the gateway connection in your ETL tool.
Make sure you copy the **username** and **password**. If you lose the **password**, it can't be recovered.
## Migrate to PostgreSQL gateway 2.0
The PostgreSQL gateway 2.0 replaces the previous version (1.0).
As indicated in [Step 4](#create-user-credentials-for-the-postgresql-gateway) above, this version uses `sessions` on behalf of your project and OIDC authentication to make requests to CDF.
Most of the tables remain the same, but may have columns added or renamed. Some tables have been changed or divided up for clarity.
These modifications are highlighted below:
### Assets
Table name: *assets*
**Added**
| Columns | Type |
| :------------------ | :-------------: |
| `created_time` | **TIMESTAMPTZ** |
| `last_updated_time` | **TIMESTAMPTZ** |
### Event
Table name: *events*
**Added**
| Columns | Type |
| :------------------ | :-------------: |
| `created_time` | **TIMESTAMPTZ** |
| `last_updated_time` | **TIMESTAMPTZ** |
### Extraction pipeline runs
Table name: *extraction\_pipeline\_runs*
**Added**
| Columns | Type |
| :------ | :--------: |
| `id` | **BIGINT** |
### Extraction pipelines
Table name: *extraction\_pipelines*
**Added**
| Columns | Type |
| :------------------ | :----------------: |
| `contacts` | **JSON** |
| `raw_tables` | **JSON** |
| `documentation` | **VARCHAR(10000)** |
| `last_updated_time` | **TIMESTAMPTZ** |
| `created_by` | **VARCHAR(255)** |
### Files
Table name: *files*
**Added**
| Columns | Type |
| :--------------------- | :--------------: |
| `directory` | **VARCHAR(512)** |
| `asset_ids` | **BIGINT\[]** |
| `source_created_time` | **TIMESTAMPTZ** |
| `source_modified_time` | **TIMESTAMPTZ** |
| `security_categories` | **BIGINT\[]** |
| `created_time` | **TIMESTAMPTZ** |
| `last_updated_time` | **TIMESTAMPTZ** |
### Labels
Table name: *labels*
**Added**
| Columns | Type |
| :------------- | :-------------: |
| `data_set_id` | **BIGINT\[]** |
| `created_time` | **TIMESTAMPTZ** |
### Sequences
Table name: *sequences*
**Added**
| Columns | Type |
| :------------- | :-------------: |
| `created_time` | **TIMESTAMPTZ** |
### Sequence rows
Table name: *sequence\_rows*
**Changed**
| Old | New |
| :---------------------: | :-----------------: |
| `row_values` ⇾ `values` | **JSON** ⇾ **JSON** |
### Datapoints
The `datapoints` table has been divided into 2 different tables because version 1.0 only supported double datapoints. These are `string_datapoints` and `double_datapoints`.
It includes the following columns:
| Columns | Type |
| :------------ | :-------------------------------------------------------------------------------------------: |
| `value` | **VARCHAR(255)** for `string_datapoints`
In the **Create a new group** window, enter a **unique name** for the group.
Add relevant capabilities. The **minimum** required capabilities are:
* `postgresGateway:READ`
* `postgresGateway:WRITE`
* `project:list`
* `groups:list`
* `session:CREATE`
The created user will also need `read` and/or `write` capabilities for the CDF resources you want to ingest data into. For instance, if you're ingesting **assets**, add `asset:read` and `asset:write`.
If you revoke the capabilities in the CDF group, you also revoke access for the PostgreSQL gateway.
Link the CDF group to a Microsoft Entra ID (ME-ID) group:
1. In the **Source ID** field, enter the **Object Id** for the ME-ID group exactly as it exists in ME-ID.
2. In the **Source name** field, enter the name of the group in Microsoft Entra ID.
Select **Create**.
## Step 4: Create user credentials for the PostgreSQL gateway
Send a **POST request** to `https://{cluster}.cognitedata.com/api/v1/projects/{project}/postgresgateway` [API](/api-reference/concepts/20230101/postgres-gateway-users).
Where:
* `cluster` is where your CDF instance exists. If you don't know the cluster name, contact [Cognite support](https://cognite.zendesk.com/hc/en-us/requests/new).
* `project` is the organization name of your CDF instance.
Get a **Bearer token** from your identity provider for authentication. To get a bearer token from Postman, see the illustration below.
Get the sessions **nonce** using the Cognite API using the **Bearer token** obtained from above.
**nonce** will expire after 1 minute, and must be used immediately.
Provide the **nonce** to the API endpoint:
```json theme={"languages":{"custom":["/_languages/kuiper.json","../_languages/kuiper.json"]}}
{
"items": [
{
"credentials": {
"nonce": ""
}
}
]
}
```
The service returns, among other things, a **username** and **password** with the same CDF capabilities as the group you created in CDF. Make sure to keep these, as they are required when you set up the gateway connection in your ETL tool.
Make sure you copy the **username** and **password**. If you lose the **password**, it can't be recovered.
## Migrate to PostgreSQL gateway 2.0
The PostgreSQL gateway 2.0 replaces the previous version (1.0).
As indicated in [Step 4](#create-user-credentials-for-the-postgresql-gateway) above, this version uses `sessions` on behalf of your project and OIDC authentication to make requests to CDF.
Most of the tables remain the same, but may have columns added or renamed. Some tables have been changed or divided up for clarity.
These modifications are highlighted below:
### Assets
Table name: *assets*
**Added**
| Columns | Type |
| :------------------ | :-------------: |
| `created_time` | **TIMESTAMPTZ** |
| `last_updated_time` | **TIMESTAMPTZ** |
### Event
Table name: *events*
**Added**
| Columns | Type |
| :------------------ | :-------------: |
| `created_time` | **TIMESTAMPTZ** |
| `last_updated_time` | **TIMESTAMPTZ** |
### Extraction pipeline runs
Table name: *extraction\_pipeline\_runs*
**Added**
| Columns | Type |
| :------ | :--------: |
| `id` | **BIGINT** |
### Extraction pipelines
Table name: *extraction\_pipelines*
**Added**
| Columns | Type |
| :------------------ | :----------------: |
| `contacts` | **JSON** |
| `raw_tables` | **JSON** |
| `documentation` | **VARCHAR(10000)** |
| `last_updated_time` | **TIMESTAMPTZ** |
| `created_by` | **VARCHAR(255)** |
### Files
Table name: *files*
**Added**
| Columns | Type |
| :--------------------- | :--------------: |
| `directory` | **VARCHAR(512)** |
| `asset_ids` | **BIGINT\[]** |
| `source_created_time` | **TIMESTAMPTZ** |
| `source_modified_time` | **TIMESTAMPTZ** |
| `security_categories` | **BIGINT\[]** |
| `created_time` | **TIMESTAMPTZ** |
| `last_updated_time` | **TIMESTAMPTZ** |
### Labels
Table name: *labels*
**Added**
| Columns | Type |
| :------------- | :-------------: |
| `data_set_id` | **BIGINT\[]** |
| `created_time` | **TIMESTAMPTZ** |
### Sequences
Table name: *sequences*
**Added**
| Columns | Type |
| :------------- | :-------------: |
| `created_time` | **TIMESTAMPTZ** |
### Sequence rows
Table name: *sequence\_rows*
**Changed**
| Old | New |
| :---------------------: | :-----------------: |
| `row_values` ⇾ `values` | **JSON** ⇾ **JSON** |
### Datapoints
The `datapoints` table has been divided into 2 different tables because version 1.0 only supported double datapoints. These are `string_datapoints` and `double_datapoints`.
It includes the following columns:
| Columns | Type |
| :------------ | :-------------------------------------------------------------------------------------------: |
| `value` | **VARCHAR(255)** for `string_datapoints`
**DOUBLE PRECISION** for `double_datapoints` |
| `timestamp` | **TIMESTAMPTZ** |
| `external_id` | **VARCHAR(255)** |
| `id` | **BIGINT** |
### Timeseries
The `timeseries` table has been renamed to `time_series`.
**Removed**
The `legacy_name` field has been retired and is no longer available for use.
### Raw
The `raw` table is renamed to `raw_rows` for better understanding and proper differentiation between raw table data sets and raw table names.
**raw\_rows**
**Added**
| Columns | Type |
| :----------------------- | :-------------: |
| `_raw_last_updated_time` | **TIMESTAMPTZ** |
**Changed**
| Columns | Type |
| :--------------------------- | :----------------------------: |
| `database` ⇾ `_raw_database` | **VARCHAR** ⇾ **VARCHAR(32)** |
| `table` ⇾ `_raw_table` | **VARCHAR** ⇾ **VARCHAR(64)** |
| `key` ⇾ `_raw_key` | **VARCHAR(1024)** ⇾ **TEXT** |
| `columns` ⇾ `_raw_columns` | **JSON** ⇾ **JSON** |
**raw\_tables**
**Added**
| Columns | Type |
| :-------------- | :-------------: |
| `_raw_database` | **VARCHAR(32)** |
| `_raw_table` | **VARCHAR(64)** |