> ## Documentation Index
> Fetch the complete documentation index at: https://docs.cognite.com/llms.txt
> Use this file to discover all available pages before exploring further.
# Set up the PI extractor
> Install and configure the Cognite PI extractor on Windows to stream time series data from OSISoft PI to Cognite Data Fusion (CDF).
The Cognite PI extractor is distributed as a Windows installer (.msi file). When you run the .msi file, a setup wizard guides you through the installation process. The installer creates a Windows service and installs the binary files needed to run the extractor.
## Before you start
* Check the [server requirements](/cdf/integration/guides/extraction/pi/pi_server_requirements) for the extractor.
* Assign [access capabilities](/cdf/access/guides/capabilities#pi-extractor) in a CDF project.
You can use OpenID Connect and your existing identity provider (IdP) framework to manage access to CDF data securely. [Read more](/cdf/integration/guides/extraction/admin_oidc).
* Set up a Windows Update schedule. Note that the update may reboot the machine, causing extractor downtime.
* Download and run the installation files for the extractor from CDF.
Set Modify permission under **Properties** in the installation folder to avoid permission issues.
* Create a configuration file according to the [configuration settings](/cdf/integration/guides/extraction/configuration/pi). The file must be in YAML format.
## Run as a Windows service
Start the PI extractor service using the Windows service or with a command line:
```bash theme={"languages":{"custom":["/_languages/kuiper.json","../_languages/kuiper.json"]}}
net start PiExtractor
```
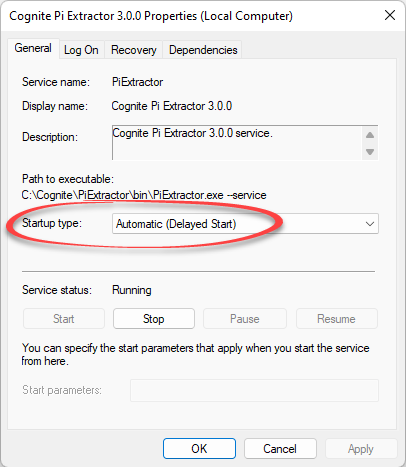
The Windows service is named **Cognite Pi Extractor 4.3.0**, and the command line for the `net start` and `net stop` commands is named **PiExtractor**.
Verify that the service is running.
 Open the **Properties** for the service and set the **Startup type** to **Automatic (Delayed Start)**:
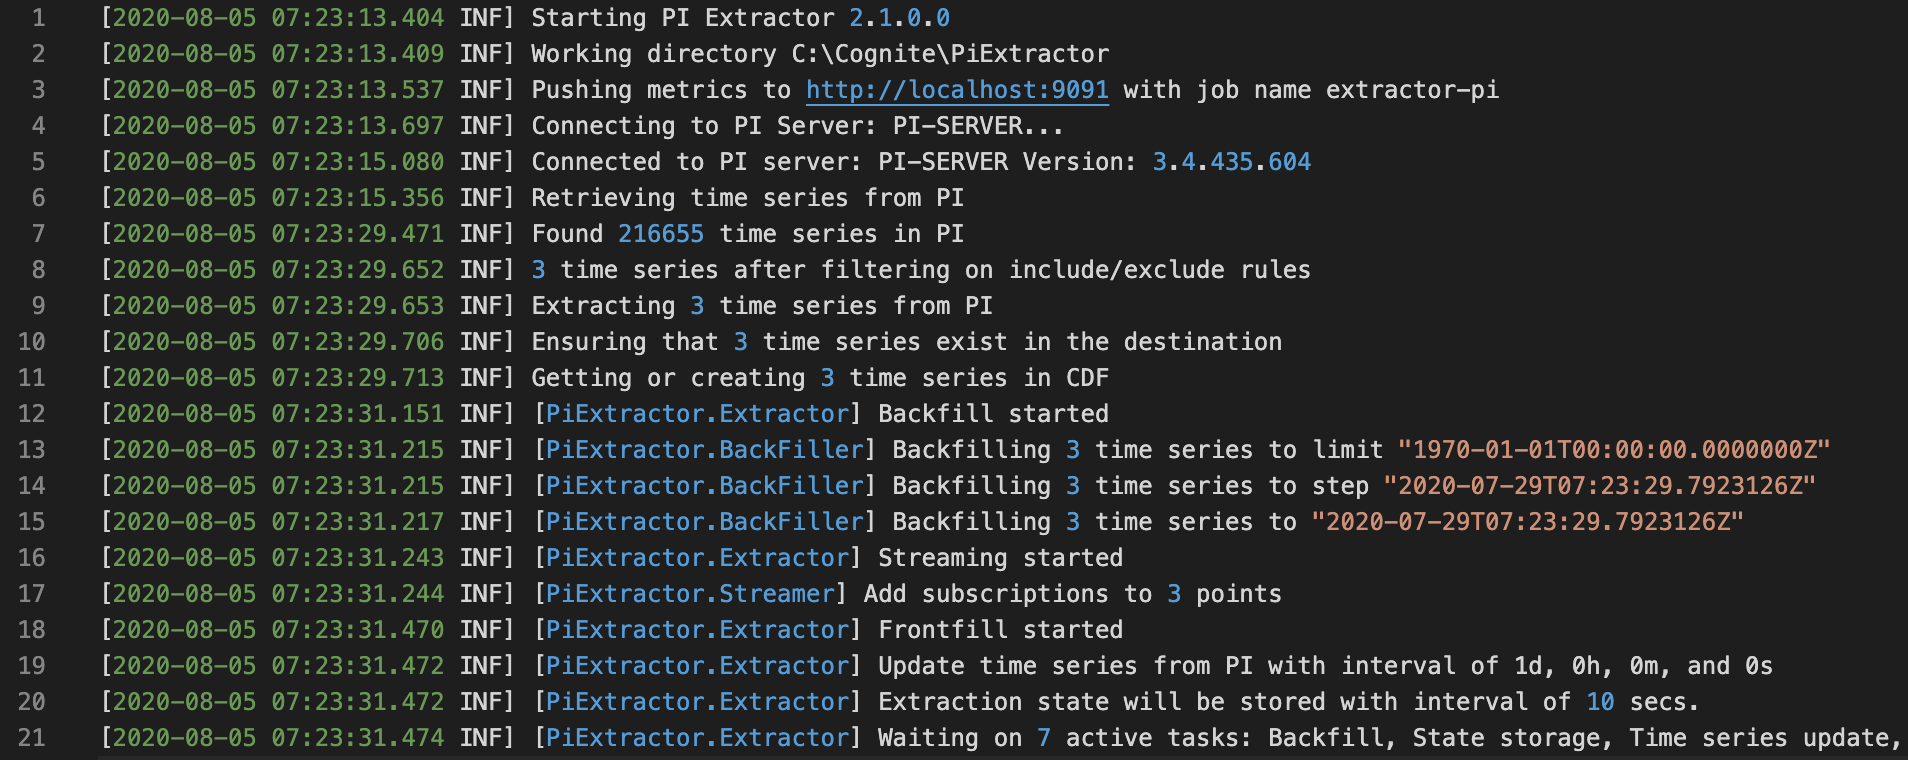
 If you've configured the extractor to log messages to a file, you'll find the log files in the configured path, for instance, `logs/log.txt`. These should contain progress messages similar to the example below:
 If you've configured the extractor to push metrics, you can inspect the extractor operation and health in real-time using a Grafana board.
## Run the extractor behind a proxy
Open and edit the `PiExtractor.exe.config` file from the installation directory.
Add the `system.net` section under `configuration` with this content:
```xml theme={"languages":{"custom":["/_languages/kuiper.json","../_languages/kuiper.json"]}}
```
Configure the proxy address and bypass rules according to the proxy server you want to use.
Restart the extractor service. Read more about the [default-proxy-element](https://learn.microsoft.com/en-us/dotnet/framework/configure-apps/file-schema/network/defaultproxy-element-network-settings).
## Upgrade the extractor
To upgrade the current extractor version, download and run the .msi file for the new version. The installer detects the current installation directory, updates the software, and keeps the configuration as-is. The sample configuration file is a part of the software package and is overwritten during an extractor upgrade.
Download the PI extractor .msi file from CDF.
Take note of the currently **installed version** in case of a rollback and of the **service properties** in the Properties dialog.
During the upgrade, the installer resets all custom service properties to their default values, such as the service recovery settings.
Run the installer.
Update the custom service properties you noted in step 2.
Verify that the extractor is running and that the version displayed in the `Starting PI Extractor` logline matches the upgraded version.
Check the metrics and verify that the extractor resumes operation.
If you've configured additional services to extract from multiple sources, the installer won't change the settings for these services during upgrades. If you've created multiple services, the following dialog appears during the upgrade:
If you've configured the extractor to push metrics, you can inspect the extractor operation and health in real-time using a Grafana board.
## Run the extractor behind a proxy
Open and edit the `PiExtractor.exe.config` file from the installation directory.
Add the `system.net` section under `configuration` with this content:
```xml theme={"languages":{"custom":["/_languages/kuiper.json","../_languages/kuiper.json"]}}
```
Configure the proxy address and bypass rules according to the proxy server you want to use.
Restart the extractor service. Read more about the [default-proxy-element](https://learn.microsoft.com/en-us/dotnet/framework/configure-apps/file-schema/network/defaultproxy-element-network-settings).
## Upgrade the extractor
To upgrade the current extractor version, download and run the .msi file for the new version. The installer detects the current installation directory, updates the software, and keeps the configuration as-is. The sample configuration file is a part of the software package and is overwritten during an extractor upgrade.
Download the PI extractor .msi file from CDF.
Take note of the currently **installed version** in case of a rollback and of the **service properties** in the Properties dialog.
During the upgrade, the installer resets all custom service properties to their default values, such as the service recovery settings.
Run the installer.
Update the custom service properties you noted in step 2.
Verify that the extractor is running and that the version displayed in the `Starting PI Extractor` logline matches the upgraded version.
Check the metrics and verify that the extractor resumes operation.
If you've configured additional services to extract from multiple sources, the installer won't change the settings for these services during upgrades. If you've created multiple services, the following dialog appears during the upgrade:
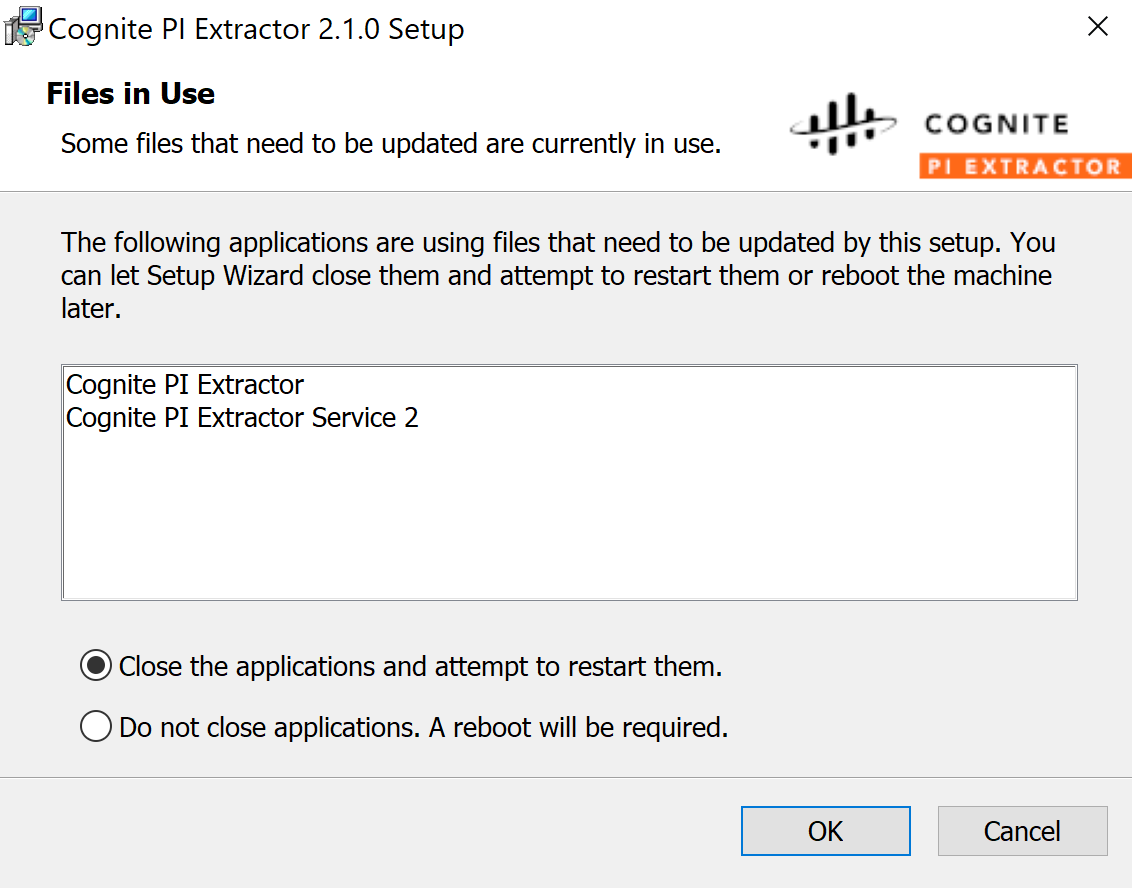 The installer uses the default options, stops the services, and restarts the services after the upgrade. Otherwise, a server reboot is required to complete the upgrade process.
## Uninstall the extractor
Run the installer and select **Remove the extractor** or open **Add or remove programs** from the control panel.
Remove **Cognite PI extractor**.
Optionally, remove the installation directory with the configuration file and logs.
Optionally, delete the .msi file.
The installer uses the default options, stops the services, and restarts the services after the upgrade. Otherwise, a server reboot is required to complete the upgrade process.
## Uninstall the extractor
Run the installer and select **Remove the extractor** or open **Add or remove programs** from the control panel.
Remove **Cognite PI extractor**.
Optionally, remove the installation directory with the configuration file and logs.
Optionally, delete the .msi file.