> ## Documentation Index
> Fetch the complete documentation index at: https://docs.cognite.com/llms.txt
> Use this file to discover all available pages before exploring further.
# Plan, schedule, and assign activities
> View work orders and checklists, assign activities to disciplines or users, create checklists from work orders, and track task progress.
You can view and interact with the planned work on the Overview and the [Schedules](#view-scheduled-work) tabs.
On the Overview tab, you'll see all planned activities divided into Work orders (maintenance work) and Checklists (operator rounds). You can assign these activities to a group of users (disciplines), such as all electricians, or directly to specific users. Also, you can suggest a start and end date for each activity, but these are only used for sorting.
 On the Overview tab, you can:
➀ **Change location** — switch between different work locations. You can also select your profile at the top right > Manage account > Select location.
➁ **Search and filter** — adjust the table view with the search field, date picker, number of columns, and [save the view as a filter](#create-filters).
➂ **Create and assign** — [create checklists from a work order or its tasks](#create-checklists-from-work-orders) and assign or reassign work orders and checklists.
➃ **Change view** — switch between the Work orders and Checklists view.
The Work orders tab shows the work orders imported from a work management application, such as SAP. Here, you can:
* View work order details with a list of tasks (operations) to perform. Expand the task to see if it applies to several assets.
* Select Create & Assign to create a checklist from work order tasks. Once you create the checklist, you can check its progress by selecting the number of tasks in the Checklist Progress column.
* Create checklists from several work order tasks relevant to a field worker. If there are tasks left, you can also create another checklist. The work order will remain in progress until field workers complete all tasks in the work order.
The **Checklists** tab shows recurring tasks generated from templates that are created by an admin on the Templates tab and planned checklists moved to the *Ready* state on the [Schedules](/cdf/infield/guides/plan#view-scheduled-work) tab. Here, you can:
* View the checklist details.
* Assign or reassign checklists.
* [Track and complete checklist tasks](/cdf/infield/guides/plan#track-and-complete-tasks).
* Delete checklists. If the field worker collects the data before you delete the checklist, the data is saved and stored in InField. You can only restore the deleted checklist through the Cognite API.
When planning the work, you can also use Search to find and analyze time series, assets, and documents in your selected location.
## Create filters
On the Overview tab, you can adjust the filters to view the most relevant data and save the selection as a filter.
On the Overview tab, you can:
➀ **Change location** — switch between different work locations. You can also select your profile at the top right > Manage account > Select location.
➁ **Search and filter** — adjust the table view with the search field, date picker, number of columns, and [save the view as a filter](#create-filters).
➂ **Create and assign** — [create checklists from a work order or its tasks](#create-checklists-from-work-orders) and assign or reassign work orders and checklists.
➃ **Change view** — switch between the Work orders and Checklists view.
The Work orders tab shows the work orders imported from a work management application, such as SAP. Here, you can:
* View work order details with a list of tasks (operations) to perform. Expand the task to see if it applies to several assets.
* Select Create & Assign to create a checklist from work order tasks. Once you create the checklist, you can check its progress by selecting the number of tasks in the Checklist Progress column.
* Create checklists from several work order tasks relevant to a field worker. If there are tasks left, you can also create another checklist. The work order will remain in progress until field workers complete all tasks in the work order.
The **Checklists** tab shows recurring tasks generated from templates that are created by an admin on the Templates tab and planned checklists moved to the *Ready* state on the [Schedules](/cdf/infield/guides/plan#view-scheduled-work) tab. Here, you can:
* View the checklist details.
* Assign or reassign checklists.
* [Track and complete checklist tasks](/cdf/infield/guides/plan#track-and-complete-tasks).
* Delete checklists. If the field worker collects the data before you delete the checklist, the data is saved and stored in InField. You can only restore the deleted checklist through the Cognite API.
When planning the work, you can also use Search to find and analyze time series, assets, and documents in your selected location.
## Create filters
On the Overview tab, you can adjust the filters to view the most relevant data and save the selection as a filter.
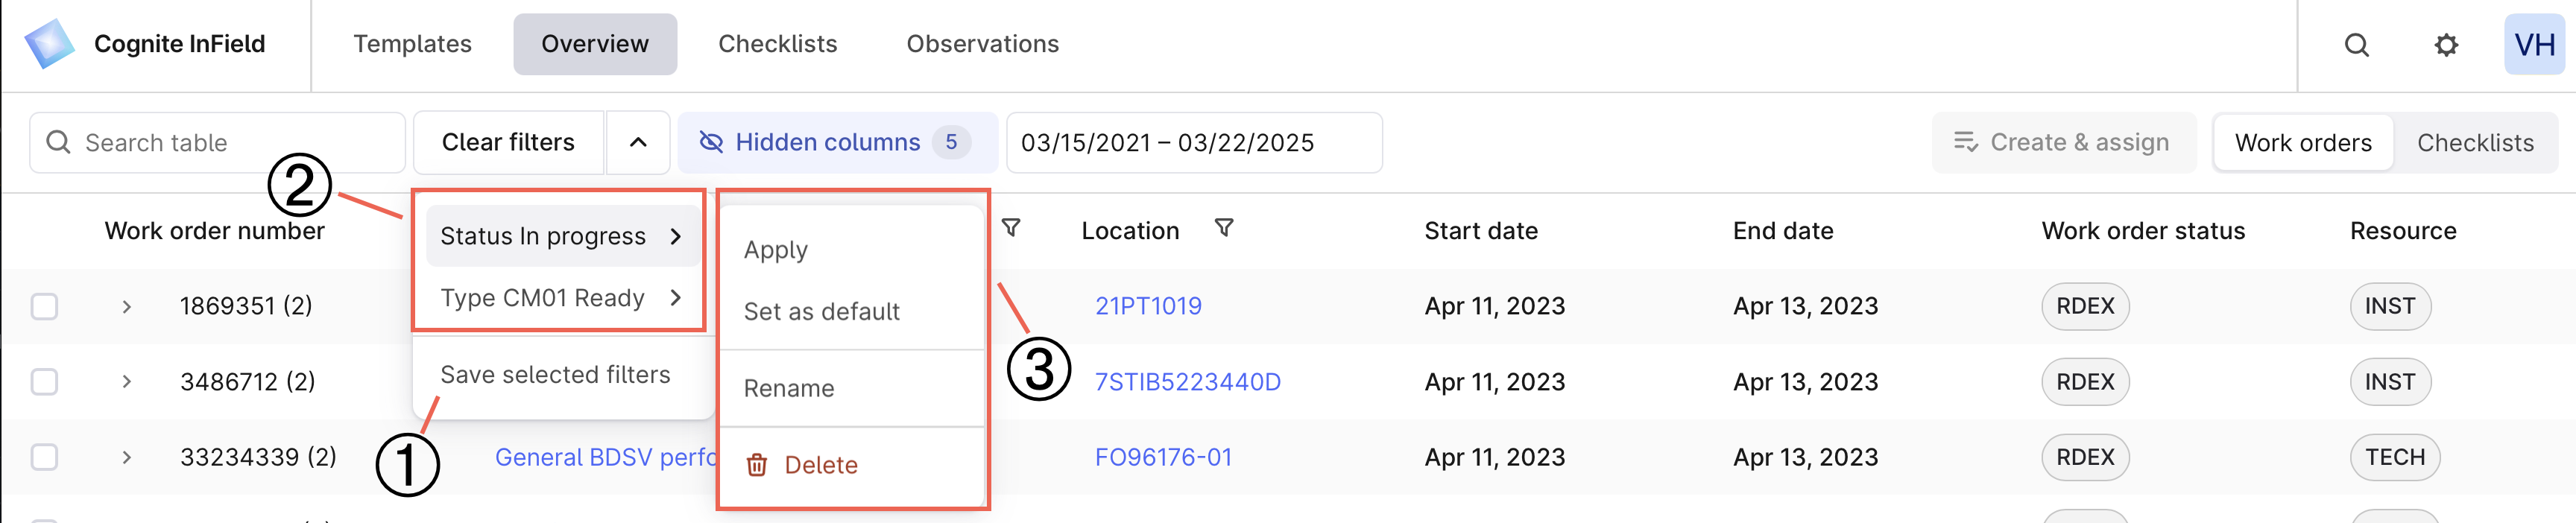 ➀ **Create** — save selected filters and create a filter preset you can use later.
➁ **Select** — select the saved filter preset to view relevant information.
➂ **Edit** — change saved filters, make them default, or delete them.
To create a filter for columns:
Select Hidden columns, select the columns to display, reorder them if needed, and select Apply.
For example, select a certain checklist status.
Next to Clear filters, select the dropdown arrow and save the filter.
Name and save the filter.
In the dropdown, you can see a list of all created filters. You can select a filter to apply to the Overview tab or make it default for the tab.
You must create separate filters for work orders and checklists. Search results and a date range don't apply to the filter preset.
## Create checklists from work orders
A checklist is a task or a list of tasks created from a [template](/cdf/infield/guides/create_templates) or created from a work order. You can create a checklist from a work order or its tasks (operations) only manually.
Go to Overview > Work orders.
Create a checklist from a work order or several work order tasks:
* Select the work order to create a checklist from all tasks within it.
* Expand the work order and select the operations you want on your checklist.
A work order can consist of one or several operations. Operations are individual steps in an order or individual tasks in a checklist. Some operations that come from the work management system, such as SAP, have an order or an operation number. One operation in a work order can generate several tasks in a checklist if several operations have the same order/operation number and the same work order number (parentActivityId).
## Track and complete tasks
As the field workers complete the tasks on a checklist, they update the status and add relevant images, measurements, and observations. You'll find the status of all activities along with their progress on the Overview tab, where you can sort the columns and select relevant dates.
The table shows the meaning of the checklist status colors.
| Color | Meaning |
| ----- | ------------------------------------------------------------------------------------------------------------------------------------------------------- |
| Grey | The operator hasn't completed any tasks. |
| Green | The operator completed the checklist and all tasks have the OK or Not applicable state. |
| Blue | The operator has started, but not completed, the checklist. |
| Red | The operator set the state of at least one of the tasks to Not OK or Blocked. |
You can update checklist statuses individually or in bulk:
* **Individually** — select the checklist, then in the right panel select More options (…) > Set checklist to > select the status.
* **In bulk** — select several checklists, then in the bottom panel select Set status and choose the status to apply.
You can't update checklists with the status Done. However, **extended access** lets you change the status to In progress and update the checklist.
## View scheduled work
The features described in this section are in [public preview](/cdf/product_feature_status#public-preview) and may change.
On the Schedules tab, you'll see all planned activities created from templates manually or automatically. As a template and checklist admin, you can view the checklists planned for the current and upcoming weeks and what has already been worked on, and move planned work to Ready.
➀ **Create** — save selected filters and create a filter preset you can use later.
➁ **Select** — select the saved filter preset to view relevant information.
➂ **Edit** — change saved filters, make them default, or delete them.
To create a filter for columns:
Select Hidden columns, select the columns to display, reorder them if needed, and select Apply.
For example, select a certain checklist status.
Next to Clear filters, select the dropdown arrow and save the filter.
Name and save the filter.
In the dropdown, you can see a list of all created filters. You can select a filter to apply to the Overview tab or make it default for the tab.
You must create separate filters for work orders and checklists. Search results and a date range don't apply to the filter preset.
## Create checklists from work orders
A checklist is a task or a list of tasks created from a [template](/cdf/infield/guides/create_templates) or created from a work order. You can create a checklist from a work order or its tasks (operations) only manually.
Go to Overview > Work orders.
Create a checklist from a work order or several work order tasks:
* Select the work order to create a checklist from all tasks within it.
* Expand the work order and select the operations you want on your checklist.
A work order can consist of one or several operations. Operations are individual steps in an order or individual tasks in a checklist. Some operations that come from the work management system, such as SAP, have an order or an operation number. One operation in a work order can generate several tasks in a checklist if several operations have the same order/operation number and the same work order number (parentActivityId).
## Track and complete tasks
As the field workers complete the tasks on a checklist, they update the status and add relevant images, measurements, and observations. You'll find the status of all activities along with their progress on the Overview tab, where you can sort the columns and select relevant dates.
The table shows the meaning of the checklist status colors.
| Color | Meaning |
| ----- | ------------------------------------------------------------------------------------------------------------------------------------------------------- |
| Grey | The operator hasn't completed any tasks. |
| Green | The operator completed the checklist and all tasks have the OK or Not applicable state. |
| Blue | The operator has started, but not completed, the checklist. |
| Red | The operator set the state of at least one of the tasks to Not OK or Blocked. |
You can update checklist statuses individually or in bulk:
* **Individually** — select the checklist, then in the right panel select More options (…) > Set checklist to > select the status.
* **In bulk** — select several checklists, then in the bottom panel select Set status and choose the status to apply.
You can't update checklists with the status Done. However, **extended access** lets you change the status to In progress and update the checklist.
## View scheduled work
The features described in this section are in [public preview](/cdf/product_feature_status#public-preview) and may change.
On the Schedules tab, you'll see all planned activities created from templates manually or automatically. As a template and checklist admin, you can view the checklists planned for the current and upcoming weeks and what has already been worked on, and move planned work to Ready.
 On the **Schedules** tab, you can:
➀ **Select a work week** — select the week to view details of checklists for past, current, and upcoming weeks.
➁ **View checklists** — review the checklist details, such as its status and assignees, who created it, and when the checklist becomes Ready. Here you can view Planned checklists.
Planned is a transition status, meaning that the template is Ready and scheduled, but the checklist isn't Ready to start work on yet. Once the checklist reaches the scheduled date, it changes the status to Ready.
➂ **Move checklists to Ready** — manually transition checklists from Planned to Ready if you want field workers to start working on scheduled checklists before the planned date.
➃ **Preview checklists** — select a checklist to preview the task details before starting work.
You can move checklists only in the Planned status.
To move checklists to Ready:
Select the week and day you want to view.
Select the checkbox next to each checklist you want to move from Planned to Ready.
To select multiple checklists, select the first checkbox, hold Shift, and select the last checkbox in the range.
Select Move to Ready. Once moved, the checklists appear for field workers to start working on.
You don't lose any data if the checklists aren't moved or are moved only partially. Repeat the process or select Retry to complete it.
## Template and checklist status flow
Study the flowchart to see how template and checklist statuses interact and the key differences between them.
```mermaid theme={"languages":{"custom":["/_languages/kuiper.json","../_languages/kuiper.json"]}}
flowchart TD
subgraph Templates["Template Lifecycle"]
T1[Draft Template]
T2[Ready Template]
T3[Deleted Template]
T1 -->|Set to Ready| T2
T2 -->|Set to Draft| T1
T2 -->|Delete| T3
T1 -->|Delete| T3
T3 -->|Restore| T1
T3 -.->|Restore| T2
end
subgraph Creation["Checklist Creation"]
T2 -->|Create manually| C1[Ready Checklist]
T2 -->|Scheduled task
On the **Schedules** tab, you can:
➀ **Select a work week** — select the week to view details of checklists for past, current, and upcoming weeks.
➁ **View checklists** — review the checklist details, such as its status and assignees, who created it, and when the checklist becomes Ready. Here you can view Planned checklists.
Planned is a transition status, meaning that the template is Ready and scheduled, but the checklist isn't Ready to start work on yet. Once the checklist reaches the scheduled date, it changes the status to Ready.
➂ **Move checklists to Ready** — manually transition checklists from Planned to Ready if you want field workers to start working on scheduled checklists before the planned date.
➃ **Preview checklists** — select a checklist to preview the task details before starting work.
You can move checklists only in the Planned status.
To move checklists to Ready:
Select the week and day you want to view.
Select the checkbox next to each checklist you want to move from Planned to Ready.
To select multiple checklists, select the first checkbox, hold Shift, and select the last checkbox in the range.
Select Move to Ready. Once moved, the checklists appear for field workers to start working on.
You don't lose any data if the checklists aren't moved or are moved only partially. Repeat the process or select Retry to complete it.
## Template and checklist status flow
Study the flowchart to see how template and checklist statuses interact and the key differences between them.
```mermaid theme={"languages":{"custom":["/_languages/kuiper.json","../_languages/kuiper.json"]}}
flowchart TD
subgraph Templates["Template Lifecycle"]
T1[Draft Template]
T2[Ready Template]
T3[Deleted Template]
T1 -->|Set to Ready| T2
T2 -->|Set to Draft| T1
T2 -->|Delete| T3
T1 -->|Delete| T3
T3 -->|Restore| T1
T3 -.->|Restore| T2
end
subgraph Creation["Checklist Creation"]
T2 -->|Create manually| C1[Ready Checklist]
T2 -->|Scheduled task
reaches date/time| C2[Planned Checklist]
C2 -->|Scheduled date
is reached| C1
C2 -->|Move to Ready
manually| C1
end
subgraph Checklists["Checklist Lifecycle"]
C1 -->|Field worker
starts work| C3[In Progress]
C3 -->|Complete
all tasks| C4{Task States?}
C4 -->|All OK or
Not applicable| C5[Done - Green]
C4 -->|Any Not OK
or Blocked| C6[Done - Red]
C1 -->|Delete| C7[Deleted Checklist]
C3 -->|Delete| C7
C5 -->|Extended access:
Set to In Progress| C3
C6 -->|Extended access:
Set to In Progress| C3
end
style T1 fill:#e8e8e8
style T2 fill:#90EE90
style T3 fill:#ffb3b3
style C1 fill:#87CEEB
style C2 fill:#DDA0DD
style C3 fill:#ADD8E6
style C5 fill:#90EE90
style C6 fill:#ff9999
style C7 fill:#ffb3b3
classDef noteBox fill:#fff9e6,stroke:#ffcc00,stroke-width:2px
```