> ## Documentation Index
> Fetch the complete documentation index at: https://docs.cognite.com/llms.txt
> Use this file to discover all available pages before exploring further.
# Use Functions
> Deploy Python code to CDF, call functions on-demand, and schedule them to run at regular intervals. Learn to authenticate, create, and manage functions.
## Authenticate with OpenID Connect
With OpenID Connect, you can instantiate your `CogniteClient` with either an [OpenID Connect user token](#authenticate-with-a-user-token) or [client credentials](#authenticate-with-client-credentials).
### Authenticate with an OpenID Connect user token
`client = CogniteClient(project="my-project", token=my_token)`
`my_token` is a string or a callable.
### Authenticate with client credentials
For more information see [authenticate with client credentials on Python](/dev/sdks/python/python_auth_oidc). To instantiate your `CogniteClient` with client credentials:
```python title="python" theme={"languages":{"custom":["/_languages/kuiper.json","../_languages/kuiper.json"]}}
from cognite.client import CogniteClient, ClientConfig
from cognite.client.credentials import OAuthClientCredentials
# This value may change depending on the cluster your CDF project runs on
base_url = "https://api.cognitedata.com"
tenant_id = "my-tenant-id"
creds = OAuthClientCredentials(
token_url=f"https://login.microsoftonline.com/{tenant_id}/oauth2/v2.0/token",
client_id="my-client-id",
client_secret="my-client-secret",
scopes=[f"{base_url}/.default"]
)
cnf = ClientConfig(
client_name="custom-client-name",
project="cdf-project-name",
credentials=creds,
base_url=base_url
)
client = CogniteClient(cnf)
```
## Create a function
You can create a function from [a Jupyter Notebook](#create-a-function-from-a-jupyter-notebook), [a folder](#create-a-function-from-a-folder), [an uploaded zip file](#create-a-function-from-an-uploaded-zip-file), or from CDF. The examples below assume that you have [the Python SDK](https://github.com/cognitedata/cognite-sdk-python) installed in your environment.
### Create a function from a Jupyter Notebook
To create a function from a Jupyter Notebook, refer directly to the Python function named `handle`. This is the easiest way to get started but it's only suitable for short and simple functions.
The `function_handle` argument points to the `handle` function defined in the example below, and the name in the definition must be `handle`.
When you deploy with the `function_handle` argument, you must import within `handle()`. In other cases (with the `folder` or `file_id` arguments), the imports can be outside `handle()`.
To create a Function with dependencies, see the [Python SDK documentation](https://cognite-sdk-python.readthedocs-hosted.com/en/latest/functions.html#create-function).
**Example:**
Define the following function in your notebook:
```python title="python" theme={"languages":{"custom":["/_languages/kuiper.json","../_languages/kuiper.json"]}}
def handle(client, data):
asset_no = data["assetNo"]
print("Returning asset number {}".format(asset_no))
assets = client.assets.list()
return {"assetName": assets[asset_no].name}
```
Deploy the function to CDF:
```python title="python" theme={"languages":{"custom":["/_languages/kuiper.json","../_languages/kuiper.json"]}}
from cognite.client import CogniteClient, ClientConfig
from cognite.client.credentials import OAuthClientCredentials
# This value would change depending on the cluster where your CDF projects runs on
base_url = "https://api.cognitedata.com"
tenant_id = "my-tenant-id"
creds = OAuthClientCredentials(
token_url=f"https://login.microsoftonline.com/{tenant_id}/oauth2/v2.0/token",
client_id="my-client-id",
client_secret="my-client-secret",
scopes=[f"{base_url}/.default"]
)
cnf = ClientConfig(
client_name="custom-client-name",
project="cdf-project-name",
credentials=creds,
base_url=base_url
)
client = CogniteClient(cnf)
# Create the function
func = client.functions.create(
name="my-function",
external_id="my-function",
function_handle=handle
)
```
### Create a function from a folder
For more advanced functions, you can define your function in a module that imports other modules. To create a function, replace the `function_handle` argument with the `folder` argument and set it equal to the path of the folder containing your code.
**Example:**
```python title="python" theme={"languages":{"custom":["/_languages/kuiper.json","../_languages/kuiper.json"]}}
from cognite import CogniteClient
client = CogniteClient(project="my-project", token="my-token")
func = client.functions.create(
name="my-function",
external_id="my-function",
folder="path/to/folder"
)
```
Your modules inside `path/to/folder` can have nested imports of arbitrary depth. The only requirement is the file called `handler.py` (assumed to be in the root folder unless otherwise specified) and a function named `handle` within this module. This serves as the entry point to the function.
If your `handler.py` file isn't in the root folder, you must specify its location via the argument `function_path` (defaults to `handler.py`).
If your function depends on other packages, you can list these packages in a `requirements.txt` file. You must place the file in the root folder. These packages will be `pip` installed when the function is deployed.
### Create a function from an uploaded zip file
You can also upload a zip file containing the function code directly to the files API and refer to its `id` when you create the function.
**Example:**
```python title="python" theme={"languages":{"custom":["/_languages/kuiper.json","../_languages/kuiper.json"]}}
from cognite import CogniteClient
client = CogniteClient(project="my-project", token="my-token")
func = client.functions.create(
name="my-function",
external_id="my-function",
file_id=123456789
)
```
The zip file must follow the same structure as when you [create a function from a folder](#create-a-function-from-a-folder) with the zip file itself as the root folder (there shouldn't be an additional root folder within the zip file).
### Additional arguments
* `function_path` (string): The relative path from the root folder to the file containing the `handle` function. Defaults to `handler.py`.
* `secrets` (dict): Secrets that will be stored securely on your function and available call-time.
* `env_vars` (dict): Environment variables that can be accessed inside your function call-time.
* `runtime` (string): The function runtime. Valid values are given in the [SDK documentation](https://cognite-sdk-python.readthedocs-hosted.com/en/latest/functions.html#create-function).
* `index_url` (string): A URL [pointing to a different package repository](https://pip.pypa.io/en/stable/cli/pip_install#cmdoption-0). It supports [basic HTTP authentication](https://pip.pypa.io/en/stable/topics/authentication#basic-http-authentication).
* `extra_index_urls` (list): A list of URLs [pointing to additional python package repositories](https://pip.pypa.io/en/stable/cli/pip_install#cmdoption-extra-index-url). Supports [basic HTTP authentication](https://pip.pypa.io/en/stable/topics/authentication#basic-http-authentication).
Be aware of the intrinsic security implications of using the `index_url` and `extra_index_urls` options. These settings can open for attacks known as **dependency confusion**, whereby the package dependency resolver incorrectly installs a public package with the same name as the intended private package.
To mitigate this: *only* use the `index_url` option **and** have your private repository server satisfy the following:
1. Mirror the public default PyPi package index. Your index should be able to serve public packages from the public index.
2. If a package name is shared between a private package in your private index and a public package in the public index, your server must explicitly choose the private package.
Some package index server tools satisfy these requirements out of the box, such as [DevPi](https://devpi.net/docs/devpi/devpi/stable/%2Bd/index.html).
Dependency confusion happens when a software installer is tricked into installing malicious software from a public index instead of the intended private index.
In the Python ecosystem, this is made possible when multiple indices are specified using the `--extra-index-url` option for pip. When installing a package, the dependency resolver will look for a package with the requested name in the default index (PyPI by default, can be overridden by `--index-url`). If the requested package isn't found there, it will look at the indices specified in `--extra-index-url`.
This means that if a malicious entity manages to guess the name of a package hosted in the additional indices, the entity can upload a package with the same name to the public package index containing malicious code. When resolving, if the package version isn't pinned, pip will choose the package with the highest version number. Therefore, if the malicious package has the highest version number, it will be chosen by pip. The user can, to some degree, mitigate this risk by pinning the package version. In that case, pip will pull the package from the private index if that particular version only exists there. However, if the version exists in both indices, the behavior is undefined, and you can't determine which index pip will pull the package from.
The article [3 Ways to Mitigate Risk When Using Private Package Feeds](https://azure.microsoft.com/en-gb/resources/3-ways-to-mitigate-risk-using-private-package-feeds) by Microsoft is a good introduction to the dependency confusion problem.
For a complete list of arguments, see [the SDK documentation](https://cognite-sdk-python.readthedocs-hosted.com/en/latest/index.html).
## The function definition
The entry point of your function, which must be a synchronous Python function, must be named `handle` with any of the following arguments:
* `client` - a pre-instantiated `CogniteClient` automatically available inside your function call-time. It's instantiated with the same permissions as the entity calling the function (on-behalf-of flow). Note that the `client` argument is only specified when you **define** the function but **not** when you **call** it; the client is automatically provided when you call it.
* `data` - (dict) any data you send to your function.
**Secrets** or other confidential information shouldn't be passed via this argument. Use the dedicated `secrets` argument in functions.client.create() for this purpose.
* `secrets` - (dict) serves as a way to send sensitive information to your function that must be available when calling it. You can provide these secrets as a dictionary via the secrets argument in `client.functions.create()`.
* `function_call_info` - (dict) contains information about the function being called. It has the keys `function_id`, `call_id`, and if the call is scheduled, the keys `schedule_id` and `scheduled_time`.
The only requirement for the return of your function is that it's JSON-serializable (and on GCP, is less than 1 MB in size). In general, we recommend that you pass small amounts of data to and from functions and instead read from and write to CDF directly from within your function.
The function `client.functions.create()` returns a function object with various metadata. One of the properties of this object is `status` which will start with `Queued`, change to `Deploying` when the deploy process has started, and end in `Ready` if the build was successful, or `Failed` if it failed. You must wait until the function is `Ready` before calling it. This typically takes about 3–10 minutes. To retrieve the latest status of your function, do:
```python theme={"languages":{"custom":["/_languages/kuiper.json","../_languages/kuiper.json"]}}
func.update()
```
The function object also exposes a `last_called` property (UNIX timestamp in milliseconds) recording the last time the function was called. It is `None` if the function has never been called.
## Call a function
When your function is **Ready**, you can call it.
**Example:**
```python title="python" theme={"languages":{"custom":["/_languages/kuiper.json","../_languages/kuiper.json"]}}
call = func.call(data={"assetNo": 0})
```
Note that you don't pass a `client` here, even though it's part of the function definition. You get it automatically inside the function.
When the function is called, a session is created on behalf of the user, and the client inside the function inherits the user's permissions and scopes.
The client is instantiated with a fresh access token based on the newly created session.
The call object has metadata about the call, but not the response itself:
```python title="python" theme={"languages":{"custom":["/_languages/kuiper.json","../_languages/kuiper.json"]}}
{
"id": 1234,
"start_time": "2020-07-15 08:23:17",
"end_time": "2020-07-15 08:25:15",
"status": "Completed",
"function_id": 456789
}
```
To retrieve the response:
```python theme={"languages":{"custom":["/_languages/kuiper.json","../_languages/kuiper.json"]}}
call.get_response()
```
To get the logs:
```python theme={"languages":{"custom":["/_languages/kuiper.json","../_languages/kuiper.json"]}}
call.get_logs()
```
All print statements appear in your logs. If an exception is raised, the trace-back appears in the logs.
Be careful not to print/log or return confidential information from the `handle()` function, as logs and responses are visible to anyone with `functions:read` in the project and aren't treated with the same security measures as secrets.
Functions doesn't currently support the logging module, but print statements will turn up as logs. Sometimes, importing the logging module can hide prints and exception trace-backs in the logs. If you experience `Failed` calls with no trace-back in the logs, make sure that the logging module isn't imported. If you still don't see any logs, your function probably ran out of memory during execution. You can check the memory consumption of your function locally with the Memory Profiler.
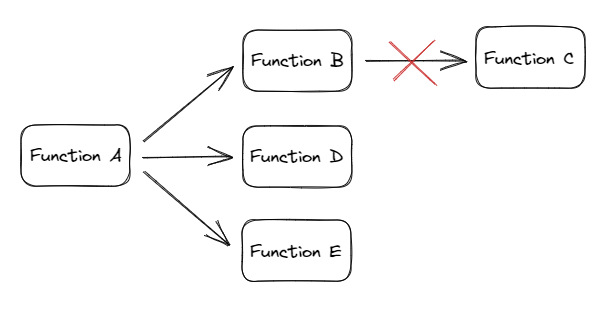
## Call a function from a function
You can call a function B from within a function A with the `client` passed through the `handle()` function. Just as a session is created for function A on behalf of the user,
a new session will be created for function B from the first sessions (so-called chained sessions). This means that the `client` in function B also will inherit the
user's permissions and scopes.
Note that you can't further call a function C from within function B in the same way. This is due to a limitation in the [sessions API](/api-reference/concepts/20230101/sessions), which only allows for chained sessions one level deep.
 ## Schedule a function
For recurring function executions, use [Data workflows](/cdf/data_workflows). Data workflows offer better error handling, retry logic, execution history, and support for data change [triggers](/cdf/data_workflows/triggers), in addition to time-based schedules.
You can also create a schedule directly on a function to run it at regular intervals. After you create a schedule, you can't modify it. Instead, delete the existing schedule and create a new one.
**Example:**
```python title="python" theme={"languages":{"custom":["/_languages/kuiper.json","../_languages/kuiper.json"]}}
schedule = client.functions.schedules.create(
name="my-schedule",
cron_expression="0 0 * * *",
function_id=123456789,
data={"assetNo": 0},
client_credentials={"client_id": "my-client-id", "client_secret": "my-client-secret"}
)
```
This example runs your function every day at 12:00 AM, as specified by the [cron expression](https://en.wikipedia.org/wiki/Cron). (The time zone for the cron expression is UTC.) You attach the schedule to your function via the `function_id` argument. Note that you must provide `client_credentials`. These will be used to create a session for the schedule, which will be kept alive for the lifetime of the schedule.
Deleting a function also deletes the associated schedule.
## Upload and run a function in Cognite Data Fusion
In addition to uploading and running functions via [the Python SDK](https://github.com/cognitedata/cognite-sdk-python) and [the API](/api-reference/concepts/20230101/functions), you can upload, run, and share functions directly from CDF at [fusion.cognite.com](#).
Choose CDF when you deploy a single function for experimental or test purposes. In CDF, you can also have an overview on all functions running in a project, and check for failed calls.
Use the SDK when you want to deploy functions that are automatable, scalable, and reusable.
Navigate to Data fusion > Build solutions > Functions.
Select **Upload function**, and drag and drop the zip file with at least a Python file called `handler.py` with a function named `handle` with any of following arguments: `data`, `client`, `secrets`, and `function_call_info`.
See [Create a function from an uploaded zip file](#create-a-function-from-an-uploaded-zip-file) for more information.
Give your function a **name** and, if necessary, fill in the optional fields.
Select **Upload**.
## Call a function from CDF
Navigate to Data fusion > Build solutions > Functions.
Choose the function you want to call, and then select **Call**.
For recurring function executions, we recommend [Data workflows](/cdf/data_workflows). Alternatively, select **Create schedule**, and enter a name, client credentials, and a cron expression that defines when your function runs.
The columns **Calls**, **Schedules**, and **Details** provide more information about the functions. You can also find information about **call status**, **response**, and **logs**.
## Technical limitations and data retention
For information about technical limitations, quotas, and data retention policies for Functions, see [Cloud provider limitations](/cdf/functions/technical).
## Schedule a function
For recurring function executions, use [Data workflows](/cdf/data_workflows). Data workflows offer better error handling, retry logic, execution history, and support for data change [triggers](/cdf/data_workflows/triggers), in addition to time-based schedules.
You can also create a schedule directly on a function to run it at regular intervals. After you create a schedule, you can't modify it. Instead, delete the existing schedule and create a new one.
**Example:**
```python title="python" theme={"languages":{"custom":["/_languages/kuiper.json","../_languages/kuiper.json"]}}
schedule = client.functions.schedules.create(
name="my-schedule",
cron_expression="0 0 * * *",
function_id=123456789,
data={"assetNo": 0},
client_credentials={"client_id": "my-client-id", "client_secret": "my-client-secret"}
)
```
This example runs your function every day at 12:00 AM, as specified by the [cron expression](https://en.wikipedia.org/wiki/Cron). (The time zone for the cron expression is UTC.) You attach the schedule to your function via the `function_id` argument. Note that you must provide `client_credentials`. These will be used to create a session for the schedule, which will be kept alive for the lifetime of the schedule.
Deleting a function also deletes the associated schedule.
## Upload and run a function in Cognite Data Fusion
In addition to uploading and running functions via [the Python SDK](https://github.com/cognitedata/cognite-sdk-python) and [the API](/api-reference/concepts/20230101/functions), you can upload, run, and share functions directly from CDF at [fusion.cognite.com](#).
Choose CDF when you deploy a single function for experimental or test purposes. In CDF, you can also have an overview on all functions running in a project, and check for failed calls.
Use the SDK when you want to deploy functions that are automatable, scalable, and reusable.
Navigate to Data fusion > Build solutions > Functions.
Select **Upload function**, and drag and drop the zip file with at least a Python file called `handler.py` with a function named `handle` with any of following arguments: `data`, `client`, `secrets`, and `function_call_info`.
See [Create a function from an uploaded zip file](#create-a-function-from-an-uploaded-zip-file) for more information.
Give your function a **name** and, if necessary, fill in the optional fields.
Select **Upload**.
## Call a function from CDF
Navigate to Data fusion > Build solutions > Functions.
Choose the function you want to call, and then select **Call**.
For recurring function executions, we recommend [Data workflows](/cdf/data_workflows). Alternatively, select **Create schedule**, and enter a name, client credentials, and a cron expression that defines when your function runs.
The columns **Calls**, **Schedules**, and **Details** provide more information about the functions. You can also find information about **call status**, **response**, and **logs**.
## Technical limitations and data retention
For information about technical limitations, quotas, and data retention policies for Functions, see [Cloud provider limitations](/cdf/functions/technical).