> ## Documentation Index
> Fetch the complete documentation index at: https://docs.cognite.com/llms.txt
> Use this file to discover all available pages before exploring further.
# Deploying the CogniteMigration data model
> Deploy the CogniteMigration data model to prepare for migration from an asset-centric to a data modeling-based Cognite Data Fusion (CDF) project.
The migration plugin is an experimental feature. Updates to the Cognite Toolkit are likely to introduce changes to the described commands and processes.
This guide walks data engineers through deploying the `CogniteMigration` data model, which stores the lineage information the migration plugin needs for later migration phases.
## Required capabilities
The following capabilities are required to run `cdf migrate prepare`:
| Capability type | Action | Scope | Description |
| --------------- | ------------------ | ------------------- | ---------------------------------------------- |
| Data models | `datamodels:write` | All | To create the space `cognite_migration` |
| Data models | `datamodels:write` | `cognite_migration` | To create the data model, views and containers |
## Deploying the CogniteMigration data model
The migration plugin requires that you store the lineage of the migration process in Cognite Data Fusion (CDF).
A user-controlled data model called `CogniteMigration` stores this lineage.
Deploy the `CogniteMigration` data model to your CDF project if it does not already exist.
```bash theme={"languages":{"custom":["/_languages/kuiper.json","../_languages/kuiper.json"]}}
cdf migrate prepare
```
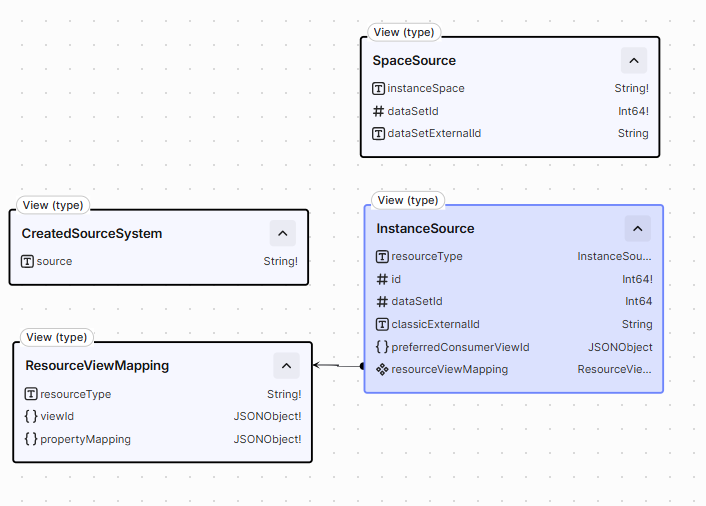
Confirm that the `CogniteMigration` data model exists in your CDF project. You should see the views described in [CogniteMigration data model structure](#cognitemigration-data-model-structure).
 ## CogniteMigration data model structure
The `CogniteMigration` data model consists of the following main concepts:
### Space Source
This concept tracks which data set each instance space was created from. Instance spaces are the **primary** access control
mechanism in data modeling. They are not equivalent to CDF data sets, as data sets are a property on the data, while spaces are
part of the identifier of the data. Later migration phases use this information to look up which
instance space to use when creating data model instances.
For more information about the data set migration, see [Data sets](/cdf/deploy/cdf_toolkit/guides/plugins/migration_plugin/datasets).
All nodes with properties in the `SpaceSource` view are expected to be located in the `cognite_migration` space.
### Created Source System
In the asset-centric schema, only assets, events, and files have a source. The source is a simple string property,
with no further structure. In the data modeling world, **CogniteSourceSystem** is a first-class concept that can store
more information about the source system. Assets, time series, activities, and files all have a pointer to a
CogniteSourceSystem.
To migrate the source property, the migration plugin tracks which source strings map to which `CogniteSourceSystem` identifier.
For more information about source system migration, see [Source system](/cdf/deploy/cdf_toolkit/guides/plugins/migration_plugin/source_systems).
All nodes with properties in the `CreatedSourceSystem` view are expected to be located in the `cognite_migration` space.
### Resource View Mapping
To migrate from asset-centric to data modeling-based CDF projects, you need to have mappings from the asset-centric
resources to the data model resources. These mappings are stored in this view. You govern the resource-to-view mappings, making them reusable across CDF projects. You can also define multiple mappings for each resource type. For example, you can have one mapping from asset to wind turbine, and another
from asset to wind farm.
When you run `cdf migrate prepare`, the Cognite Toolkit deploys several default resource view mappings to help you get
started. These default mappings are for each resource type and map to the appropriate view in the Cognite Core
data model.
All nodes with properties in the `ResourceViewMapping` view are expected to be located in the `cognite_migration` space.
### Instance Source
When you migrate assets, events, time series, and file metadata, the Cognite Toolkit stores the lineage: which source resource maps to which data modeling instance. Application-level and access management migration need this mapping for dependent resources. For example, Charts and Canvas contain references to assets, time series, and files. The Cognite Toolkit uses the lineage to update those references to the new instances.
You can also set the preferred consumer view for each instance. The Charts and Canvas migration uses this setting
to select which view to use when looking at the data modeling instance.
After you migrate assets, events, time series, and file metadata, the InstanceSource view contains one entry for each migrated resource.
This **does not impact the instance budget** of your CDF project. Each migrated resource is already one instance, and adding
properties in the InstanceSource view does not increase the instance count.
**Do not delete** the instances in this view. They are the migrated assets, events, time series, and files.
After you complete the migration, delete the **CogniteMigration** data model instead. Deleting the data model
removes only the lineage data and leaves the migrated instances in place.
## Manual population of the CogniteMigration data model
If you are **not** migrating Charts, Canvas, annotations, Cognite InField, or 3D models using the migration plugin, you can skip this section.
The Cognite Toolkit populates the `CogniteMigration` data model automatically when you migrate data sets, source systems, assets,
events, time series, and file metadata. If you skip those commands — for example, by updating your data pipelines to write to
data modeling instances instead of asset-centric resources — you must add the lineage yourself. You need that lineage to
migrate Charts, Canvas, annotations, InField, and 3D models.
### Example of manually creating lineage using the Cognite SDK
This example uses the Cognite Python SDK (`cognite-sdk`) to create lineage from the asset `my_source_asset` to the instance
`my_migrated_asset` in the `destination_space` space. It also sets the preferred consumer view to
`MyCogniteAssetExtension` in the `my_schema_space` space. Charts and Canvas use that view when they display the asset.
Before you run this snippet, deploy the `CogniteMigration` data model. The asset `my_source_asset` and the
instance `my_migrated_asset` must already exist in your CDF project.
```python theme={"languages":{"custom":["/_languages/kuiper.json","../_languages/kuiper.json"]}}
from cognite.client import CogniteClient
from cognite.client import data_modeling as dm
client = CogniteClient()
# These two calls are not necessary, you can get the NodeId and asset IDs from anywhere you would like.
# They are here just to illustrate that these are expected to exist in CDF.
my_migrated_node = client.data_modeling.instances.retrieve(dm.NodeId("destination_space", "my_migrated_asset")).nodes[0]
my_source_asset = client.assets.retrieve(external_id="my_source_asset")
lineage_data = dm.NodeApply(
space=my_migrated_node.space,
external_id=my_migrated_node.external_id,
sources=[
dm.NodeOrEdgeData(
source=dm.ViewId("cognite_migration", "InstanceSource", "v1"),
properties={
"resourceType": "asset",
"id": my_source_asset.id,
"dataSetId": my_source_asset.data_set_id,
"classicExternalId": my_source_asset.external_id,
"preferredConsumerViewId": dm.ViewId(
"my_schema_space",
"MyCogniteAssetExtension",
"v1"
).dump(camel_case=True)
}
)
]
)
client.data_modeling.instances.apply(lineage_data)
```
### Example of manually creating lineage using the data plugin
You can use the Cognite Toolkit [data plugin](/cdf/deploy/cdf_toolkit/guides/plugins/data_plugin) to download the source data,
create the lineage data offline, and then upload it using the data plugin. This takes advantage of
the data plugin's optimized upload and download functionality.
To enable the data plugin, enable it in your `cdf.toml` file. You also have
to enable the alpha flags that extend the download and upload functionality of the data plugin.
```toml title="cdf.toml" theme={"languages":{"custom":["/_languages/kuiper.json","../_languages/kuiper.json"]}}
[plugins]
data = true
[alpha_flags]
extend-download = true
extend-upload = true
```
For example, if you want to download all assets in the `my_source_assets` data set, you can run the following command:
```bash theme={"languages":{"custom":["/_languages/kuiper.json","../_languages/kuiper.json"]}}
cdf data download assets --data-set my_source_assets --limit -1 --format csv --output-dir data --api-format response
```
This downloads all the assets in the `my_source_assets` data set to the `data/` directory in CSV format.
You can then create the lineage data offline, using for example Pandas:
```python title="create_lineage.py" theme={"languages":{"custom":["/_languages/kuiper.json","../_languages/kuiper.json"]}}
import pandas as pd
from pathlib import Path
from cognite.client import data_modeling as dm
asset_df = pd.read_csv("data/asset-centric-assets/Assets-part-0000.Assets.csv")
lineage_df = asset_df[["id", "dataSetId", "externalId"]].rename(columns={"externalId": "classicExternalId"}).copy()
# Assuming all assets have been migrated to the same space,
# This part can contain more complex logic
lineage_df["space"] = "my_space"
# Assuming the same externalId for each asset.
lineage_df["externalId"] = lineage_df["classicExternalId"]
# Assuming the preferred view to see these assets through in
# Canvas and Charts is the CogniteAsset. This is most likely your
# custom extension.
lineage_df["preferredConsumerViewId"] = str(dm.ViewId("cdf_cdm", "CogniteAsset", "v1").dump(camel_case=True))
lineage_df["resourceType"] = "asset"
destination = Path("data/lineage/lineage.csv")
destination.parent.mkdir(parents=True, exist_ok=True)
lineage_df.to_csv(destination, index=False)
```
Next, create a manifest file specifying the InstanceSource view. Use the same base name for this file as the file
containing the lineage data itself (here, `lineage`) and add the `.Manifest.yaml` suffix to the file name:
```yaml title="data/lineage/lineage.Manifest.yaml" theme={"languages":{"custom":["/_languages/kuiper.json","../_languages/kuiper.json"]}}
kind: Instances
type: instanceView
instanceType: node
view:
space: cognite_migration
externalId: InstanceSource
version: v1
```
Now upload the lineage data to CDF using the data plugin:
```bash theme={"languages":{"custom":["/_languages/kuiper.json","../_languages/kuiper.json"]}}
cdf data upload dir data/lineage
```
## Further reading
* [Migrating data sets](/cdf/deploy/cdf_toolkit/guides/plugins/migration_plugin/datasets)
* [Creating a data model and mappings](/cdf/deploy/cdf_toolkit/guides/plugins/migration_plugin/data_model_migration)
* [Migration overview](/cdf/deploy/cdf_toolkit/guides/plugins/migration_plugin/steps)
## CogniteMigration data model structure
The `CogniteMigration` data model consists of the following main concepts:
### Space Source
This concept tracks which data set each instance space was created from. Instance spaces are the **primary** access control
mechanism in data modeling. They are not equivalent to CDF data sets, as data sets are a property on the data, while spaces are
part of the identifier of the data. Later migration phases use this information to look up which
instance space to use when creating data model instances.
For more information about the data set migration, see [Data sets](/cdf/deploy/cdf_toolkit/guides/plugins/migration_plugin/datasets).
All nodes with properties in the `SpaceSource` view are expected to be located in the `cognite_migration` space.
### Created Source System
In the asset-centric schema, only assets, events, and files have a source. The source is a simple string property,
with no further structure. In the data modeling world, **CogniteSourceSystem** is a first-class concept that can store
more information about the source system. Assets, time series, activities, and files all have a pointer to a
CogniteSourceSystem.
To migrate the source property, the migration plugin tracks which source strings map to which `CogniteSourceSystem` identifier.
For more information about source system migration, see [Source system](/cdf/deploy/cdf_toolkit/guides/plugins/migration_plugin/source_systems).
All nodes with properties in the `CreatedSourceSystem` view are expected to be located in the `cognite_migration` space.
### Resource View Mapping
To migrate from asset-centric to data modeling-based CDF projects, you need to have mappings from the asset-centric
resources to the data model resources. These mappings are stored in this view. You govern the resource-to-view mappings, making them reusable across CDF projects. You can also define multiple mappings for each resource type. For example, you can have one mapping from asset to wind turbine, and another
from asset to wind farm.
When you run `cdf migrate prepare`, the Cognite Toolkit deploys several default resource view mappings to help you get
started. These default mappings are for each resource type and map to the appropriate view in the Cognite Core
data model.
All nodes with properties in the `ResourceViewMapping` view are expected to be located in the `cognite_migration` space.
### Instance Source
When you migrate assets, events, time series, and file metadata, the Cognite Toolkit stores the lineage: which source resource maps to which data modeling instance. Application-level and access management migration need this mapping for dependent resources. For example, Charts and Canvas contain references to assets, time series, and files. The Cognite Toolkit uses the lineage to update those references to the new instances.
You can also set the preferred consumer view for each instance. The Charts and Canvas migration uses this setting
to select which view to use when looking at the data modeling instance.
After you migrate assets, events, time series, and file metadata, the InstanceSource view contains one entry for each migrated resource.
This **does not impact the instance budget** of your CDF project. Each migrated resource is already one instance, and adding
properties in the InstanceSource view does not increase the instance count.
**Do not delete** the instances in this view. They are the migrated assets, events, time series, and files.
After you complete the migration, delete the **CogniteMigration** data model instead. Deleting the data model
removes only the lineage data and leaves the migrated instances in place.
## Manual population of the CogniteMigration data model
If you are **not** migrating Charts, Canvas, annotations, Cognite InField, or 3D models using the migration plugin, you can skip this section.
The Cognite Toolkit populates the `CogniteMigration` data model automatically when you migrate data sets, source systems, assets,
events, time series, and file metadata. If you skip those commands — for example, by updating your data pipelines to write to
data modeling instances instead of asset-centric resources — you must add the lineage yourself. You need that lineage to
migrate Charts, Canvas, annotations, InField, and 3D models.
### Example of manually creating lineage using the Cognite SDK
This example uses the Cognite Python SDK (`cognite-sdk`) to create lineage from the asset `my_source_asset` to the instance
`my_migrated_asset` in the `destination_space` space. It also sets the preferred consumer view to
`MyCogniteAssetExtension` in the `my_schema_space` space. Charts and Canvas use that view when they display the asset.
Before you run this snippet, deploy the `CogniteMigration` data model. The asset `my_source_asset` and the
instance `my_migrated_asset` must already exist in your CDF project.
```python theme={"languages":{"custom":["/_languages/kuiper.json","../_languages/kuiper.json"]}}
from cognite.client import CogniteClient
from cognite.client import data_modeling as dm
client = CogniteClient()
# These two calls are not necessary, you can get the NodeId and asset IDs from anywhere you would like.
# They are here just to illustrate that these are expected to exist in CDF.
my_migrated_node = client.data_modeling.instances.retrieve(dm.NodeId("destination_space", "my_migrated_asset")).nodes[0]
my_source_asset = client.assets.retrieve(external_id="my_source_asset")
lineage_data = dm.NodeApply(
space=my_migrated_node.space,
external_id=my_migrated_node.external_id,
sources=[
dm.NodeOrEdgeData(
source=dm.ViewId("cognite_migration", "InstanceSource", "v1"),
properties={
"resourceType": "asset",
"id": my_source_asset.id,
"dataSetId": my_source_asset.data_set_id,
"classicExternalId": my_source_asset.external_id,
"preferredConsumerViewId": dm.ViewId(
"my_schema_space",
"MyCogniteAssetExtension",
"v1"
).dump(camel_case=True)
}
)
]
)
client.data_modeling.instances.apply(lineage_data)
```
### Example of manually creating lineage using the data plugin
You can use the Cognite Toolkit [data plugin](/cdf/deploy/cdf_toolkit/guides/plugins/data_plugin) to download the source data,
create the lineage data offline, and then upload it using the data plugin. This takes advantage of
the data plugin's optimized upload and download functionality.
To enable the data plugin, enable it in your `cdf.toml` file. You also have
to enable the alpha flags that extend the download and upload functionality of the data plugin.
```toml title="cdf.toml" theme={"languages":{"custom":["/_languages/kuiper.json","../_languages/kuiper.json"]}}
[plugins]
data = true
[alpha_flags]
extend-download = true
extend-upload = true
```
For example, if you want to download all assets in the `my_source_assets` data set, you can run the following command:
```bash theme={"languages":{"custom":["/_languages/kuiper.json","../_languages/kuiper.json"]}}
cdf data download assets --data-set my_source_assets --limit -1 --format csv --output-dir data --api-format response
```
This downloads all the assets in the `my_source_assets` data set to the `data/` directory in CSV format.
You can then create the lineage data offline, using for example Pandas:
```python title="create_lineage.py" theme={"languages":{"custom":["/_languages/kuiper.json","../_languages/kuiper.json"]}}
import pandas as pd
from pathlib import Path
from cognite.client import data_modeling as dm
asset_df = pd.read_csv("data/asset-centric-assets/Assets-part-0000.Assets.csv")
lineage_df = asset_df[["id", "dataSetId", "externalId"]].rename(columns={"externalId": "classicExternalId"}).copy()
# Assuming all assets have been migrated to the same space,
# This part can contain more complex logic
lineage_df["space"] = "my_space"
# Assuming the same externalId for each asset.
lineage_df["externalId"] = lineage_df["classicExternalId"]
# Assuming the preferred view to see these assets through in
# Canvas and Charts is the CogniteAsset. This is most likely your
# custom extension.
lineage_df["preferredConsumerViewId"] = str(dm.ViewId("cdf_cdm", "CogniteAsset", "v1").dump(camel_case=True))
lineage_df["resourceType"] = "asset"
destination = Path("data/lineage/lineage.csv")
destination.parent.mkdir(parents=True, exist_ok=True)
lineage_df.to_csv(destination, index=False)
```
Next, create a manifest file specifying the InstanceSource view. Use the same base name for this file as the file
containing the lineage data itself (here, `lineage`) and add the `.Manifest.yaml` suffix to the file name:
```yaml title="data/lineage/lineage.Manifest.yaml" theme={"languages":{"custom":["/_languages/kuiper.json","../_languages/kuiper.json"]}}
kind: Instances
type: instanceView
instanceType: node
view:
space: cognite_migration
externalId: InstanceSource
version: v1
```
Now upload the lineage data to CDF using the data plugin:
```bash theme={"languages":{"custom":["/_languages/kuiper.json","../_languages/kuiper.json"]}}
cdf data upload dir data/lineage
```
## Further reading
* [Migrating data sets](/cdf/deploy/cdf_toolkit/guides/plugins/migration_plugin/datasets)
* [Creating a data model and mappings](/cdf/deploy/cdf_toolkit/guides/plugins/migration_plugin/data_model_migration)
* [Migration overview](/cdf/deploy/cdf_toolkit/guides/plugins/migration_plugin/steps)