> ## Documentation Index
> Fetch the complete documentation index at: https://docs.cognite.com/llms.txt
> Use this file to discover all available pages before exploring further.
# Setting up Azure DevOps pipelines
> Step-by-step guide to automate Cognite Toolkit deployments using Azure DevOps Pipelines with version control.
This guide helps you set up the Cognite Toolkit in Azure DevOps Pipelines to automate the deployment of your modules with version control and continuous integration.
**Prerequisites:**
* Access to an Azure DevOps project with pipeline creation permissions
* A CDF project with [authentication configured](/cdf/deploy/cdf_toolkit/guides/auth) for the Cognite Toolkit
* The Cognite Toolkit [installed and configured](/cdf/deploy/cdf_toolkit/guides/setup) locally
* A Git repository connected to Azure DevOps
You'll set up two pipelines: one for validating pull requests (CI) and one for automatic deployments (CD).
## Add pipelines to your repository
In a terminal, run these commands and select **Azure DevOps** as the CI/CD provider to create a folder with example pipelines:
```sh theme={"languages":{"custom":["/_languages/kuiper.json","../_languages/kuiper.json"]}}
git switch -c add-ado-pipelines
cdf repo init
```
The example pipelines are created in a `.devops` folder in your repository.
Adapt the pipelines to your needs, and then commit the changes to a new branch and push it to your repository:
```sh theme={"languages":{"custom":["/_languages/kuiper.json","../_languages/kuiper.json"]}}
git add .devops
git commit -m "Adding Toolkit pipelines"
git push -u origin add-ado-pipelines
```
Create a pull request to merge the `add-ado-pipelines` branch into `main`.
After merging, the `.devops` folder with pipeline configuration files is available in your main branch.
## Enable pull request validation (CI)
Automatic validation ensures that modules are valid before merging pull requests into the main branch.
1. In your [DevOps project](https://dev.azure.com), navigate to Pipelines.
2. Select New pipeline.
3. Select the repository you pushed the changes to.
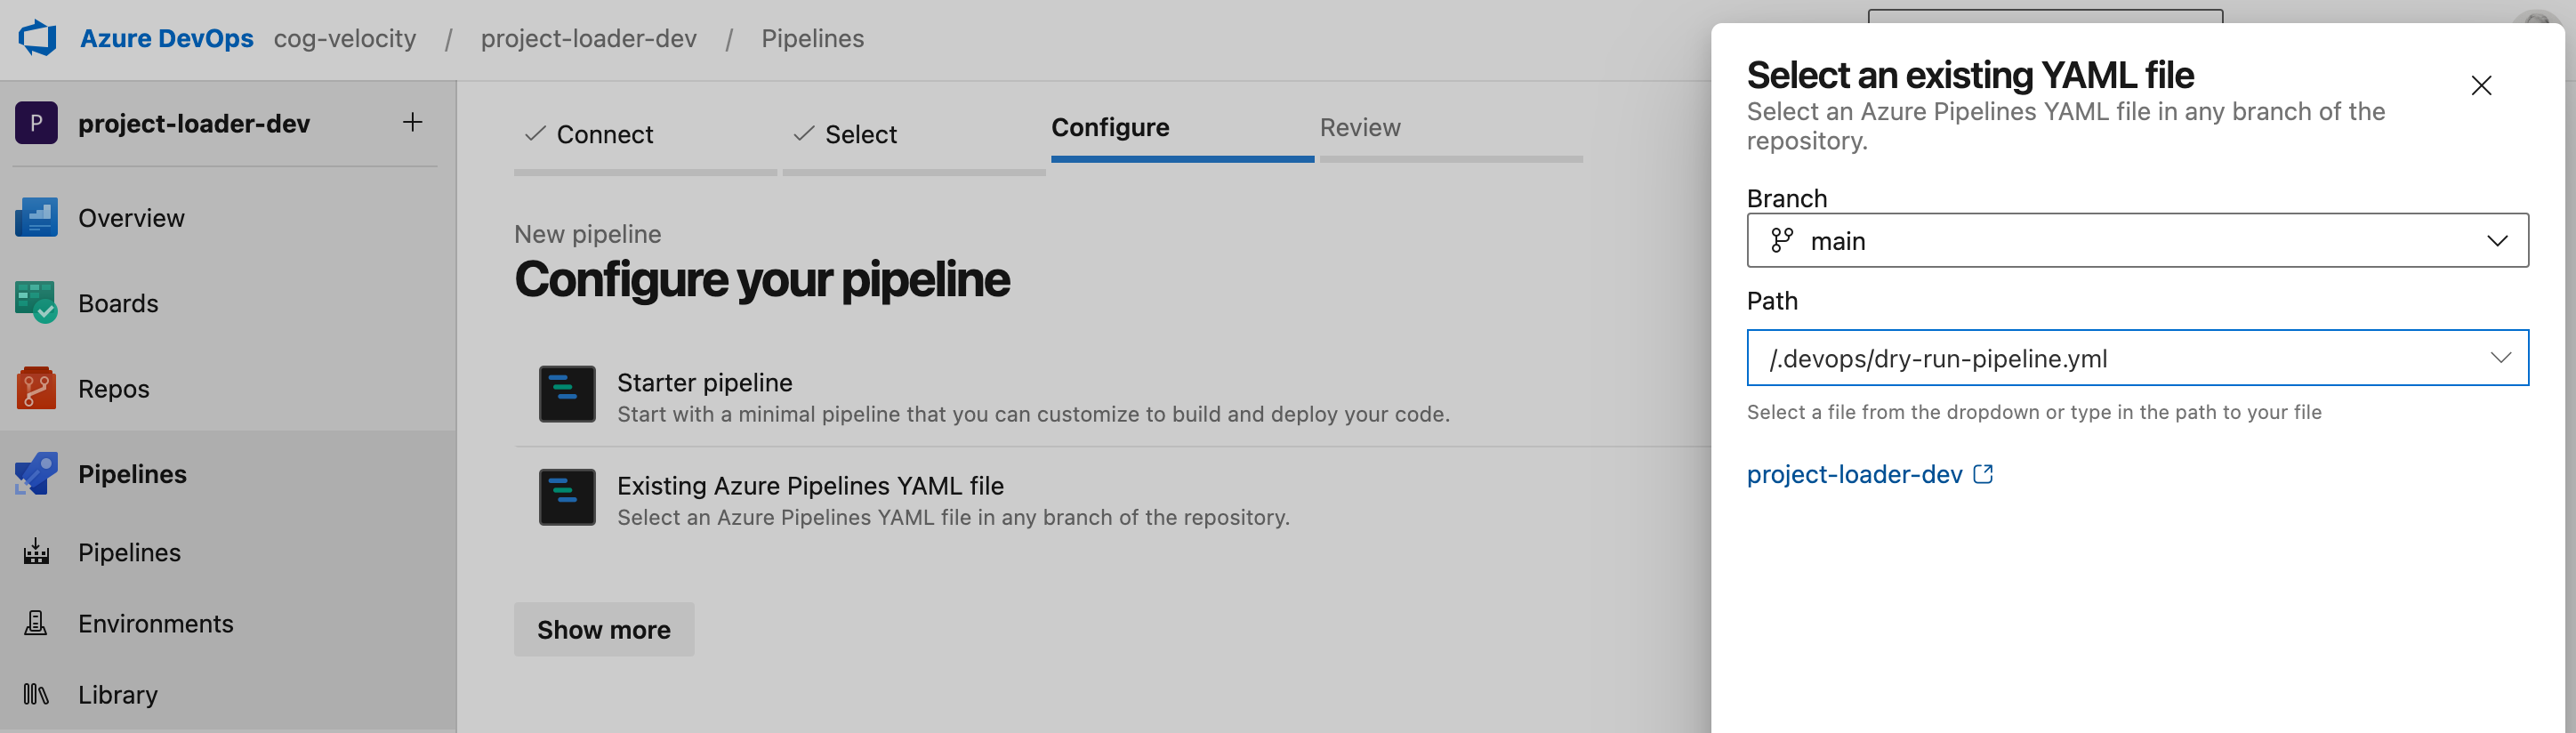
4. Select Existing Azure Pipelines YAML file and specify:
* **Branch**: main
* **Path**: `./.devops/dry-run-pipeline.yml`
 5. Select Save (alternative to the **Run** button).
6. In the pipeline overview, click the three dots and select Rename/move to set a descriptive name, for example "Pull request checks".
1. In your DevOps project, navigate to Pipelines > Library.
2. Select + Variable group.
3. Create a variable group with the name `dev-toolkit-credentials`.
4. Select Pipeline permissions and grant access to the pipelines that should use these credentials.
5. Add these variables with the correct values for your environment:
* `CDF_CLUSTER` - Your CDF cluster (e.g., westeurope-1)
* `CDF_PROJECT` - Your CDF project name
* `LOGIN_FLOW` - Set to `client_credentials`
* `IDP_CLIENT_ID` - Your application client ID
* `IDP_CLIENT_SECRET` - Your client secret (**important**: mark as secret using the padlock icon)
* `IDP_TOKEN_URL` - Your token URL (if not using Entra ID)
For Entra ID, the `IDP_TOKEN_URL` is automatically configured. Only set this variable if you're using a different identity provider.
1. In your DevOps project, navigate to Repos > Branches.
2. Click the three dots next to the `main` branch and select Branch policies.
3. Under Build Validation, click the `+` button.
4. Select the dry-run pipeline you created.
5. Set the minimum number of reviewers to 1.
All new pull requests now require a successful build and dry-run before merging.
## Set up automatic deployment (CD)
Automatically deploy modules when changes are pushed to the main branch.
1. In your [DevOps project](https://dev.azure.com), navigate to Pipelines.
2. Select New pipeline.
3. Select your repository.
4. Select Existing Azure Pipelines YAML file and specify:
* **Branch**: main
* **Path**: `./.devops/deploy-pipeline.yml`
5. Select Save (alternative to the **Run** button).
1. In your DevOps project, navigate to Pipelines > Library.
2. Select + Variable group.
3. Create a variable group with the name `-toolkit-credentials` (e.g., `prod-toolkit-credentials` for production).
4. Select Pipeline permissions and grant access to the deployment pipeline.
5. Add these variables with the correct values for your target environment:
* `CDF_CLUSTER` - Your CDF cluster
* `CDF_PROJECT` - Your CDF project name
* `LOGIN_FLOW` - Set to `client_credentials`
* `IDP_CLIENT_ID` - Your application client ID
* `IDP_CLIENT_SECRET` - Your client secret (**important**: mark as secret using the padlock icon)
* `IDP_TOKEN_URL` - Your token URL (if not using Entra ID)
Use separate variable groups and credentials for each environment (dev, test, prod) to maintain proper security boundaries.
The pipeline now automatically deploys modules when changes are pushed to the main branch.
5. Select Save (alternative to the **Run** button).
6. In the pipeline overview, click the three dots and select Rename/move to set a descriptive name, for example "Pull request checks".
1. In your DevOps project, navigate to Pipelines > Library.
2. Select + Variable group.
3. Create a variable group with the name `dev-toolkit-credentials`.
4. Select Pipeline permissions and grant access to the pipelines that should use these credentials.
5. Add these variables with the correct values for your environment:
* `CDF_CLUSTER` - Your CDF cluster (e.g., westeurope-1)
* `CDF_PROJECT` - Your CDF project name
* `LOGIN_FLOW` - Set to `client_credentials`
* `IDP_CLIENT_ID` - Your application client ID
* `IDP_CLIENT_SECRET` - Your client secret (**important**: mark as secret using the padlock icon)
* `IDP_TOKEN_URL` - Your token URL (if not using Entra ID)
For Entra ID, the `IDP_TOKEN_URL` is automatically configured. Only set this variable if you're using a different identity provider.
1. In your DevOps project, navigate to Repos > Branches.
2. Click the three dots next to the `main` branch and select Branch policies.
3. Under Build Validation, click the `+` button.
4. Select the dry-run pipeline you created.
5. Set the minimum number of reviewers to 1.
All new pull requests now require a successful build and dry-run before merging.
## Set up automatic deployment (CD)
Automatically deploy modules when changes are pushed to the main branch.
1. In your [DevOps project](https://dev.azure.com), navigate to Pipelines.
2. Select New pipeline.
3. Select your repository.
4. Select Existing Azure Pipelines YAML file and specify:
* **Branch**: main
* **Path**: `./.devops/deploy-pipeline.yml`
5. Select Save (alternative to the **Run** button).
1. In your DevOps project, navigate to Pipelines > Library.
2. Select + Variable group.
3. Create a variable group with the name `-toolkit-credentials` (e.g., `prod-toolkit-credentials` for production).
4. Select Pipeline permissions and grant access to the deployment pipeline.
5. Add these variables with the correct values for your target environment:
* `CDF_CLUSTER` - Your CDF cluster
* `CDF_PROJECT` - Your CDF project name
* `LOGIN_FLOW` - Set to `client_credentials`
* `IDP_CLIENT_ID` - Your application client ID
* `IDP_CLIENT_SECRET` - Your client secret (**important**: mark as secret using the padlock icon)
* `IDP_TOKEN_URL` - Your token URL (if not using Entra ID)
Use separate variable groups and credentials for each environment (dev, test, prod) to maintain proper security boundaries.
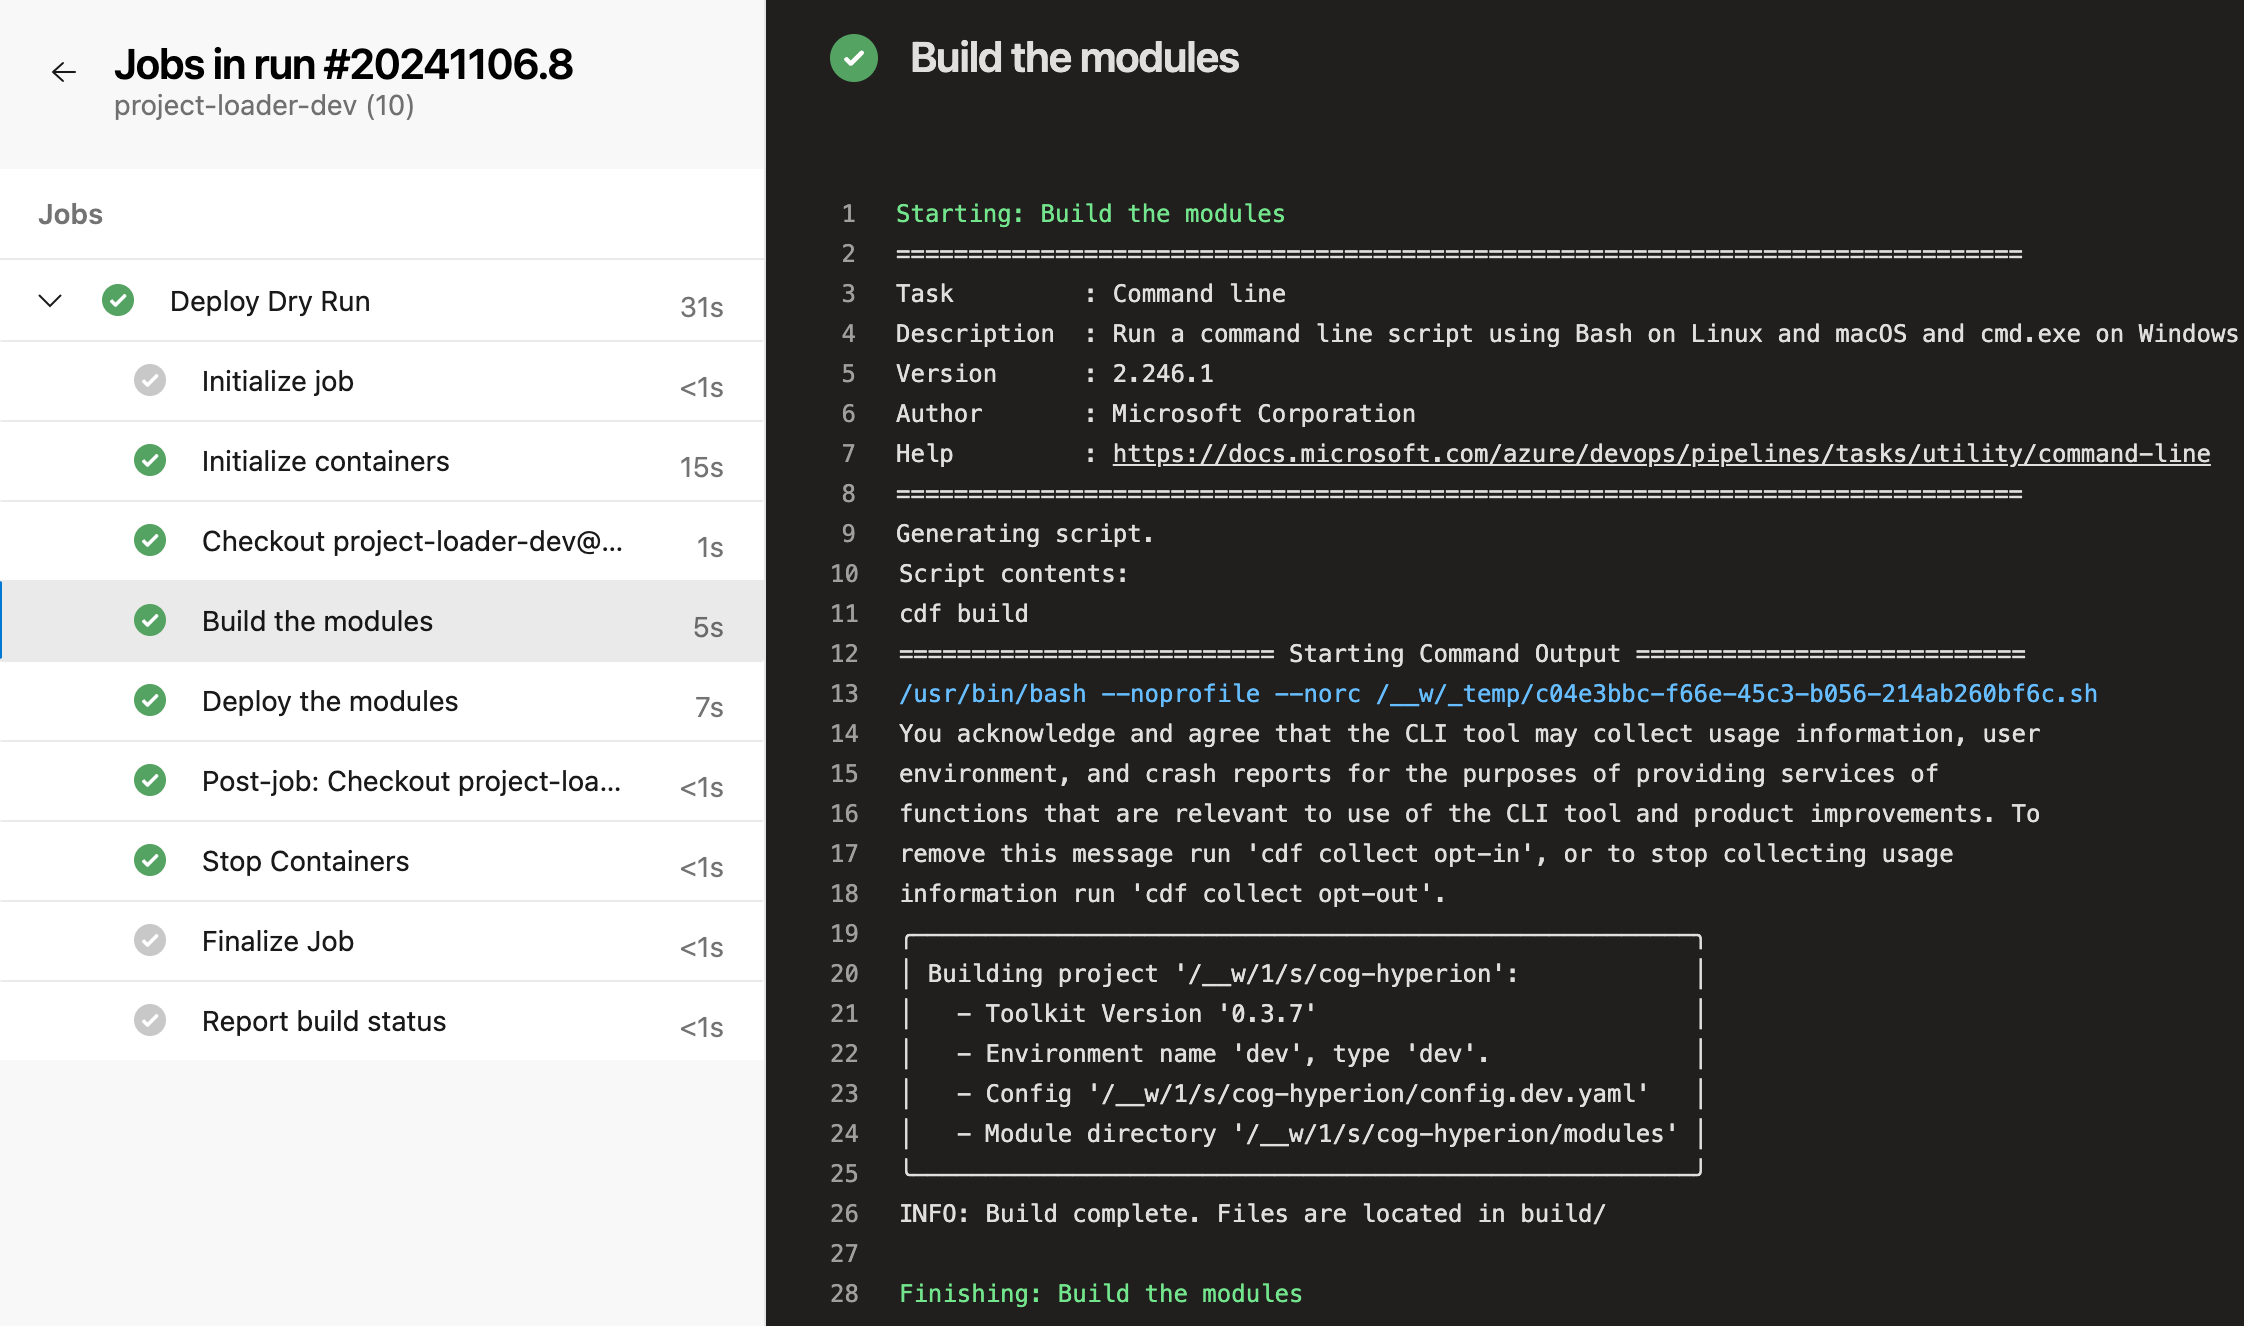
The pipeline now automatically deploys modules when changes are pushed to the main branch.
 ## Troubleshooting
### OAuth 2 MUST utilize https error
**Error message:**
```
authlib.auth2.rfc6749.errors.InsecuretransportError: OAuth 2 MUST utilize https.
```
**Solution:**
This error indicates incorrectly configured environment variables. Verify that all environment variables are set correctly in your variable group, particularly the `IDP_TOKEN_URL` which must use HTTPS.
## Troubleshooting
### OAuth 2 MUST utilize https error
**Error message:**
```
authlib.auth2.rfc6749.errors.InsecuretransportError: OAuth 2 MUST utilize https.
```
**Solution:**
This error indicates incorrectly configured environment variables. Verify that all environment variables are set correctly in your variable group, particularly the `IDP_TOKEN_URL` which must use HTTPS.