> ## Documentation Index
> Fetch the complete documentation index at: https://docs.cognite.com/llms.txt
> Use this file to discover all available pages before exploring further.
# Power BI REST API connector
> Use the Power BI REST API connector to fetch data with Cognite's OData services or other Cognite APIs using GET, POST, and GraphQL queries.
## Select data access method
The REST API connector provides three ways to access Cognite Data Fusion (CDF) data:
| Method | Best for | Performance | Coding required |
| -------------------------- | --------------------------------------------------------------- | ---------------- | ----------------- |
| **OData services** | Quick exploration, simple queries, no-code users | Baseline | No |
| **GraphQL** | CDF data Models, precise field selection | Good | Minimal |
| **Direct REST (GET/POST)** | Large data sets, complex integrations, full Cognite API support | Up to 10x faster | Yes (Power Query) |
Start with OData for simplicity. Use GraphQL for data models. Switch to direct REST calls when you need maximum performance or access to specific Cognite APIs.
Download the [Power BI template](/cdf/dashboards/references/rest/powerbi_rest_examples#power-bi-template) with pre-configured utility functions and helper queries to get started faster.
## Connect to Cognite Data Fusion from Power Query Desktop
Follow these steps to connect a **Cognite Data Fusion** (CDF) project as a data source in Power BI.
In **Power BI Desktop**, sign in with your organizational account.
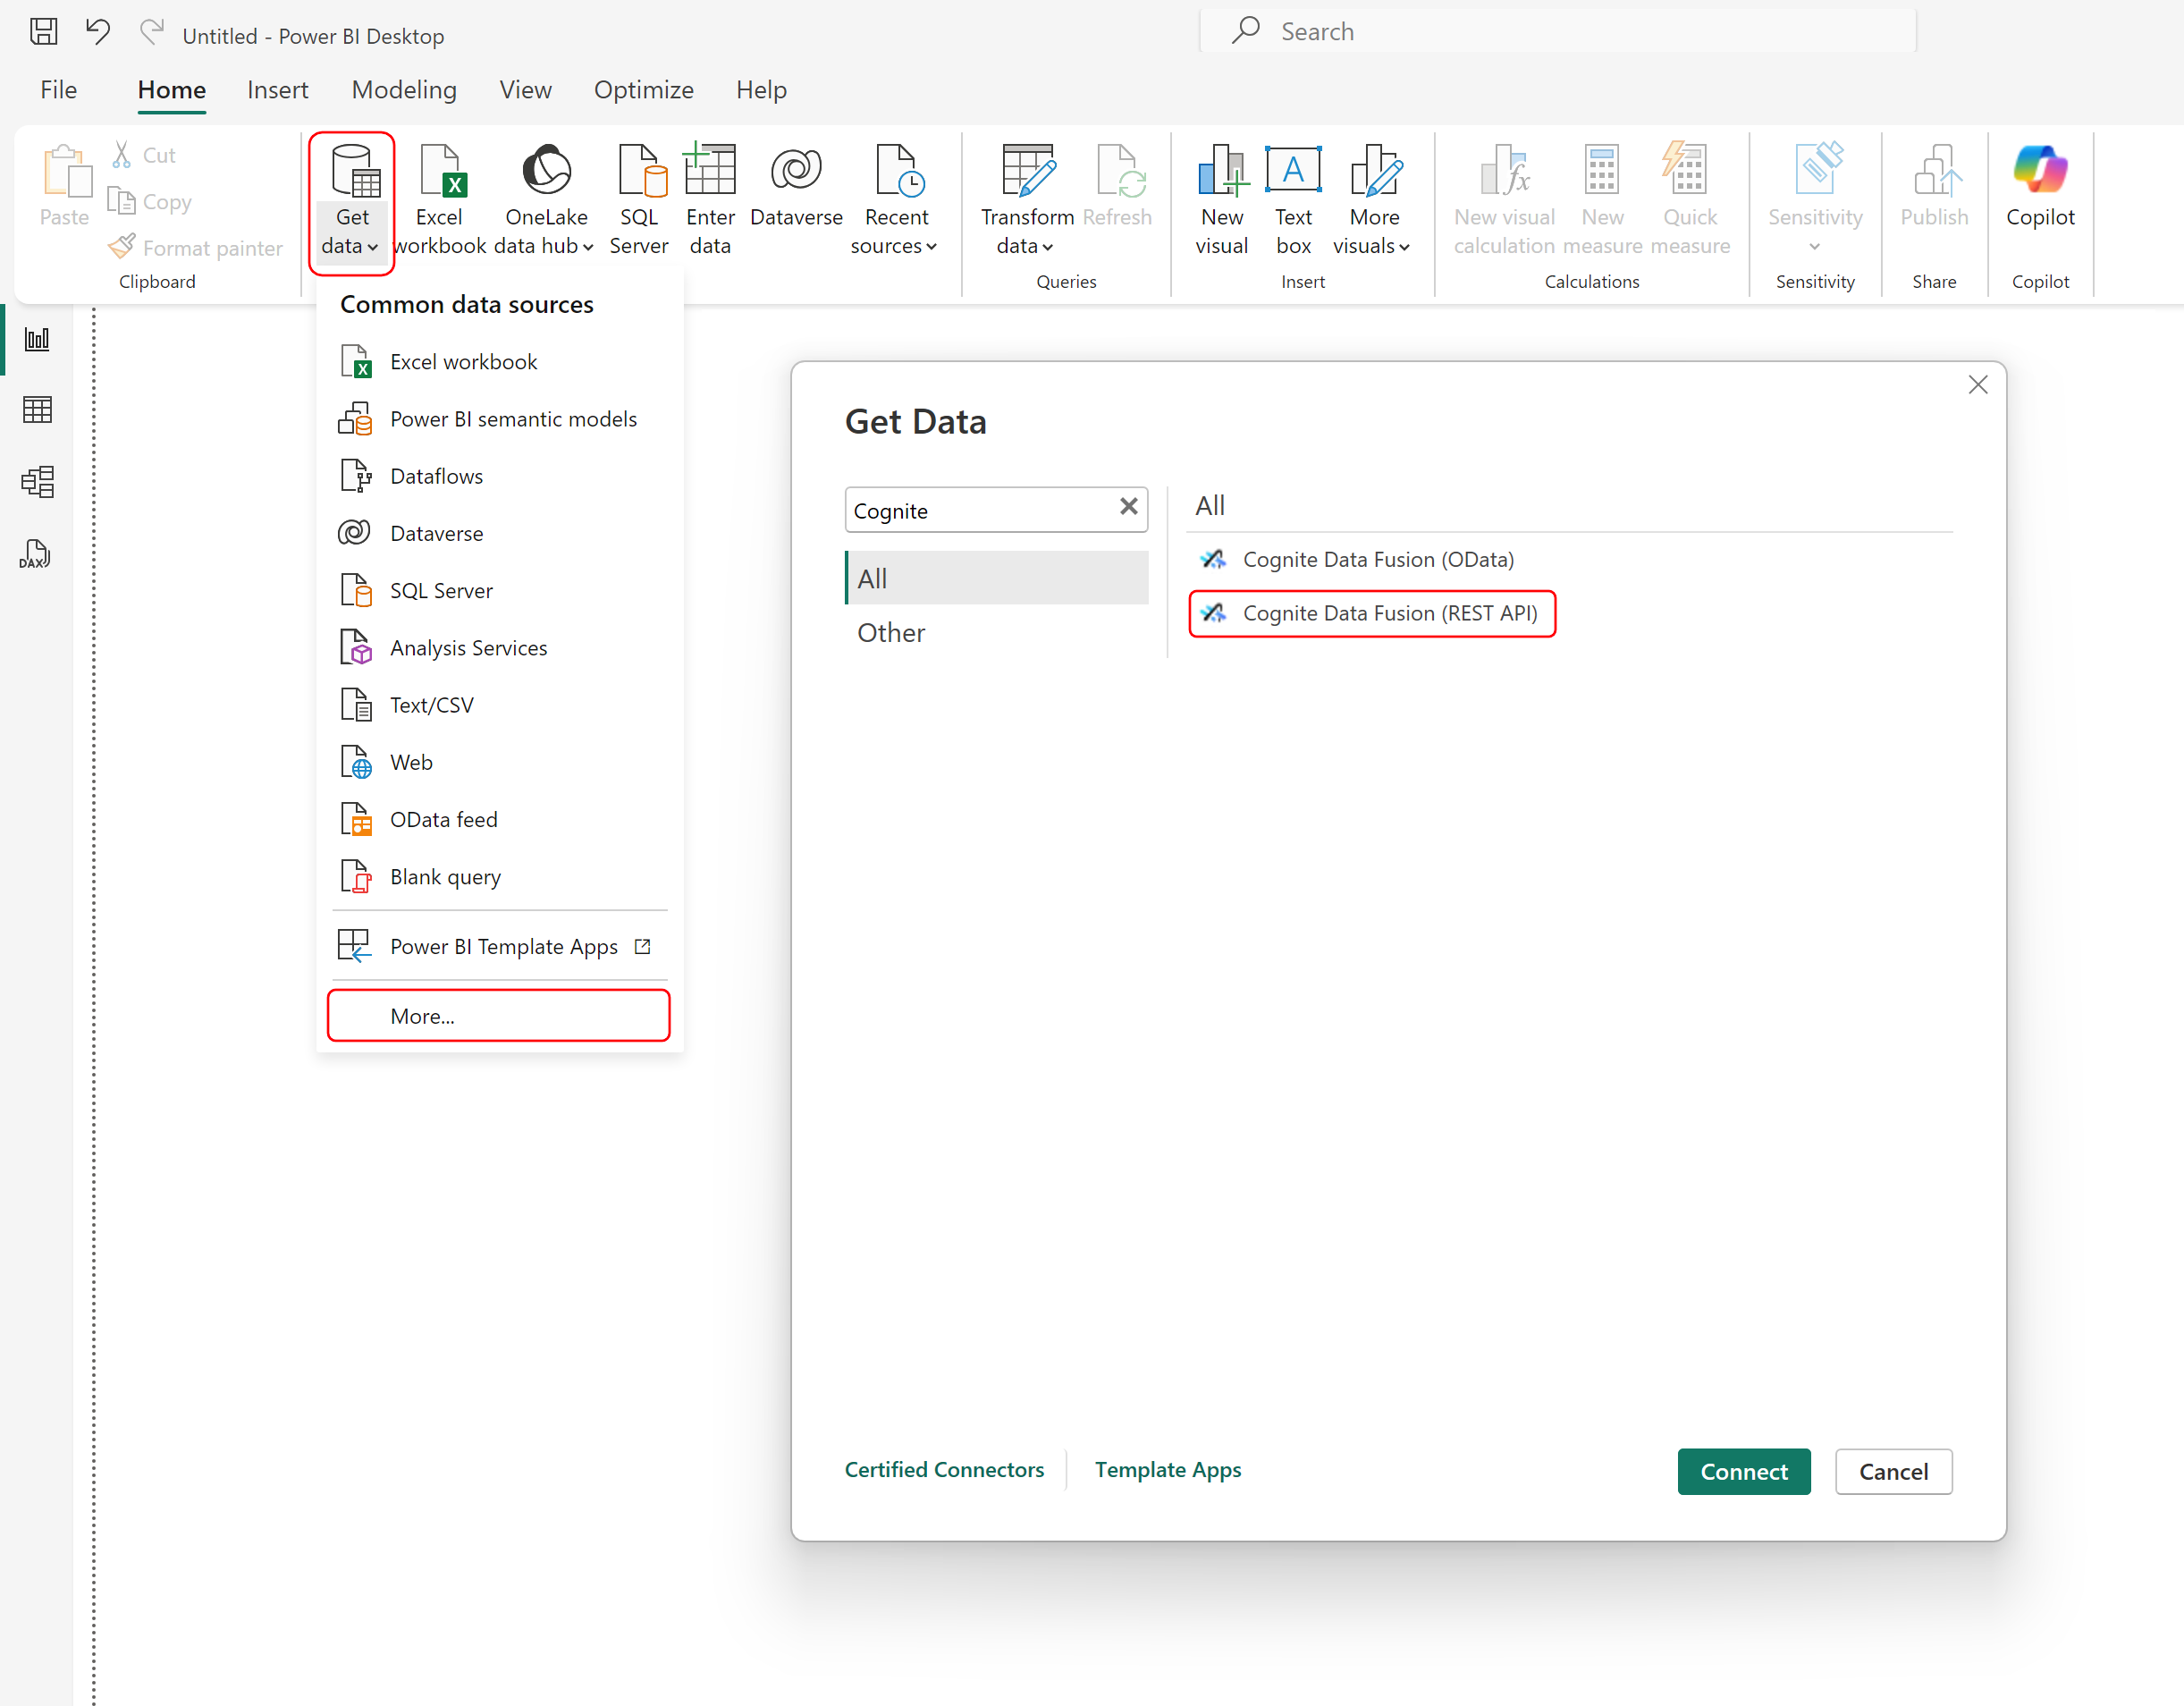
On the **Home** tab, select **Get Data** and then **More**. In the **Get Data** dialog, search for **Cognite** and select the **Cognite Data Fusion (REST API)** connector.
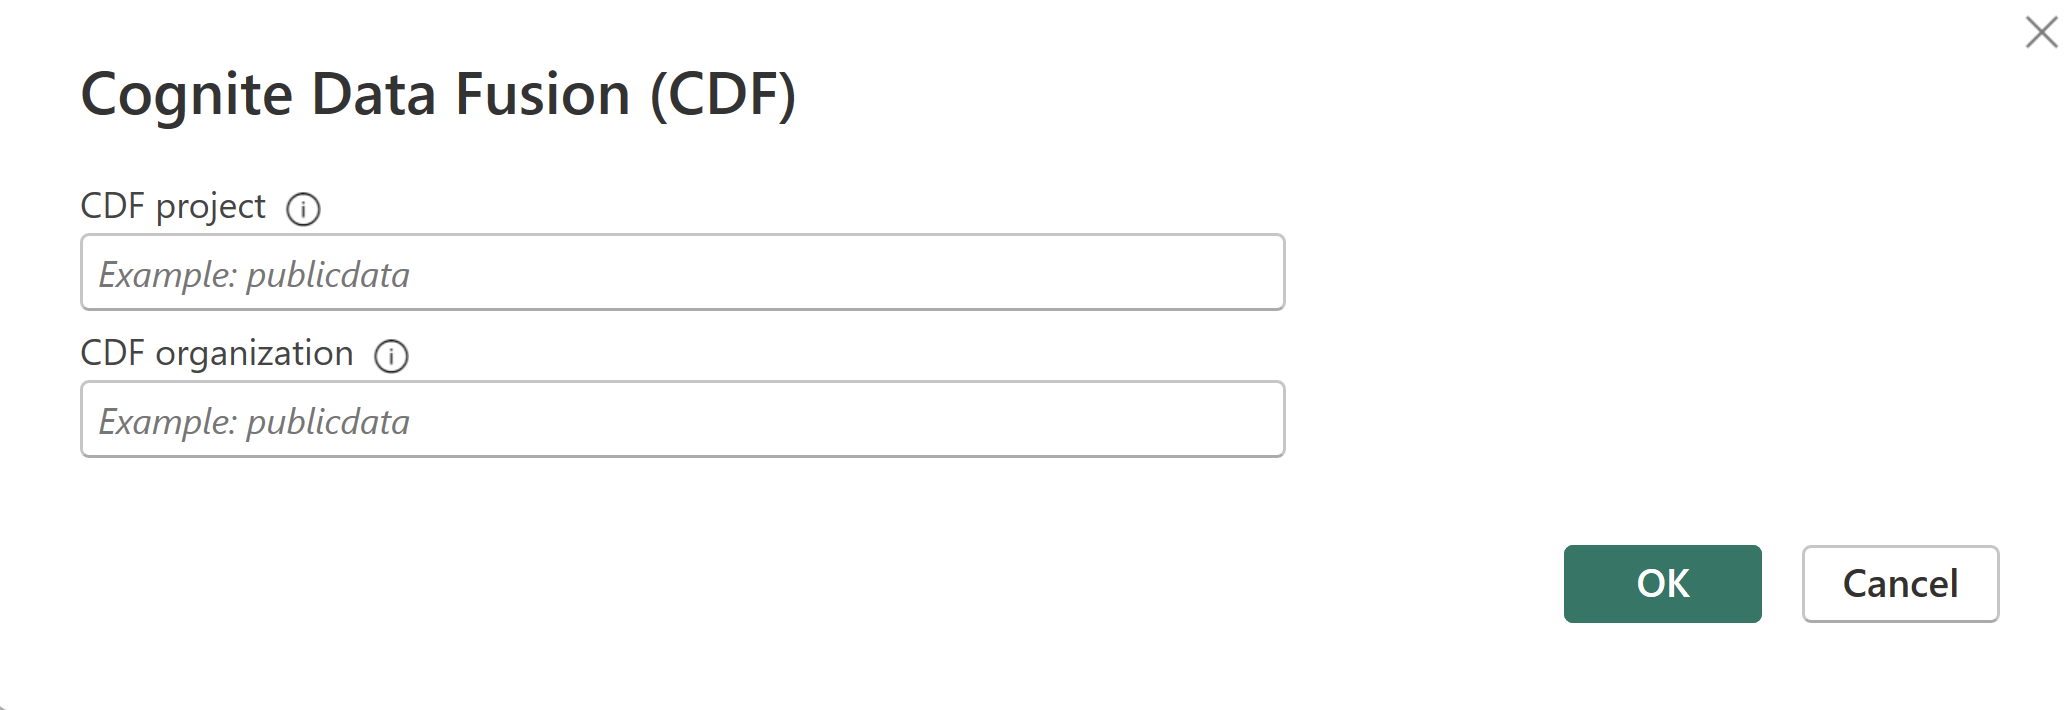
 In the dialog box, enter details to configure the connection to CDF:
* CDF project: Enter the name of the CDF project you're connecting to.
* CDF organization: Enter the organization to use to sign in to CDF.
In the dialog box, enter details to configure the connection to CDF:
* CDF project: Enter the name of the CDF project you're connecting to.
* CDF organization: Enter the organization to use to sign in to CDF.
 When prompted, sign in with your account credentials.
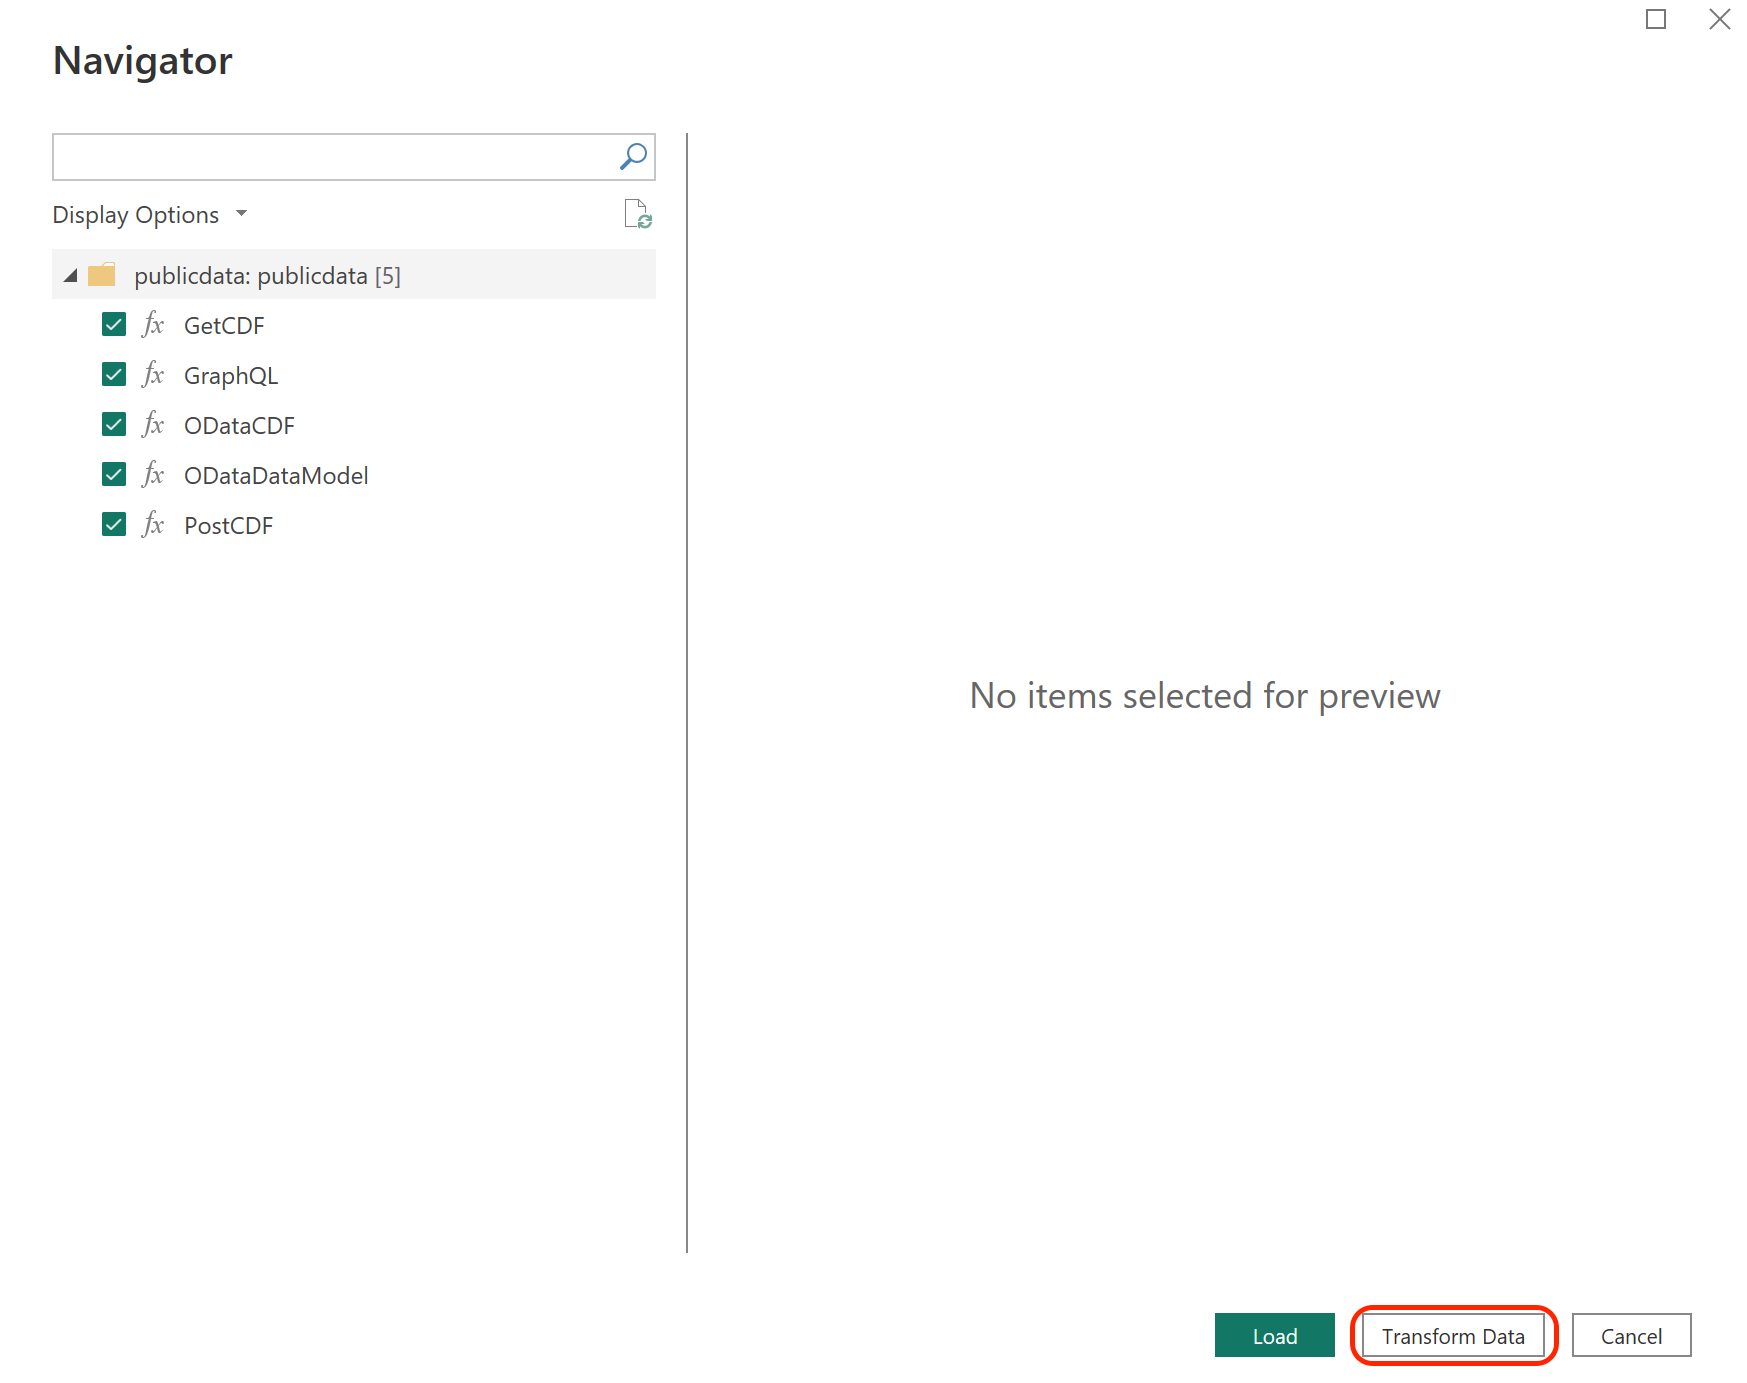
Select Connect to open the Navigator window.
Select the [function(s)](/cdf/dashboards/references/rest/powerbi_rest_functions) you want to use, and then select Transform Data to open the Power Query editor and retrieve data from CDF.
When prompted, sign in with your account credentials.
Select Connect to open the Navigator window.
Select the [function(s)](/cdf/dashboards/references/rest/powerbi_rest_functions) you want to use, and then select Transform Data to open the Power Query editor and retrieve data from CDF.
 ## Connect to Cognite Data Fusion from Power Query Online
Follow these steps to connect to CDF from Power Query Online.
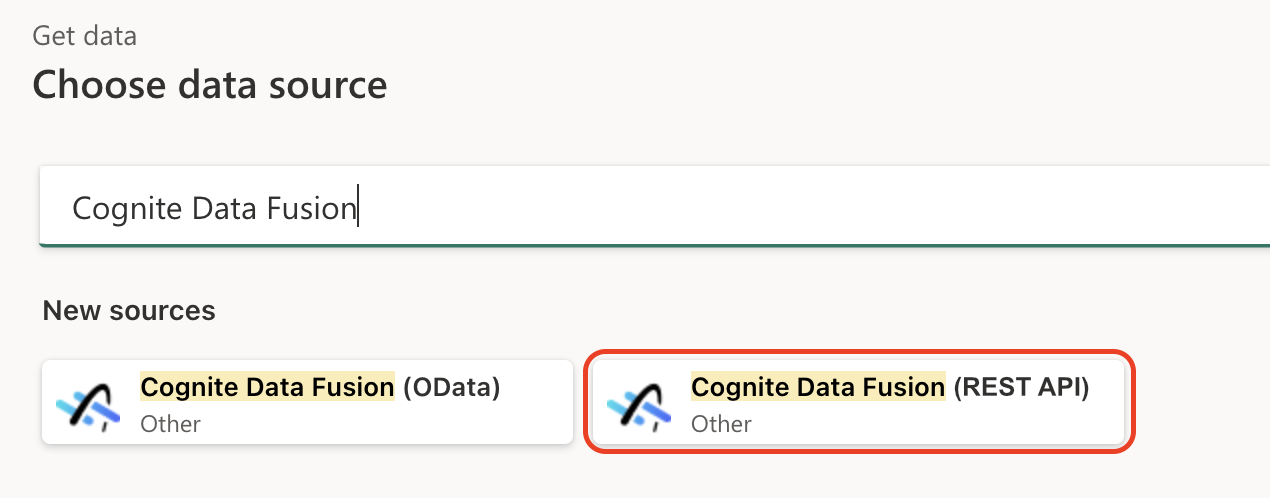
Select **Cognite Data Fusion (REST API)** under Get data. See [Where to get data](https://learn.microsoft.com/en-us/power-query/where-to-get-data) for finding Get data in Power Query Online.
## Connect to Cognite Data Fusion from Power Query Online
Follow these steps to connect to CDF from Power Query Online.
Select **Cognite Data Fusion (REST API)** under Get data. See [Where to get data](https://learn.microsoft.com/en-us/power-query/where-to-get-data) for finding Get data in Power Query Online.
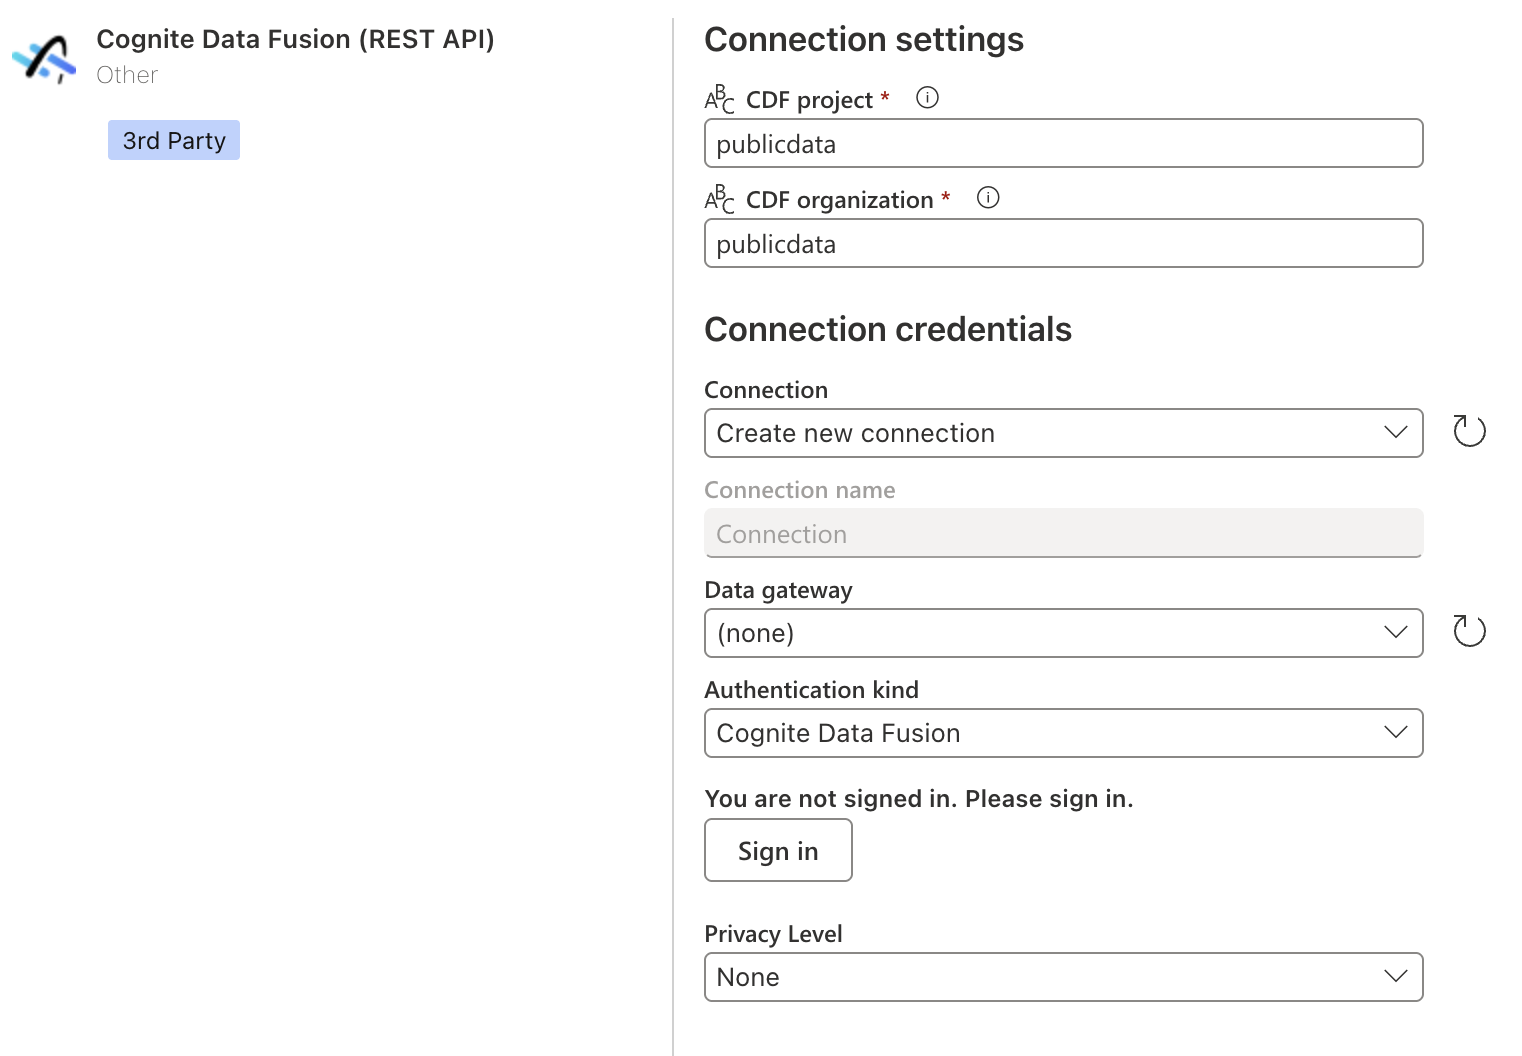
 In Connection settings, enter the following information:
* CDF project: Enter the name of the CDF project you're connecting to.
* CDF organization: Enter the organization to use to sign in to CDF.
In Connection settings, enter the following information:
* CDF project: Enter the name of the CDF project you're connecting to.
* CDF organization: Enter the organization to use to sign in to CDF.
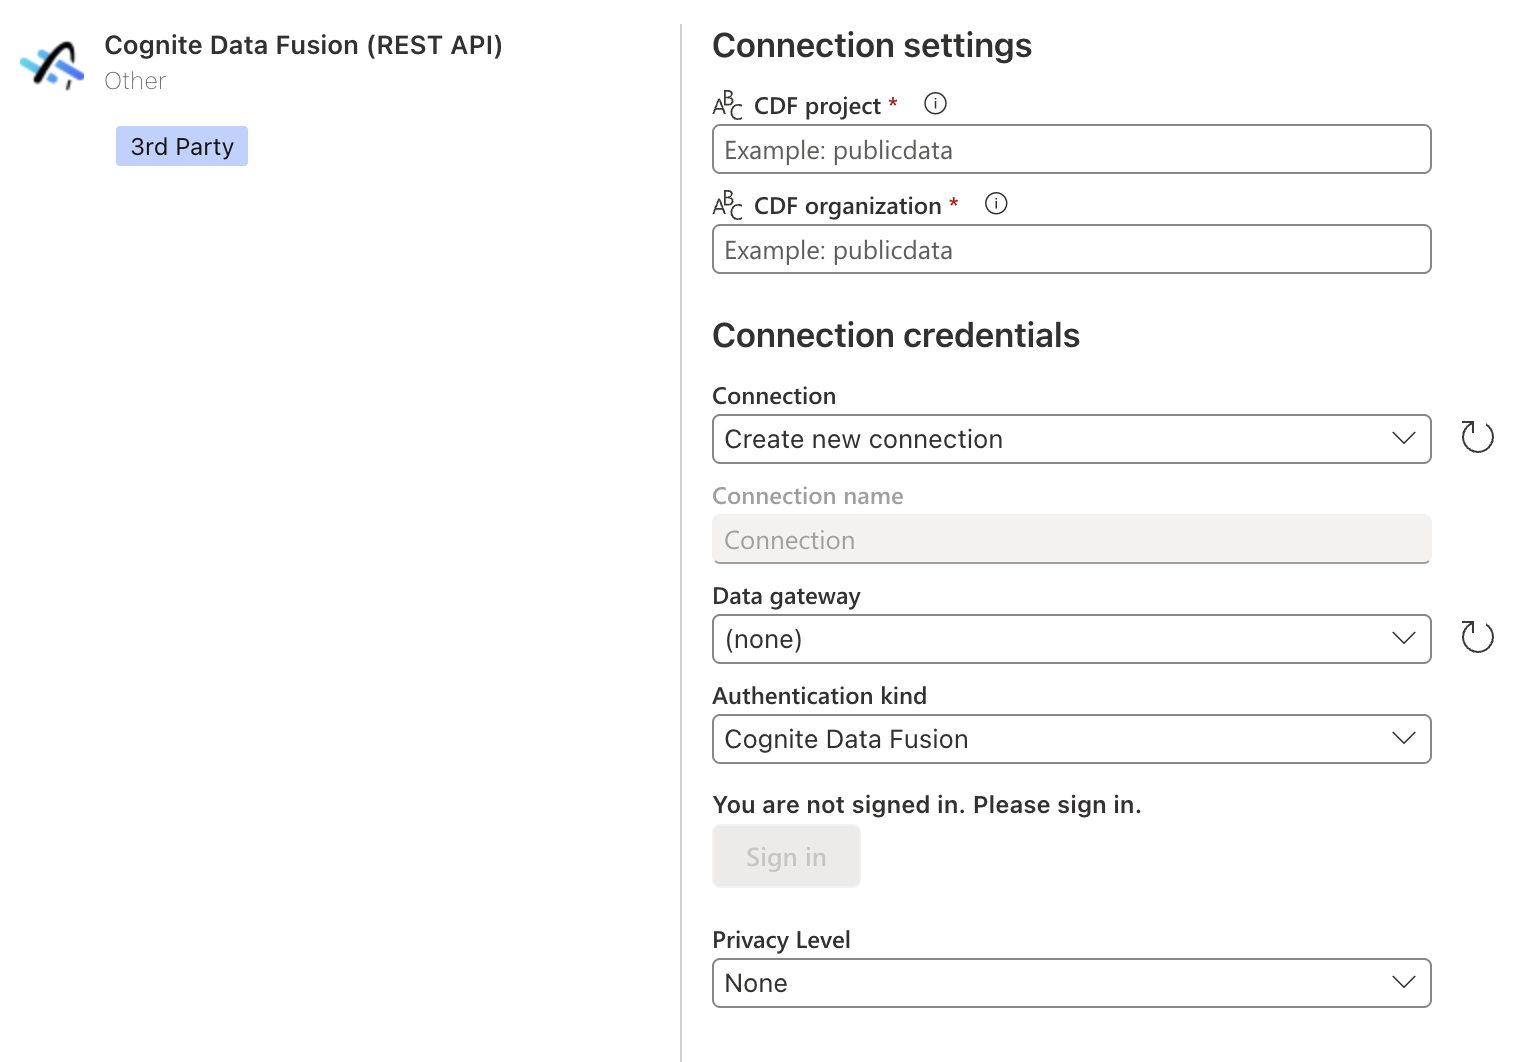 In **Connection credentials**, enter the following information:
* If you're connecting to CDF for the first time, select Create new connection under Connection.
* If you've connected previously, select an existing connection under Connection.
* For Data gateway: If your organization uses a gateway to access CDF, select the appropriate gateway from the menu. If Data gateway is set to **(none)**, the connector uses the Power BI service to connect to CDF directly.
* You can also select Privacy Level for the data connection.
* For new connections, select **Sign in** and follow the authentication process.
In **Connection credentials**, enter the following information:
* If you're connecting to CDF for the first time, select Create new connection under Connection.
* If you've connected previously, select an existing connection under Connection.
* For Data gateway: If your organization uses a gateway to access CDF, select the appropriate gateway from the menu. If Data gateway is set to **(none)**, the connector uses the Power BI service to connect to CDF directly.
* You can also select Privacy Level for the data connection.
* For new connections, select **Sign in** and follow the authentication process.
 Select **Next** when you've signed in.
In **Choose data**, select the function you require, then select Create to open the Power Query editor and retrieve data from CDF.
Select **Next** when you've signed in.
In **Choose data**, select the function you require, then select Create to open the Power Query editor and retrieve data from CDF.
 ### Filter data
Use the maximum supported page size if you make requests that support pagination via `limit` parameters in GET/POST requests, or the `first` parameter in GraphQL queries. Smaller page sizes increase API calls and can significantly impact load times. See the [Cognite API documentation](/api-reference/concepts/20230101/api-description) for the maximum supported page size for each endpoint. For GraphQL queries, the maximum limit is 1000 instances per page.
When using the REST API functions, you can **apply server-side filters** to reduce the initial data loaded into Power BI.
If you're using OData, Power BI can **push down** some filters to the OData service when using the Power Query editor.
For GraphQL queries, you can **apply filters directly in the query** to reduce the amount of data loaded into Power BI. You can also use GraphQL query variables to parameterize your queries and make them more reusable.
### About schema and type handling
This is how schema and type information is handled when retrieving data using the different functions in the connector.
OData functions
When fetching data with the `ODataCDF` or `ODataDataModel` functions:
* Tables always include type information as the OData protocol includes metadata for every property.
* Even if the result contains no data, for instance due to filtering or an empty resource, the returned table will have a defined schema with properly typed columns.
REST and GraphQL functions
When fetching data with the `GetCDF`, `PostCDF`, or `GraphQL` functions, the outcome can vary:
**Successful with data**: Returns a table with columns based on the unique properties found in all records present in the API response. Column types are initially set as `any` since the REST API doesn't provide type metadata.
**Successful but empty**: Returns an empty table with no columns, since the API response doesn't include schema information when no data is present.
**Failed request**: Throws an error, similar to OData functions.
Best practices for REST functions
Due to the variable schema behavior with REST functions, it's recommended to:
* Manually define an expected schema with column names and types when using REST functions.
* Apply type transformations to ensure consistent data types across refreshes.
* Consider using a sample query to establish a schema template, then applying that schema even when results might be empty.
You can find examples and more information about schema handling for REST and GraphQL functions in [incremental refresh with Power BI](/cdf/dashboards/references/rest/powerbi_rest_incremental_refresh).
### Scheduled refresh
After publishing your report to the Power BI service, you must configure scheduled data refreshes to keep your data current and maintain authentication.
**Token expiration**: The REST API connector uses refresh tokens that expire after 26 hours. To prevent authentication failures:
* **Schedule at least 2 daily refreshes** in the Power BI service.
* Refreshes must occur within 24 hours of each other to maintain the authentication token.
* If the token expires, you must manually re-authenticate by selecting Edit credentials in the data set settings.
### Error handling
When you're writing custom `GET` and `POST` requests, you may get errors if you provide an invalid URL or body. If you receive a `CogniteAPIError` error message, see the [Cognite API reference documentation](/api-reference/concepts/20230101/api-description) and adjust your request.
### Filter data
Use the maximum supported page size if you make requests that support pagination via `limit` parameters in GET/POST requests, or the `first` parameter in GraphQL queries. Smaller page sizes increase API calls and can significantly impact load times. See the [Cognite API documentation](/api-reference/concepts/20230101/api-description) for the maximum supported page size for each endpoint. For GraphQL queries, the maximum limit is 1000 instances per page.
When using the REST API functions, you can **apply server-side filters** to reduce the initial data loaded into Power BI.
If you're using OData, Power BI can **push down** some filters to the OData service when using the Power Query editor.
For GraphQL queries, you can **apply filters directly in the query** to reduce the amount of data loaded into Power BI. You can also use GraphQL query variables to parameterize your queries and make them more reusable.
### About schema and type handling
This is how schema and type information is handled when retrieving data using the different functions in the connector.
OData functions
When fetching data with the `ODataCDF` or `ODataDataModel` functions:
* Tables always include type information as the OData protocol includes metadata for every property.
* Even if the result contains no data, for instance due to filtering or an empty resource, the returned table will have a defined schema with properly typed columns.
REST and GraphQL functions
When fetching data with the `GetCDF`, `PostCDF`, or `GraphQL` functions, the outcome can vary:
**Successful with data**: Returns a table with columns based on the unique properties found in all records present in the API response. Column types are initially set as `any` since the REST API doesn't provide type metadata.
**Successful but empty**: Returns an empty table with no columns, since the API response doesn't include schema information when no data is present.
**Failed request**: Throws an error, similar to OData functions.
Best practices for REST functions
Due to the variable schema behavior with REST functions, it's recommended to:
* Manually define an expected schema with column names and types when using REST functions.
* Apply type transformations to ensure consistent data types across refreshes.
* Consider using a sample query to establish a schema template, then applying that schema even when results might be empty.
You can find examples and more information about schema handling for REST and GraphQL functions in [incremental refresh with Power BI](/cdf/dashboards/references/rest/powerbi_rest_incremental_refresh).
### Scheduled refresh
After publishing your report to the Power BI service, you must configure scheduled data refreshes to keep your data current and maintain authentication.
**Token expiration**: The REST API connector uses refresh tokens that expire after 26 hours. To prevent authentication failures:
* **Schedule at least 2 daily refreshes** in the Power BI service.
* Refreshes must occur within 24 hours of each other to maintain the authentication token.
* If the token expires, you must manually re-authenticate by selecting Edit credentials in the data set settings.
### Error handling
When you're writing custom `GET` and `POST` requests, you may get errors if you provide an invalid URL or body. If you receive a `CogniteAPIError` error message, see the [Cognite API reference documentation](/api-reference/concepts/20230101/api-description) and adjust your request.