> ## Documentation Index
> Fetch the complete documentation index at: https://docs.cognite.com/llms.txt
> Use this file to discover all available pages before exploring further.
# Power BI OData connector
> Connect a Cognite Data Fusion project as a data source in Power BI using the OData connector.
**Deprecated - For existing reports only**: This connector only supports Azure Entra ID and lacks access to newer CDF features. **All new reports must use the [REST API connector](/cdf/dashboards/guides/powerbi/set_up_rest_connector)**. The REST API connector supports all identity providers supported in CDF, better performance, and access to all CDF features.
See the [migration guide](#migration-guide).
Before users can sign in with their organizational ID and retrieve data from CDF, an administrator must register and consent for your organization to use [**Microsoft Power Query for Excel**](/cdf/dashboards/guides/powerbi/admin) app registration.
## Connect to Cognite Data Fusion from Power Query Desktop
Follow these steps to connect a Cognite Data Fusion (CDF) project as a data source in Power BI.
In **Power BI Desktop**, sign in with your organization account.
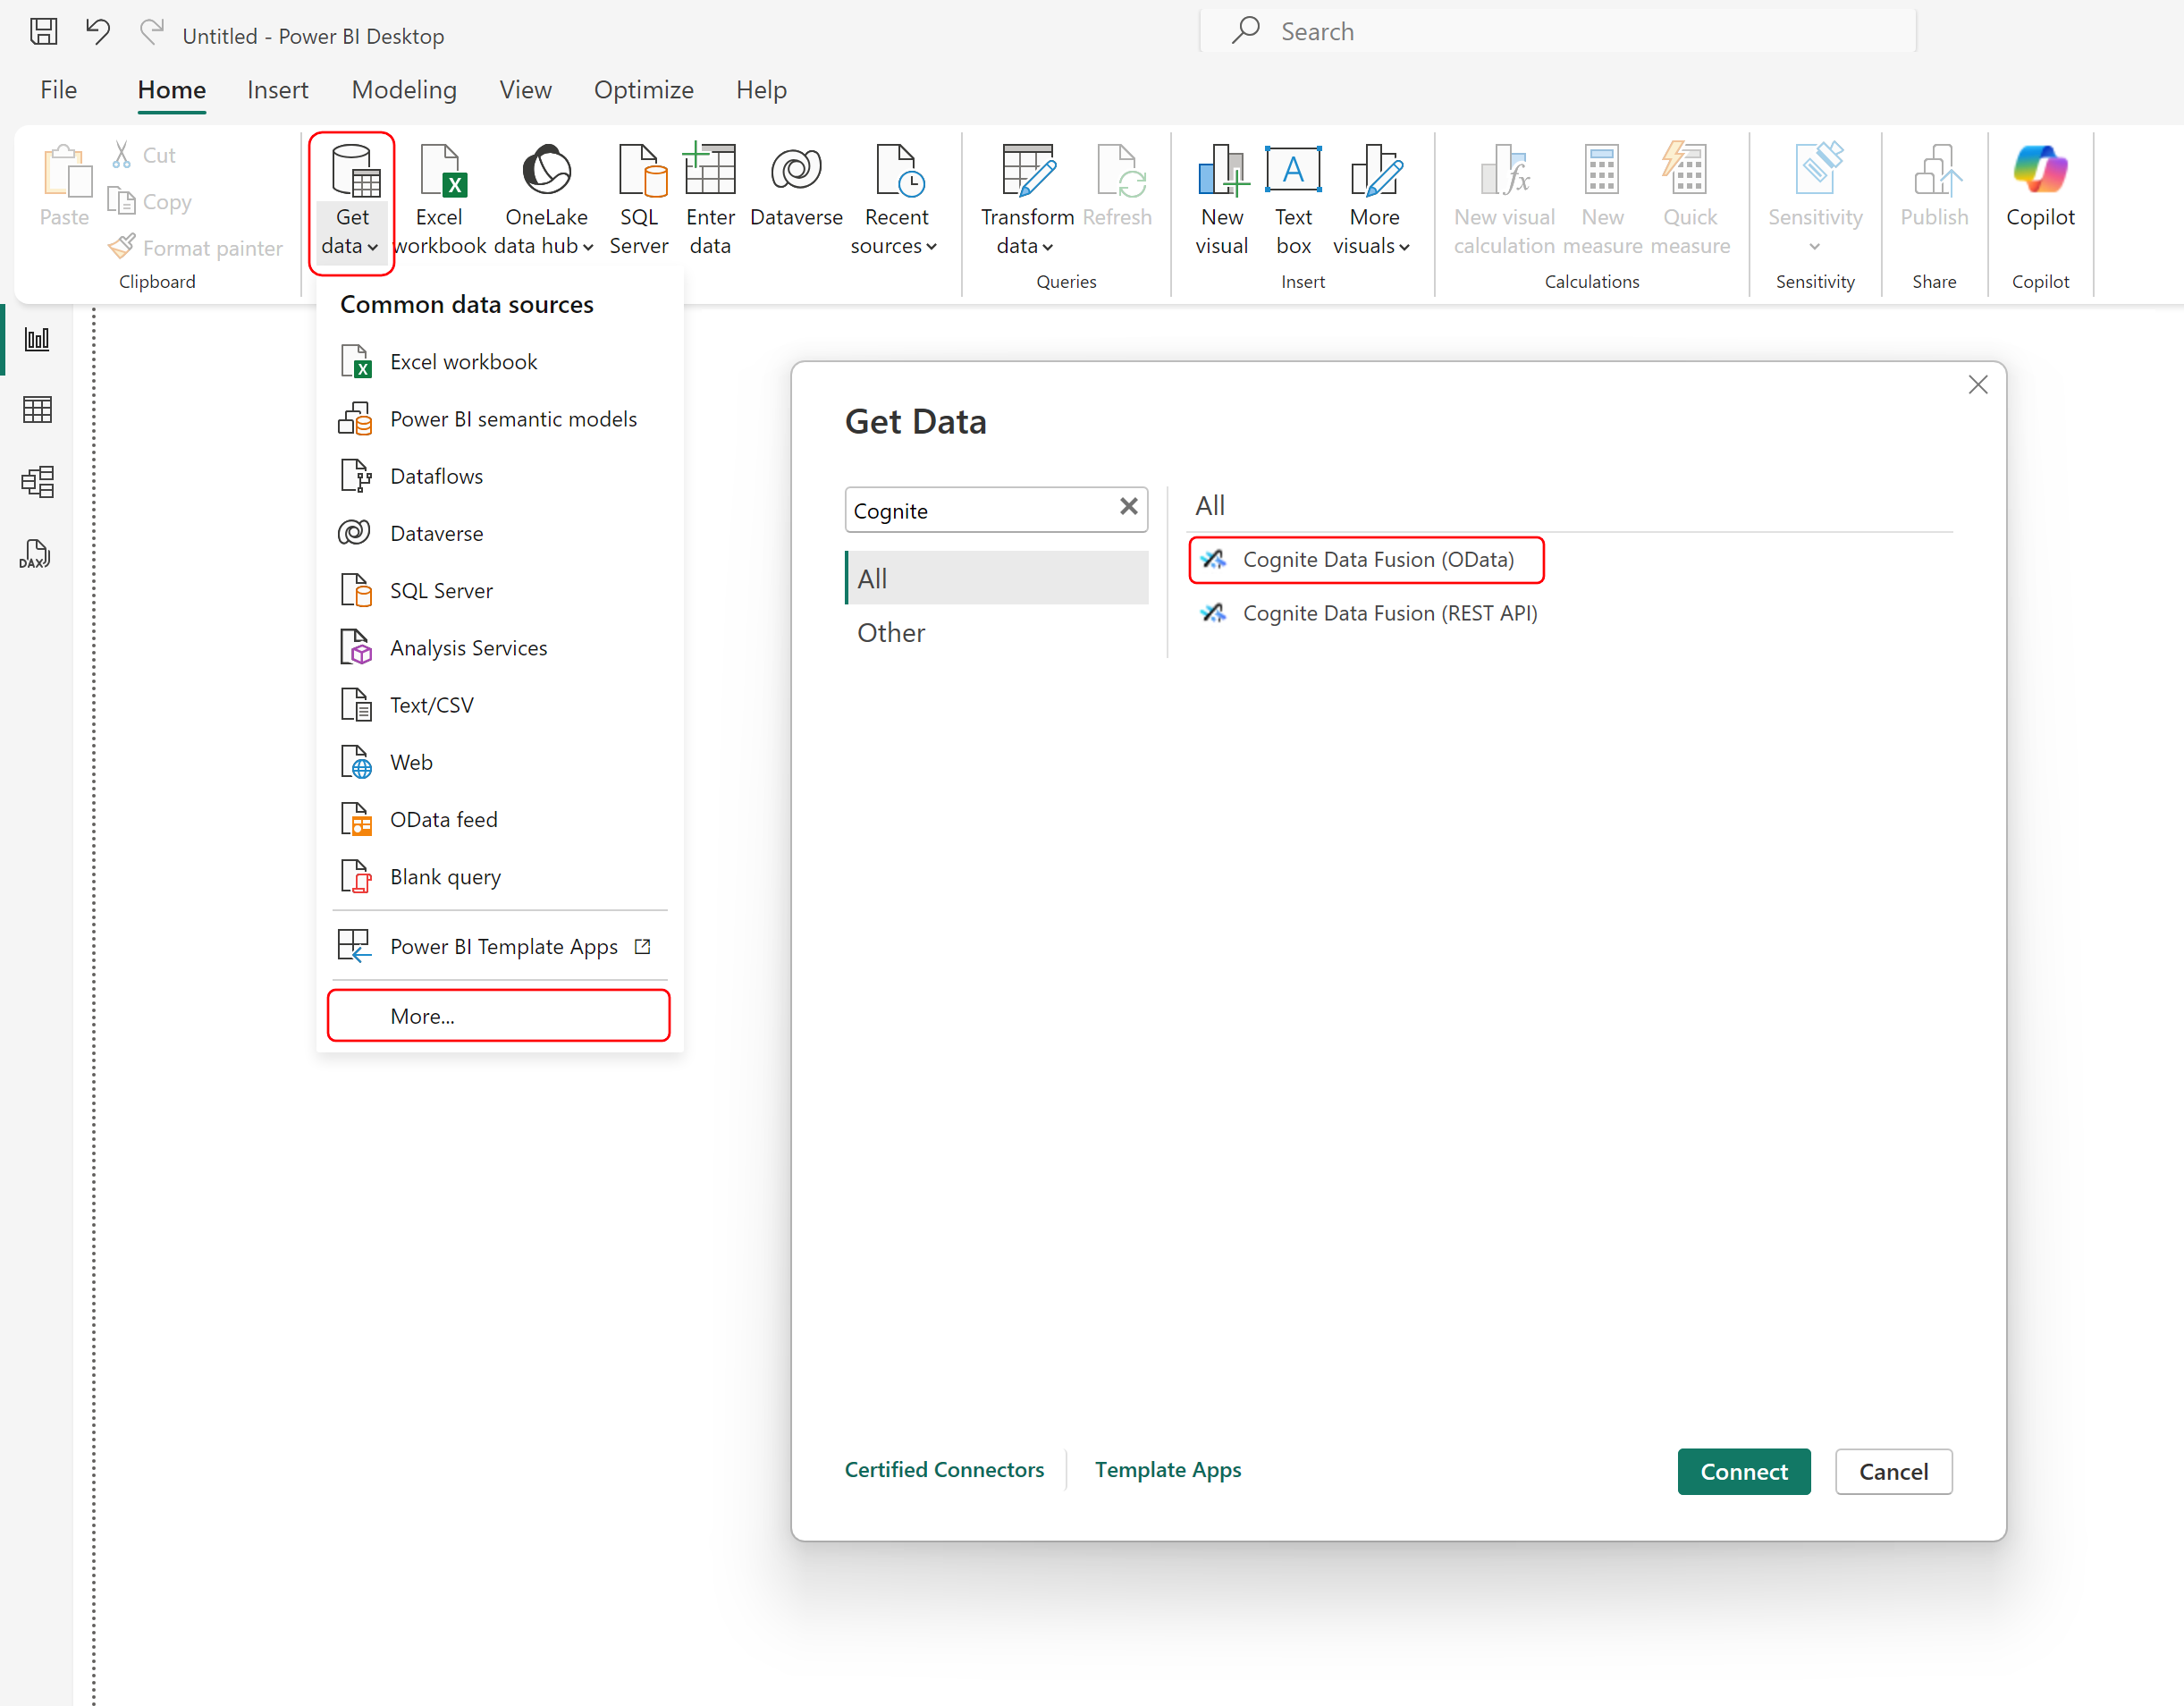
On the **Home** tab, select **Get Data** and then **More**. In the **Get Data** dialog, search for **Cognite** and select the **Cognite Data Fusion (Odata)** connector.
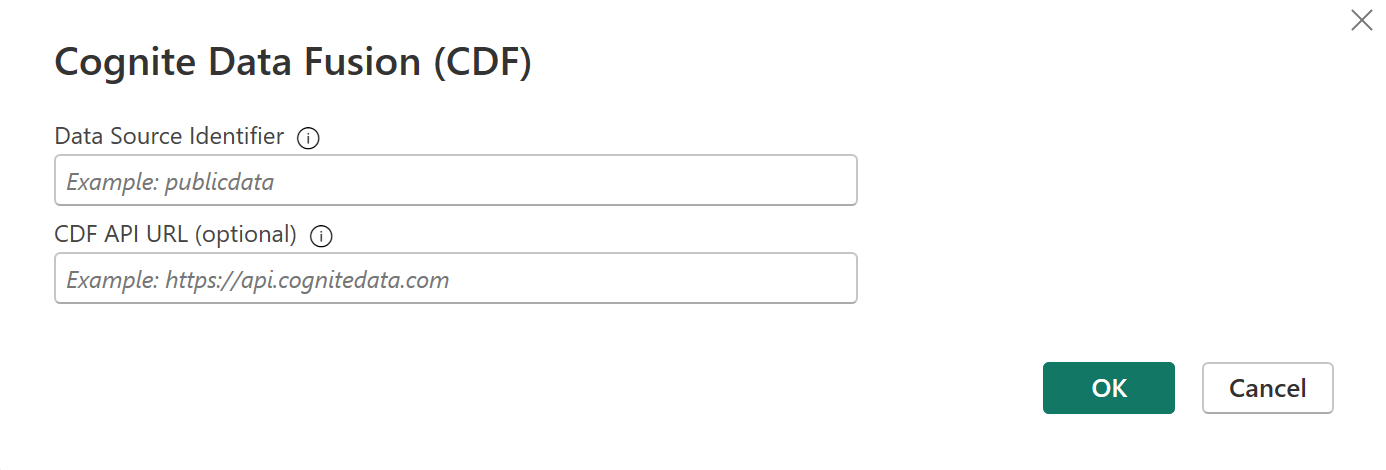
 In the dialog box, enter details to configure the connection to CDF:
* Data Source Identifier: Enter the CDF project name, a data model URL, or a custom OData query to retrieve data from CDF. This is a required field.
To authenticate as a guest user in Entra ID, add the Entra ID tenant ID, for example, `dataSource?tenantId=MyEntraIDTenant.onmicrosoft.com`.
If you're passing a custom OData URL that already contains query parameters, then you can add the `tenantId` at the end with this syntax: `dataSource?$filter={Filter}&tenantId=MyEntraIDTenant.onmicrosoft.com`.
* CDF API URL: Enter the URL to the Cognite API, for example, `https://api.cognitedata.com` or `https://az-eastus-1.cognitedata.com`. To access some OData services, you might also need to add the API version, for example, `https://bluefield.cognitedata.com/20230821`.
In the dialog box, enter details to configure the connection to CDF:
* Data Source Identifier: Enter the CDF project name, a data model URL, or a custom OData query to retrieve data from CDF. This is a required field.
To authenticate as a guest user in Entra ID, add the Entra ID tenant ID, for example, `dataSource?tenantId=MyEntraIDTenant.onmicrosoft.com`.
If you're passing a custom OData URL that already contains query parameters, then you can add the `tenantId` at the end with this syntax: `dataSource?$filter={Filter}&tenantId=MyEntraIDTenant.onmicrosoft.com`.
* CDF API URL: Enter the URL to the Cognite API, for example, `https://api.cognitedata.com` or `https://az-eastus-1.cognitedata.com`. To access some OData services, you might also need to add the API version, for example, `https://bluefield.cognitedata.com/20230821`.
 When prompted, sign in with your Entra ID account credentials.
Select Connect to open the Navigator window.
Select the data you want to load or transform. For example, select the **Assets** table.
Select **Load** to import the data directly or **Transform Data** to open the Power Query editor for data filtering and transformation.
## Connect to Cognite Data Fusion from Power Query Online
Follow these steps to connect to CDF from Power Query Online.
Select **Cognite Data Fusion (OData)** under Get data. See [Where to get data](https://learn.microsoft.com/en-us/power-query/where-to-get-data) for finding Get data in Power Query Online.
When prompted, sign in with your Entra ID account credentials.
Select Connect to open the Navigator window.
Select the data you want to load or transform. For example, select the **Assets** table.
Select **Load** to import the data directly or **Transform Data** to open the Power Query editor for data filtering and transformation.
## Connect to Cognite Data Fusion from Power Query Online
Follow these steps to connect to CDF from Power Query Online.
Select **Cognite Data Fusion (OData)** under Get data. See [Where to get data](https://learn.microsoft.com/en-us/power-query/where-to-get-data) for finding Get data in Power Query Online.
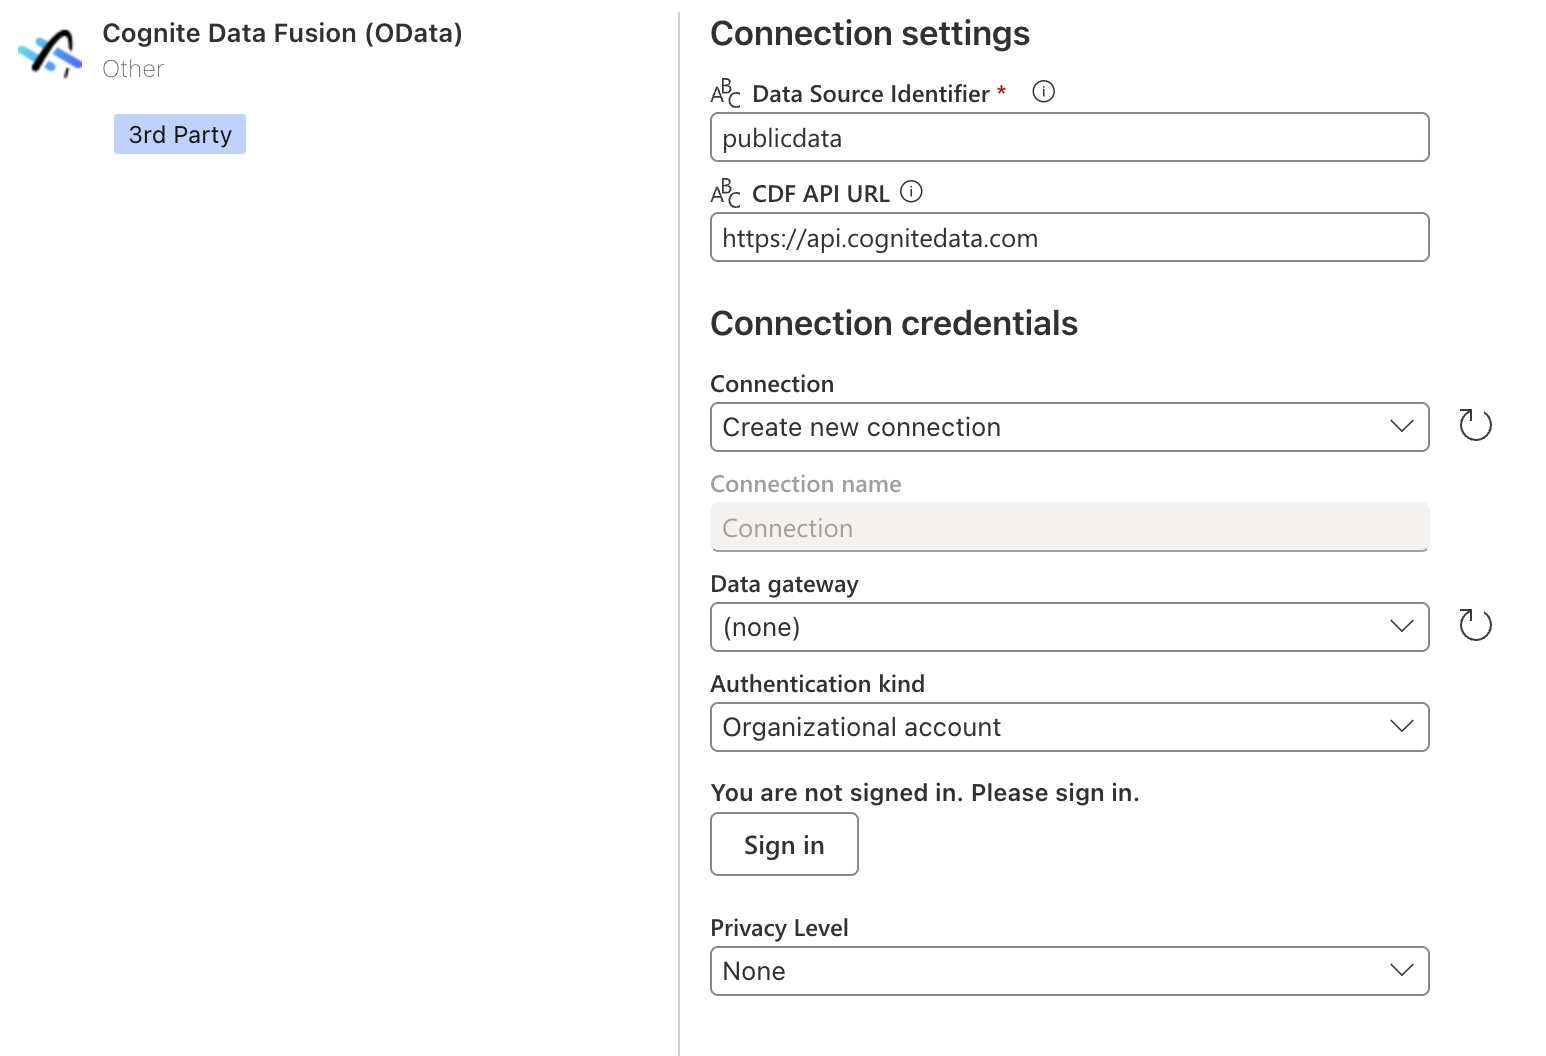
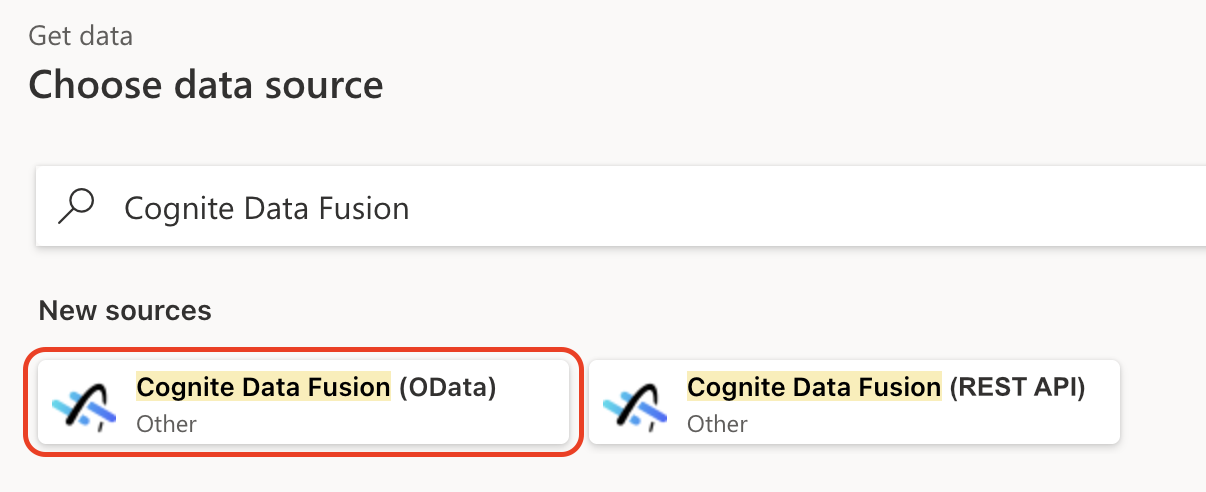 In **Connection settings**, enter the following information:
* Data Source Identifier: Enter the CDF project name, a data model URL, or a custom OData query to retrieve data from CDF.
* To authenticate as a guest user in Entra ID, add the Entra ID tenant ID, for example, `dataSource?tenantId=MyEntraIDTenant.onmicrosoft.com`.
* If you're passing a custom OData URL that already contains query parameters, then you can add the `tenantId` at the end with this syntax: `dataSource?$filter={Filter}&tenantId=MyEntraIDTenant.onmicrosoft.com`.
* CDF API URL: Enter the URL to the Cognite API, for example, `https://api.cognitedata.com` or `https://az-eastus-1.cognitedata.com`. To access some OData services, you might also need to add the API version, for example, `https://bluefield.cognitedata.com/20230821`.
In **Connection settings**, enter the following information:
* Data Source Identifier: Enter the CDF project name, a data model URL, or a custom OData query to retrieve data from CDF.
* To authenticate as a guest user in Entra ID, add the Entra ID tenant ID, for example, `dataSource?tenantId=MyEntraIDTenant.onmicrosoft.com`.
* If you're passing a custom OData URL that already contains query parameters, then you can add the `tenantId` at the end with this syntax: `dataSource?$filter={Filter}&tenantId=MyEntraIDTenant.onmicrosoft.com`.
* CDF API URL: Enter the URL to the Cognite API, for example, `https://api.cognitedata.com` or `https://az-eastus-1.cognitedata.com`. To access some OData services, you might also need to add the API version, for example, `https://bluefield.cognitedata.com/20230821`.
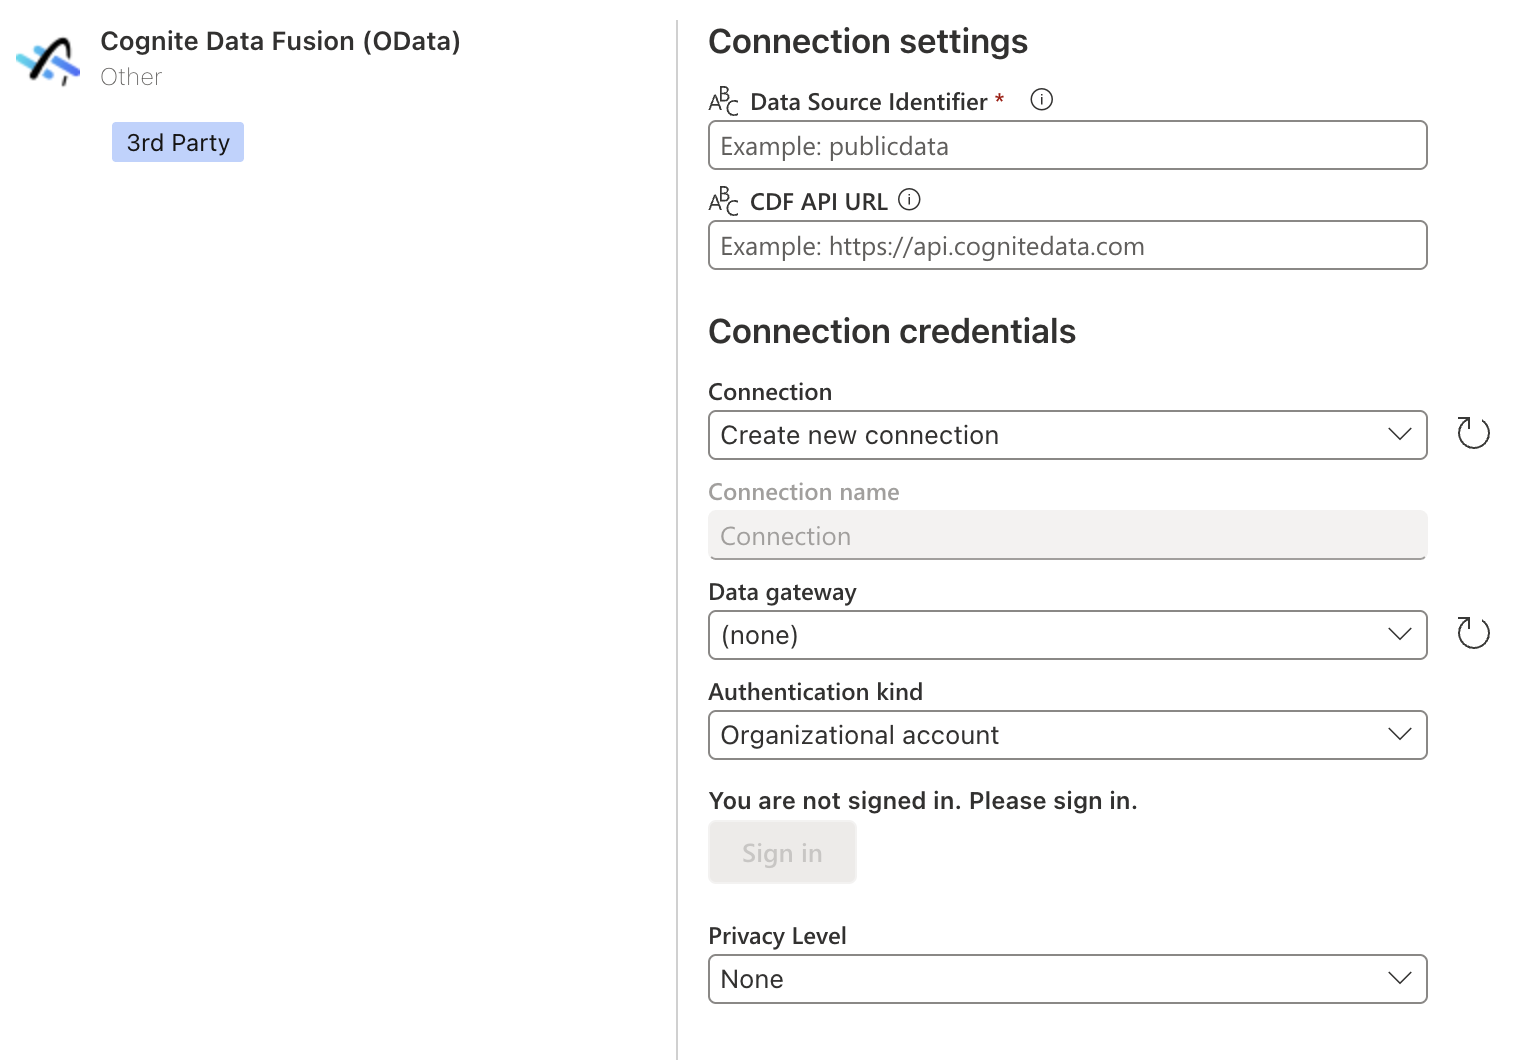 In **Connection credentials**, enter the following information:
* If you're connecting to CDF for the first time, select Create new connection under Connection.
* If you've connected previously, select an existing connection under Connection.
* For Data gateway: If your organization uses a gateway to access CDF, select the appropriate gateway from the menu. If Data gateway is set to **(none)**, the connector uses the Power BI service to connect to CDF directly.
* You can also select Privacy Level for the data connection.
* For new connections, select **Sign in** and follow the authentication process.
In **Connection credentials**, enter the following information:
* If you're connecting to CDF for the first time, select Create new connection under Connection.
* If you've connected previously, select an existing connection under Connection.
* For Data gateway: If your organization uses a gateway to access CDF, select the appropriate gateway from the menu. If Data gateway is set to **(none)**, the connector uses the Power BI service to connect to CDF directly.
* You can also select Privacy Level for the data connection.
* For new connections, select **Sign in** and follow the authentication process.
 Select **Next** when you've signed in.
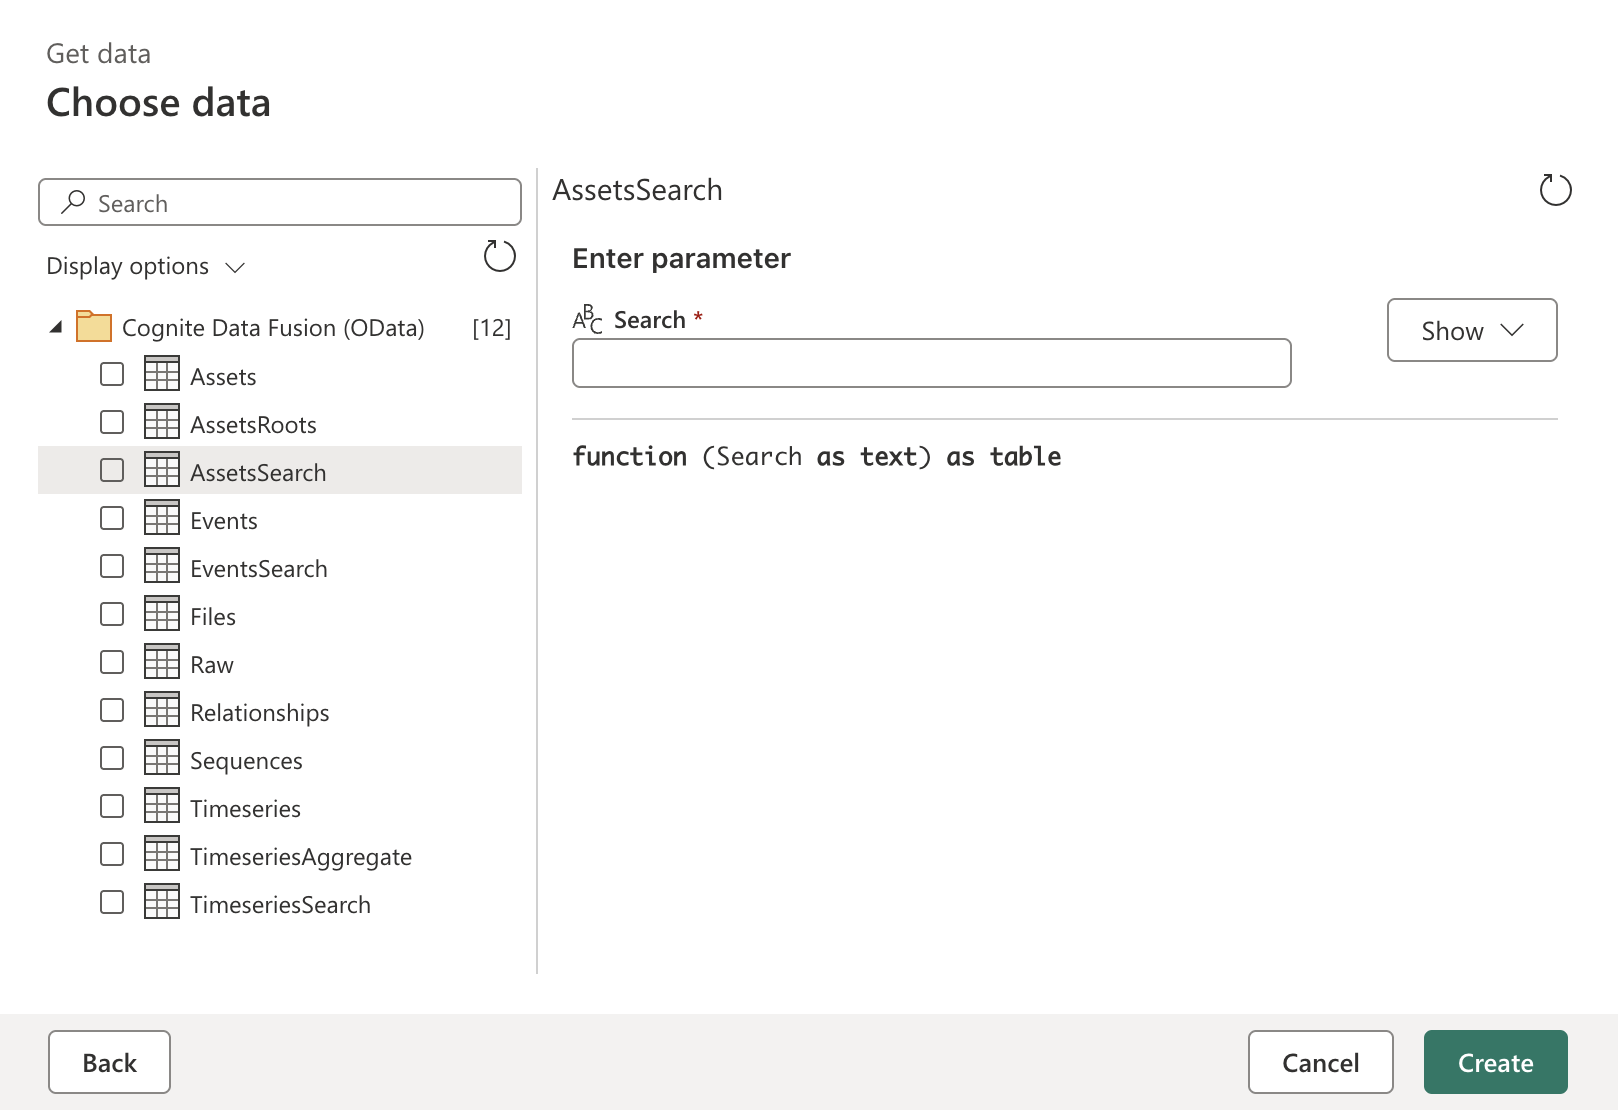
In **Choose data**, select the data you require, then select **Create** to open the Power Query editor and retrieve data from CDF.
Select **Next** when you've signed in.
In **Choose data**, select the data you require, then select **Create** to open the Power Query editor and retrieve data from CDF.
 ### Filter data
Use **Transform Data** to apply filters and reduce the amount of data loaded into Power BI.
### Scheduled refresh
After publishing your report to the Power BI service, you can schedule data refreshes to keep your data current.
### Data model URLs
If you're using data models, make sure Data Source Identifier includes the correct data model URL. See [Data modeling OData service](/cdf/dashboards/references/odata/dm_odata).
### Custom queries
Enter custom OData queries in Data Source Identifier to retrieve specific data sets. See [Custom OData queries](/cdf/dashboards/references/odata/custom_queries).
## Migrate to the REST API connector
Migrate existing Power BI reports from the OData connector to the REST API connector. This involves updating the Power Query code at the beginning of each data query.
### Understand the differences
The OData connector uses the function signature `Cognite.Contents` and directly accesses tables through URL manipulation:
```js theme={"languages":{"custom":["/_languages/kuiper.json","../_languages/kuiper.json"]}}
let
CogniteCDMViews = Cognite.Contents(
"publicdata/models/spaces/cdf_cdm/datamodels/CogniteCore/versions/v1",
"https://api.cognitedata.com/20230821"
),
CogniteTimeSeriesTable = CogniteCDMViews{[Name = "CogniteTimeSeries", Signature = "table"]}[Data]
in
CogniteTimeSeriesTable
```
The REST API connector uses the function signature `CogniteDataSource.Contents` and separates authentication from data fetching, exposing a table of functions you can choose from.
### Migration approach
Choose a migration approach based on the effort you want to invest and the performance improvements you need:
**Option 1: Minimal changes using ODataCDF**
For the fastest migration with minimal code changes, use the `ODataCDF` function which maintains compatibility with your existing OData URLs:
```js theme={"languages":{"custom":["/_languages/kuiper.json","../_languages/kuiper.json"]}}
let
Source = CogniteDataSource.Contents("publicdata", "publicdata"),
ODataCDF = Source{[Key="ODataCDF"]}[Data],
CogniteCDMViews = ODataCDF("publicdata/models/spaces/cdf_cdm/datamodels/CogniteCore/versions/v1", "20230821"),
CogniteTimeSeriesTable = CogniteCDMViews{[Name="CogniteTimeSeries",Signature="table"]}[Data]
in
CogniteTimeSeriesTable
```
Make the following changes:
1. Replace `Cognite.Contents(` in the original query with the code to access the `ODataCDF` function as shown above.
2. Update the function call to `ODataCDF(` with the URL from the original query and the API version.
3. Remove `?tenantId=xxx` from your URLs if present. This was only needed for guest authentication in Azure ENtra ID.
4. Keep other OData query parameters, such as `$filter` and `$select`, unchanged.
**Option 2: Simplified data model access using ODataDataModel**
For cleaner code when working with data models, use the dedicated `ODataDataModel` function. This option gives cleaner syntax, no URL construction, direct parameters for `space`, `model`, and `version`, and the same OData protocol with improved usability.
```js theme={"languages":{"custom":["/_languages/kuiper.json","../_languages/kuiper.json"]}}
let
Source = CogniteDataSource.Contents("publicdata", "publicdata"),
ODataDataModel = Source{[Key="ODataDataModel"]}[Data],
CogniteCDMViews = ODataDataModel("cdf_cdm", "CogniteCore", "v1"),
CogniteTimeSeriesTable = CogniteCDMViews{[Name="CogniteTimeSeries",Signature="table"]}[Data]
in
CogniteTimeSeriesTable
```
**Option 3: Better performance with GraphQL**
For improved performance while querying data models, migrate to GraphQL. This option gives better performance than OData and enables all features supported by the GraphQL service.
```js theme={"languages":{"custom":["/_languages/kuiper.json","../_languages/kuiper.json"]}}
let
Source = CogniteDataSource.Contents("publicdata", "publicdata"),
GraphQL = Source{[Key="GraphQL"]}[Data],
CogniteTimeSeriesTable = GraphQL(
"cdf_cdm",
"CogniteCore",
"v1",
"query MyQuery($cursor: String) {
listCogniteTimeSeries(first: 1000, after: $cursor) {
items {
space
externalId
createdTime
lastUpdatedTime
name
description
isStep
type
sourceUnit
}
}
}"
)
in
CogniteTimeSeriesTable
```
**Option 4: Maximum performance with direct REST API**
For best performance, use direct REST API calls. This option gives maximum performance, access to all Cognite API features, and full control over request parameters.
```js theme={"languages":{"custom":["/_languages/kuiper.json","../_languages/kuiper.json"]}}
let
Source = CogniteDataSource.Contents("publicdata", "publicdata"),
PostCDF = Source{[Key="PostCDF"]}[Data],
Body = [
sources = {
[
source = [
type = "view",
space = "cdf_cdm",
externalId = "CogniteTimeSeries",
version = "v1"
]
]
},
limit = 1000
],
BodyText = Text.FromBinary(Json.FromValue(Body)),
CogniteTimeSeriesTable = PostCDF("/models/instances/list", BodyText)
in
CogniteTimeSeriesTable
```
### Migration steps
Open the Report in Power BI Desktop.
1. Open the Power Query editor.
2. Select a query using the OData connector.
3. Replace the connector code following one of the options above.
4. Remove `tenantId` parameter if present in URLs.
Sign in using your CDF organization credentials.
Update all queries in your report.
Test thoroughly before publishing.
Publish and update scheduled refreshes in the Power BI service.
### Filter data
Use **Transform Data** to apply filters and reduce the amount of data loaded into Power BI.
### Scheduled refresh
After publishing your report to the Power BI service, you can schedule data refreshes to keep your data current.
### Data model URLs
If you're using data models, make sure Data Source Identifier includes the correct data model URL. See [Data modeling OData service](/cdf/dashboards/references/odata/dm_odata).
### Custom queries
Enter custom OData queries in Data Source Identifier to retrieve specific data sets. See [Custom OData queries](/cdf/dashboards/references/odata/custom_queries).
## Migrate to the REST API connector
Migrate existing Power BI reports from the OData connector to the REST API connector. This involves updating the Power Query code at the beginning of each data query.
### Understand the differences
The OData connector uses the function signature `Cognite.Contents` and directly accesses tables through URL manipulation:
```js theme={"languages":{"custom":["/_languages/kuiper.json","../_languages/kuiper.json"]}}
let
CogniteCDMViews = Cognite.Contents(
"publicdata/models/spaces/cdf_cdm/datamodels/CogniteCore/versions/v1",
"https://api.cognitedata.com/20230821"
),
CogniteTimeSeriesTable = CogniteCDMViews{[Name = "CogniteTimeSeries", Signature = "table"]}[Data]
in
CogniteTimeSeriesTable
```
The REST API connector uses the function signature `CogniteDataSource.Contents` and separates authentication from data fetching, exposing a table of functions you can choose from.
### Migration approach
Choose a migration approach based on the effort you want to invest and the performance improvements you need:
**Option 1: Minimal changes using ODataCDF**
For the fastest migration with minimal code changes, use the `ODataCDF` function which maintains compatibility with your existing OData URLs:
```js theme={"languages":{"custom":["/_languages/kuiper.json","../_languages/kuiper.json"]}}
let
Source = CogniteDataSource.Contents("publicdata", "publicdata"),
ODataCDF = Source{[Key="ODataCDF"]}[Data],
CogniteCDMViews = ODataCDF("publicdata/models/spaces/cdf_cdm/datamodels/CogniteCore/versions/v1", "20230821"),
CogniteTimeSeriesTable = CogniteCDMViews{[Name="CogniteTimeSeries",Signature="table"]}[Data]
in
CogniteTimeSeriesTable
```
Make the following changes:
1. Replace `Cognite.Contents(` in the original query with the code to access the `ODataCDF` function as shown above.
2. Update the function call to `ODataCDF(` with the URL from the original query and the API version.
3. Remove `?tenantId=xxx` from your URLs if present. This was only needed for guest authentication in Azure ENtra ID.
4. Keep other OData query parameters, such as `$filter` and `$select`, unchanged.
**Option 2: Simplified data model access using ODataDataModel**
For cleaner code when working with data models, use the dedicated `ODataDataModel` function. This option gives cleaner syntax, no URL construction, direct parameters for `space`, `model`, and `version`, and the same OData protocol with improved usability.
```js theme={"languages":{"custom":["/_languages/kuiper.json","../_languages/kuiper.json"]}}
let
Source = CogniteDataSource.Contents("publicdata", "publicdata"),
ODataDataModel = Source{[Key="ODataDataModel"]}[Data],
CogniteCDMViews = ODataDataModel("cdf_cdm", "CogniteCore", "v1"),
CogniteTimeSeriesTable = CogniteCDMViews{[Name="CogniteTimeSeries",Signature="table"]}[Data]
in
CogniteTimeSeriesTable
```
**Option 3: Better performance with GraphQL**
For improved performance while querying data models, migrate to GraphQL. This option gives better performance than OData and enables all features supported by the GraphQL service.
```js theme={"languages":{"custom":["/_languages/kuiper.json","../_languages/kuiper.json"]}}
let
Source = CogniteDataSource.Contents("publicdata", "publicdata"),
GraphQL = Source{[Key="GraphQL"]}[Data],
CogniteTimeSeriesTable = GraphQL(
"cdf_cdm",
"CogniteCore",
"v1",
"query MyQuery($cursor: String) {
listCogniteTimeSeries(first: 1000, after: $cursor) {
items {
space
externalId
createdTime
lastUpdatedTime
name
description
isStep
type
sourceUnit
}
}
}"
)
in
CogniteTimeSeriesTable
```
**Option 4: Maximum performance with direct REST API**
For best performance, use direct REST API calls. This option gives maximum performance, access to all Cognite API features, and full control over request parameters.
```js theme={"languages":{"custom":["/_languages/kuiper.json","../_languages/kuiper.json"]}}
let
Source = CogniteDataSource.Contents("publicdata", "publicdata"),
PostCDF = Source{[Key="PostCDF"]}[Data],
Body = [
sources = {
[
source = [
type = "view",
space = "cdf_cdm",
externalId = "CogniteTimeSeries",
version = "v1"
]
]
},
limit = 1000
],
BodyText = Text.FromBinary(Json.FromValue(Body)),
CogniteTimeSeriesTable = PostCDF("/models/instances/list", BodyText)
in
CogniteTimeSeriesTable
```
### Migration steps
Open the Report in Power BI Desktop.
1. Open the Power Query editor.
2. Select a query using the OData connector.
3. Replace the connector code following one of the options above.
4. Remove `tenantId` parameter if present in URLs.
Sign in using your CDF organization credentials.
Update all queries in your report.
Test thoroughly before publishing.
Publish and update scheduled refreshes in the Power BI service.