> ## Documentation Index
> Fetch the complete documentation index at: https://docs.cognite.com/llms.txt
> Use this file to discover all available pages before exploring further.
# Microsoft Power Query for Power BI and Excel
> Register and grant consent for an organization to use Microsoft Power Query for Excel and Power BI Data Refresh applications to retrieve data from CDF.
You can use OpenID Connect and your existing identity provider (IdP) framework to manage access to Cognite Data Fusion (CDF) data securely. We currently support Microsoft Entra ID, Microsoft's cloud-based identity and access management service.
This article explains how a Microsoft Entra ID (ME-ID) administrator registers and grants consent for an organization to use the **Microsoft Power Query for Excel** application for desktop usage and the **Power BI Data Refresh** application for service usage. This registration and consent enables the **Cognite Power BI OData Connector** and **Excel's OData feed connector** to impersonate and act on behalf of a user to retrieve data from CDF.
When an administrator has granted consent, users can sign in with their organizational ID and use the **Cognite Power BI OData Connector** in Power BI Desktop or **Excel's OData feed connector** to retrieve data from CDF. Granting consent for the **Power BI Data Refresh** application is necessary for scheduled data refreshes in the Power BI Service.
The **Cognite Power BI OData Connector** (in Power BI Desktop) and **Excel** use the **Microsoft Power Query for Excel** enterprise application (`client_id: a672d62c-fc7b-4e81-a576-e60dc46e951d`) to retrieve data from CDF via user interaction.
Scheduled data refreshes in the **Power BI Service** use the **Power BI Data Refresh** enterprise application (`client_id: b52893c8-bc2e-47fc-918b-77022b299bbc`).
If your organization uses both interactive connections (Excel/Power BI Desktop) and scheduled refreshes (Power BI Service), you may need to grant admin consent for **both** applications separately.
## Before you start
* [Register the Cognite API and the CDF application in Microsoft Entra ID](/cdf/access/entra/guides/configure_cdf_azure_oidc).
* [Set up Microsoft Entra ID and CDF groups](/cdf/access/entra/guides/create_groups_oidc) to control access to CDF data.
## Step 1: Identify the correct client IDs
Determine which applications require admin consent based on how users will access CDF data:
* **For Excel and Power BI Desktop connections:** Use the **Microsoft Power Query for Excel** client ID:
`a672d62c-fc7b-4e81-a576-e60dc46e951d`
* **For Power BI Service scheduled data refreshes:** Use the **Power BI Data Refresh** client ID:
`b52893c8-bc2e-47fc-918b-77022b299bbc`
See also [Microsoft's documentation](https://learn.microsoft.com/en-us/power-query/configure-microsoft-entra-for-connector#preauthorize-the-power-query-client-applications).
## Step 2: Grant admin consent via URL
Construct the consent URL by replacing the placeholders in the template below with the appropriate values:
```
https://login.microsoftonline.com//oauth2/v2.0/authorize?client_id=&response_type=code&scope=https://.cognitedata.com/IDENTITY%20https://.cognitedata.com/user_impersonation&redirect_uri=https://login.microsoftonline.com/common/oauth2/nativeclient&response_mode=fragment
```
* Replace `` with your organization's Microsoft Entra ID tenant ID.
* Replace `` with the name of your CDF cluster, for instance `westeurope-1`, `az-eastus-1`.
* Replace `` with the specific client ID identified in the previous step. This is either for **Microsoft Power Query for Excel** or for **Power BI Data Refresh**.
Open the constructed URL in your web browser. You need an **Azure Global Administrator** role or any role capable of granting tenant-wide admin consent.
Sign in with your administrator account credentials. Review the requested permissions carefully. The application requests permission to access the Cognite API (`.cognitedata.com`) and act on behalf of the signed-in user (`user_impersonation` and `IDENTITY`).
Select **Consent on behalf of your organization** and select **Accept** to approve.
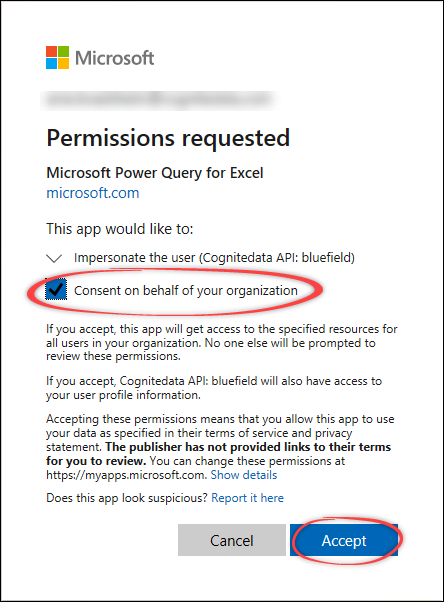 This action registers the necessary permissions in your Microsoft Entra ID tenant for the specified client application. You may be redirected to a blank page (`login.microsoftonline.com/common/oauth2/nativeclient`) after accepting. This is expected.
Repeat this step to grant consent for client IDs for both desktop use and service refresh.
## Step 3: Test the connection (admin or test user)
When you've granted consent for the **Microsoft Power Query for Excel** client ID, test the connection using Excel or Power BI Desktop. The steps below use Excel as an example:
Open **Microsoft Excel**.
Select **Data** > **Get data** > **From Other Sources** > **From OData Feed**.
This action registers the necessary permissions in your Microsoft Entra ID tenant for the specified client application. You may be redirected to a blank page (`login.microsoftonline.com/common/oauth2/nativeclient`) after accepting. This is expected.
Repeat this step to grant consent for client IDs for both desktop use and service refresh.
## Step 3: Test the connection (admin or test user)
When you've granted consent for the **Microsoft Power Query for Excel** client ID, test the connection using Excel or Power BI Desktop. The steps below use Excel as an example:
Open **Microsoft Excel**.
Select **Data** > **Get data** > **From Other Sources** > **From OData Feed**.
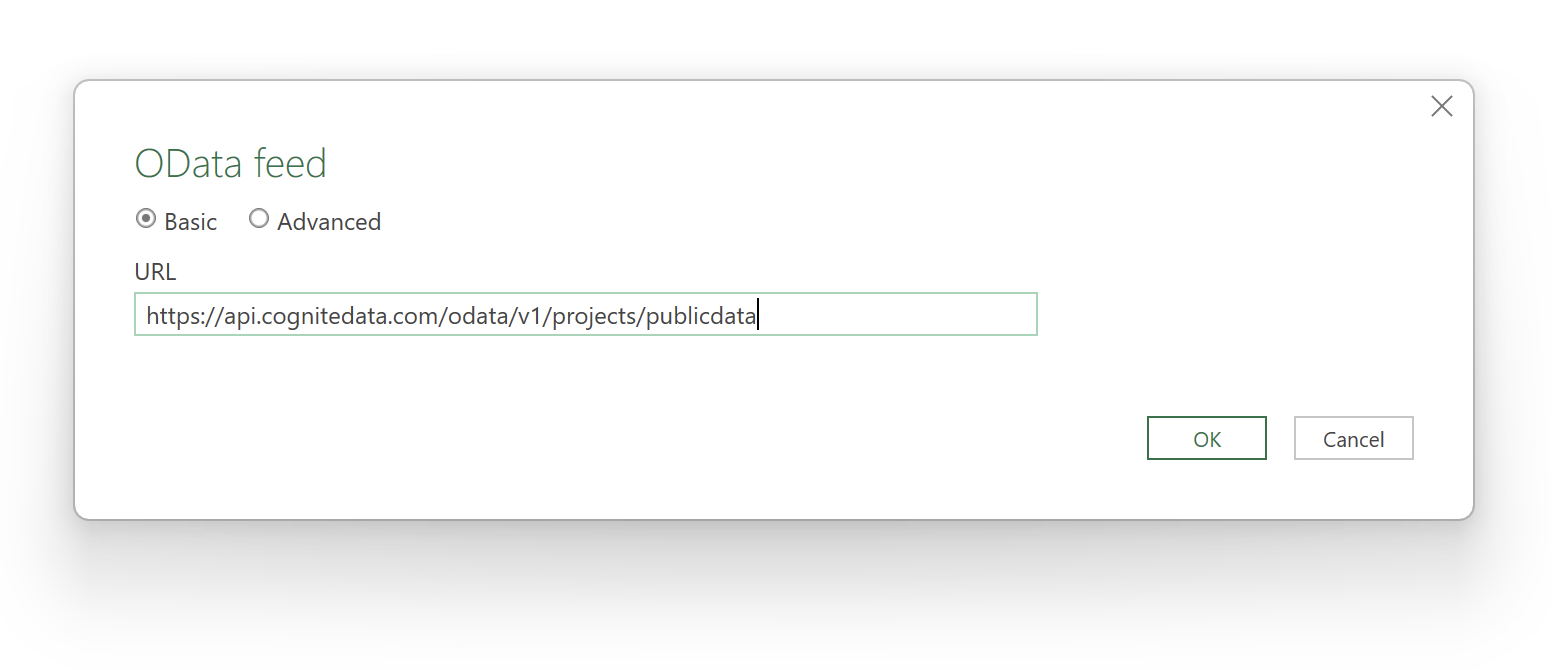 Enter the URL for the OData Feed you want to connect to, for instance `https://.cognitedata.com/odata/v1/projects/`.
If you need to sign in to Microsoft Entra ID as a guest user, you might also have to add the tenant ID as a query variable at the end of the URL, for example, `oDataUrl?tenantID=MyEntraIDTenant.onmicrosoft.com`.
Read more about [OData services](/cdf/dashboards/references/odata).
In the **Authentication** dialog, select **Organizational account** > **Sign in**.
Enter the URL for the OData Feed you want to connect to, for instance `https://.cognitedata.com/odata/v1/projects/`.
If you need to sign in to Microsoft Entra ID as a guest user, you might also have to add the tenant ID as a query variable at the end of the URL, for example, `oDataUrl?tenantID=MyEntraIDTenant.onmicrosoft.com`.
Read more about [OData services](/cdf/dashboards/references/odata).
In the **Authentication** dialog, select **Organizational account** > **Sign in**.
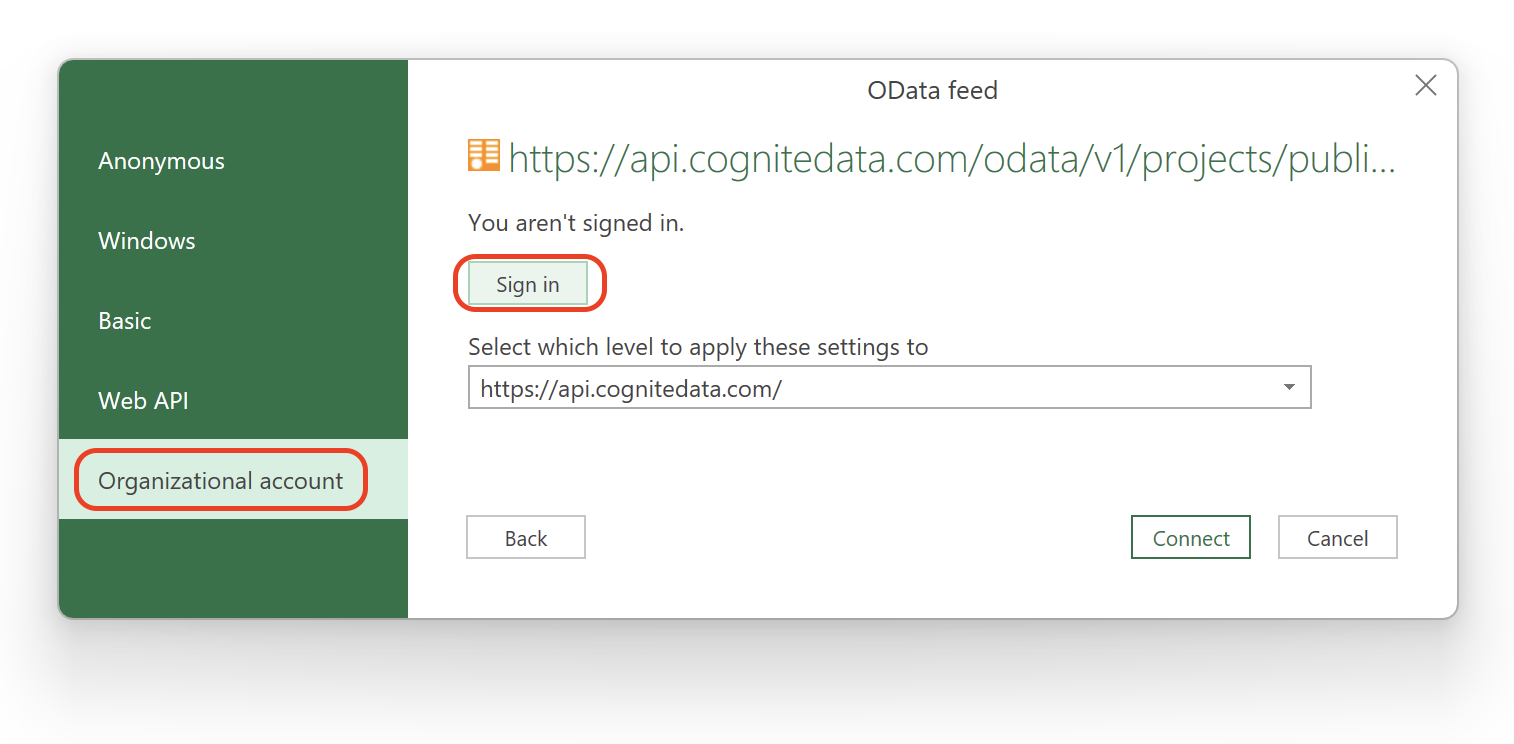 Sign in with your organizational account. This can be the admin account used for consent or any user account that should have access. Since admin consent was granted previously for this client ID, you won't see the consent prompt again.
Once authenticated, select **Connect**.
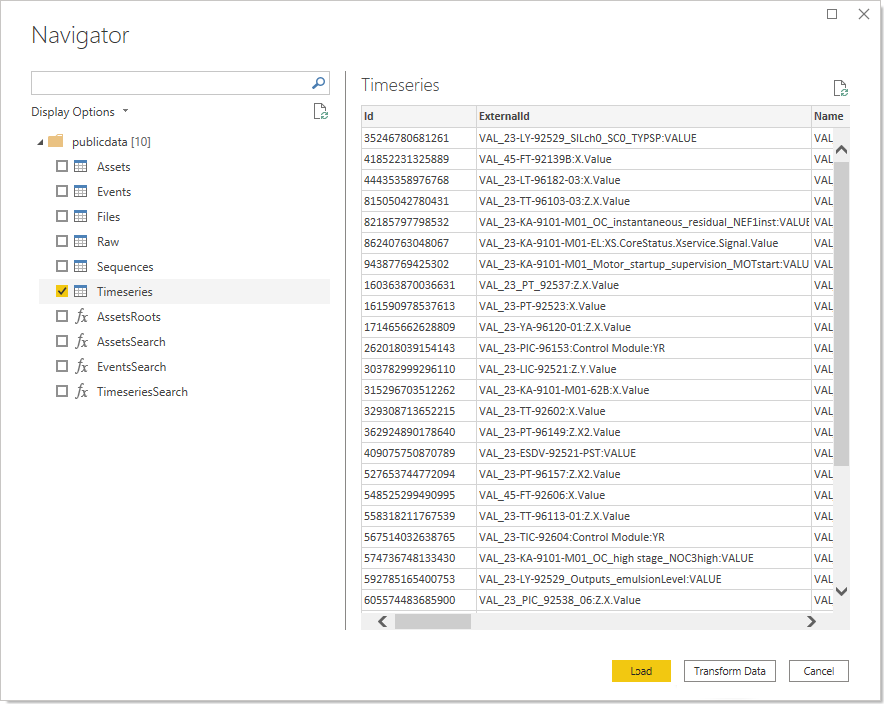
## Step 4: Verify data access
In **Navigator**, you'll see the CDF OData tables and data you have access to based on your CDF group memberships.
Sign in with your organizational account. This can be the admin account used for consent or any user account that should have access. Since admin consent was granted previously for this client ID, you won't see the consent prompt again.
Once authenticated, select **Connect**.
## Step 4: Verify data access
In **Navigator**, you'll see the CDF OData tables and data you have access to based on your CDF group memberships.
 To verify for regular users:
Sign in to **Power BI Desktop** or **Excel** with a non-admin identity belonging to the appropriate CDF access groups. This confirms that regular users in your Microsoft Entra ID can sign in and [retrieve data from the CDF project](/cdf/dashboards/guides/excel/retrieve_data_from_cdf).
If applicable, configure and test a scheduled data refresh in the Power BI Service to ensure the consent granted for the **Power BI Data Refresh** client ID is working correctly.
To verify for regular users:
Sign in to **Power BI Desktop** or **Excel** with a non-admin identity belonging to the appropriate CDF access groups. This confirms that regular users in your Microsoft Entra ID can sign in and [retrieve data from the CDF project](/cdf/dashboards/guides/excel/retrieve_data_from_cdf).
If applicable, configure and test a scheduled data refresh in the Power BI Service to ensure the consent granted for the **Power BI Data Refresh** client ID is working correctly.