To perform the steps below, you need to be an administrator of Microsoft Entra ID and your Grafana instance.
Before you start
Make sure that you have administrator access to your Grafana instance. We support the Enterprise, self-hosted and Cloud Pro editions of Grafana. We also support free cloud instances, but then you need to set up a client credentials grant flow for each instance of the Cognite Data Source.Step 1: Register Grafana as an application in Microsoft Entra ID
The Cognite Data Source for Grafana uses the credentials you use to sign in to Grafana to connect to CDF. Therefore, you need to set up the Grafana instance to authenticate the user towards the same identity provider (IdP) as your CDF project. The first step is to configure the Grafana instance to use OAuth2. The example below uses Microsoft Entra ID as the IdP.1
Register the Cognite API and CDF application
Make sure that you have already registered the Cognite API and the CDF application in Microsoft Entra ID.
2
Enable Microsoft Entra ID authentication in Grafana
To enable users to sign in to Grafana with their organizational ID, follow the steps in the Grafana documentation to register Grafana as an application in Microsoft Entra ID and enable Microsoft Entra ID authentication in Grafana.
Grafana Cloud: To enable OIDC sign-in using Microsoft Entra ID with Grafana Cloud, follow the configuration steps.Handle the changes to the Grafana configuration file by using the configuration form at Grafana Labs > Security > Advanced Auth.
Use these permission scopes in the Grafana configuration file:
scopes = openid email profile offline_access https://<your-cluster>.cognitedata.com/user_impersonation https://<your-cluster>.cognitedata.com/IDENTITY3
Restart the Grafana service
Close the Grafana configuration file after updating it and restart the Grafana service.
4
Verify configuration as administrator
Sign in to Grafana to use the Microsoft Entra ID Global administrator role. The role lets you verify that the configuration is successful and enables you to grant admin consent.
5
Grant organization consent
Select Consent on behalf of your organization.
Step 2: Decide access to CDF data
1
Link Microsoft Entra ID and CDF groups
To decide what access users should have to data in CDF, follow the steps in Link Microsoft Entra ID and CDF groups.
2
Configure required capabilities
The account needs these capabilities:
-
timeSeriesAcl:READ:required to find and plot time series. -
groupsAcl:LIST:required to verify Grafana connectivity. -
projectsAcl:LIST:required to verify Grafana connectivity. -
assetsAcl:READ:optional to use template variables and select time series from an asset. -
eventsAcl:READ:optional to use annotations.
Step 3: Install the Cognite Data Source for Grafana
To install the Cognite Data Source for Grafana:- Grafana Enterprise
- Self-hosted Grafana
1
Sign in as administrator
Make sure you’re signed in to Grafana as an administrator in your browser.
2
Install the plugin
Navigate to the Cognite Data Source for Grafana plugin and select Install plugin.
Step 4: Configure the Cognite Data Source for Grafana
To configure the Cognite Data Source for Grafana:1
Sign in to Grafana
In your browser, sign in to Grafana as an administrator.
2
Add the Cognite data source
In Grafana, navigate to Configuration > Data sources > Add data source > Search for “Cognite”.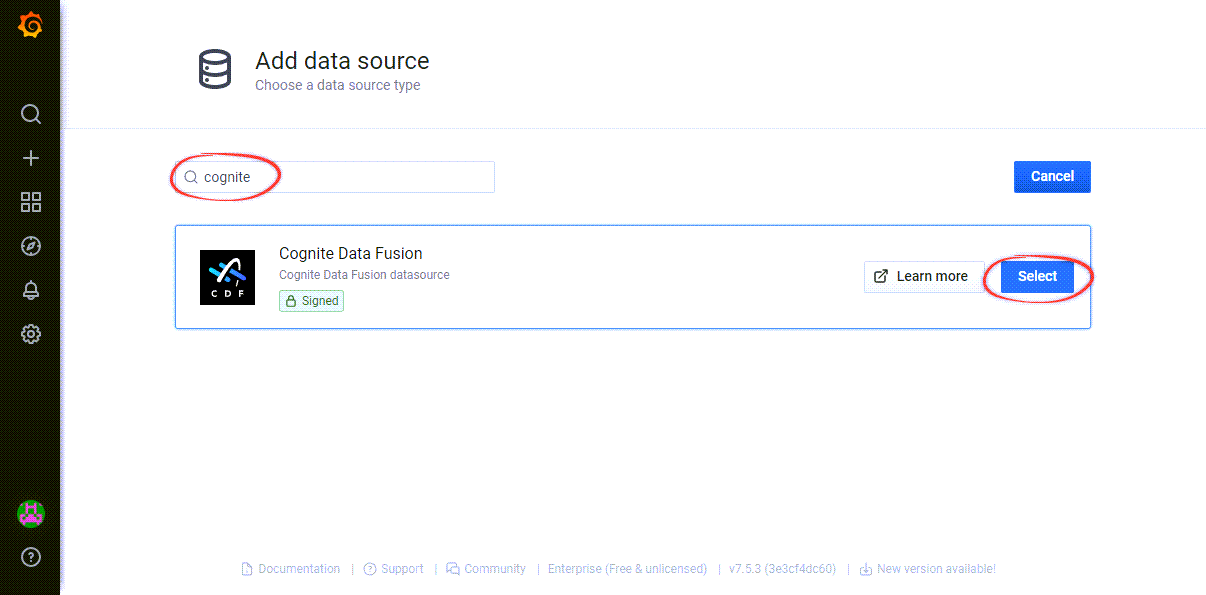
3
Configure the data source
Enter your project name, the API URL and select Forward OAuth Identity.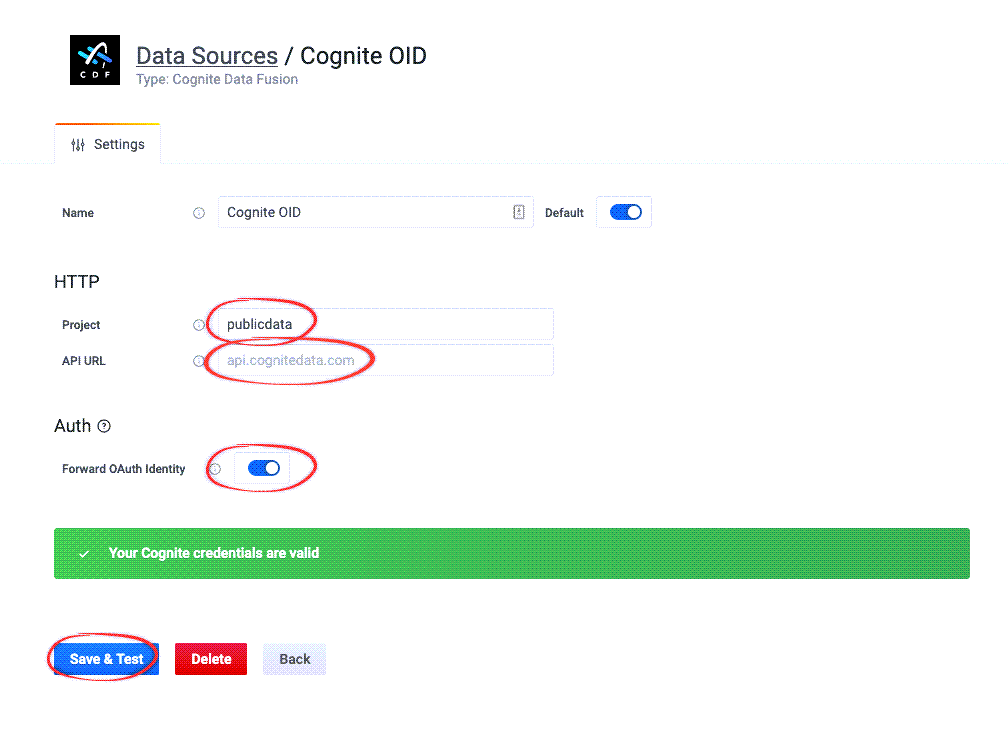
The Grafana free tier doesn’t allow you to set an identity provider for the whole Grafana instance, and you can not select a Forward OAuth Identity. Instead, you need to set up a client credentials grant flow for each instance of the Cognite Data Source.
4
Save and test the configuration
Select Save & Test to validate your Cognite credentials.
5
Verify the configuration
Verify that the configuration is successful: Sign in to Grafana with a non-admin identity and create a dashboard to confirm that regular users in your Microsoft Entra ID can access Grafana and work with data from CDF.
Set up a client credentials grant flow
In some cases, for example, if you’re using the Grafana free tier, you can not set up an identity provider for the whole Grafana instance. Instead, follow these steps to set up a client credentials grant flow for each instance of the Cognite Data Source:Before you start
1
Set up application registration
Use an application registration with capabilities to access the target CDF project. If you don’t have an application registration, follow the guide: Register a custom web app in Microsoft Entra ID.
2
Register Cognite API and CDF application
Make sure that you have registered the Cognite API and the CDF application in Microsoft Entra ID.
3
Configure required capabilities
Configure the required capabilities.
4
Add service principal to CDF group
5
Install the plugin
Navigate to Cognite Data Source for Grafana plugin and select Install plugin.
1
Navigate to data sources
In Grafana, navigate to Configuration > Data sources > Add data source.
2
Select Cognite data source
Search for Cognite and select Cognite Data Fusion data source.
3
Configure OAuth2 client credentials
- Disable Forward OAuth identity.
- Enable OAuth2 client credentials.
- Enter the credentials.
4
Validate credentials
Select Save & Test to validate your Cognite credentials.