> ## Documentation Index
> Fetch the complete documentation index at: https://docs.cognite.com/llms.txt
> Use this file to discover all available pages before exploring further.
# Configure Azure Private Link and CDF
> Set up Azure Private Link to access Cognite Data Fusion (CDF) over a private connection.
[Azure Private Link](https://learn.microsoft.com/en-us/azure/private-link/private-link-overview) enables you to access CDF over a **private endpoint**. Traffic between your virtual network and CDF uses the Microsoft backbone network and isn't exposed to the public internet.
Follow the steps in this article to set up a private endpoint to access the Cognite API. The steps include submitting information to Cognite to configure your CDF project(s) to reject traffic from sources other than the Private Link service.
Currently, you can only request Private Link to be enabled for **new CDF projects**, not for existing ones.
Make sure that you exchange confidential information through a secret and encrypted channel, for example via [Yopass](https://yopass.cogheim.net).
## Before you start
To complete the configuration, you need to be a network administrator or use infrastructure-as-code automation, with permission to create Azure private endpoints.
## Step 1: Request a Private Link connection alias from Cognite
If you have purchased Private Link, contact Cognite customer support and request a **Private Link connection alias** for your CDF projects.
Make a note of the alias you receive from Cognite. It'll look similar to this:
`cdf-api.361db72b-......-52a2bf4c6832.westeurope.azure.privatelinkservice`
## Step 2: Create a private endpoint in Azure
Follow the [Azure documentation](https://learn.microsoft.com/en-us/azure/private-link/create-private-endpoint-portal?tabs=dynamic-ip) to create a private endpoint.
When prompted, select **Connect to an Azure resource by resource ID or alias**, and enter the **connection alias** you received from Cognite.
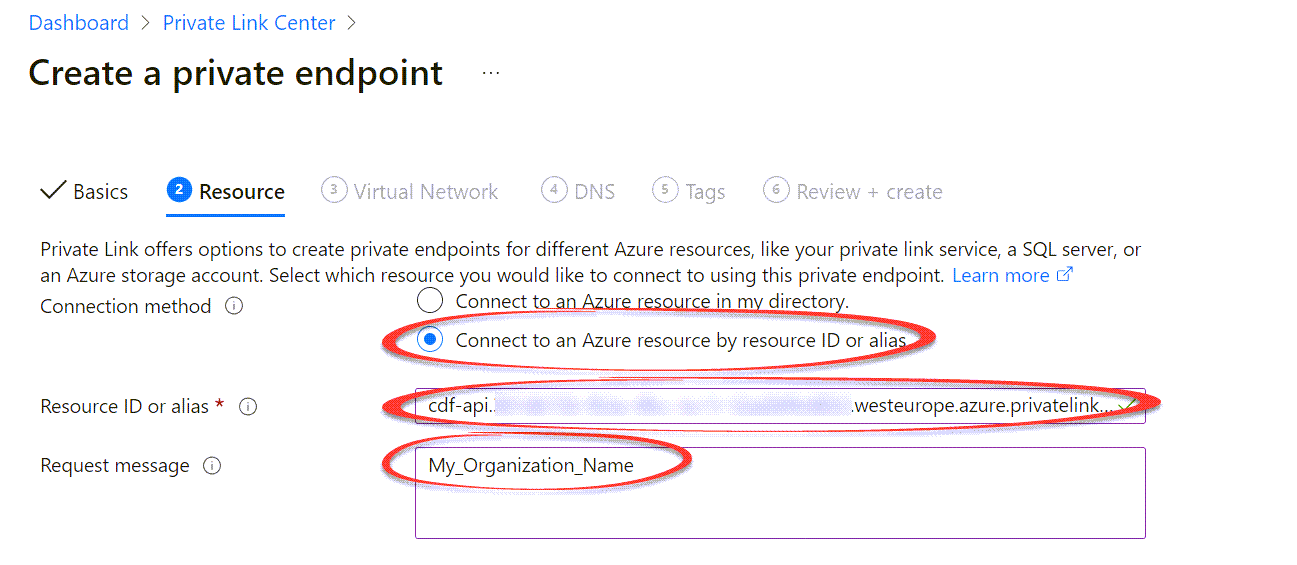 For **Request message**, enter the name of your **CDF organization**.
Fill in the remaining information according to your organization's preferences to create the private endpoint.
## Step 3: Provide the private endpoint details to Cognite
Contact Cognite customer support and provide **the private endpoint details** to configure your CDF projects:
* The **Resource GUID** of the private endpoint:
For **Request message**, enter the name of your **CDF organization**.
Fill in the remaining information according to your organization's preferences to create the private endpoint.
## Step 3: Provide the private endpoint details to Cognite
Contact Cognite customer support and provide **the private endpoint details** to configure your CDF projects:
* The **Resource GUID** of the private endpoint:
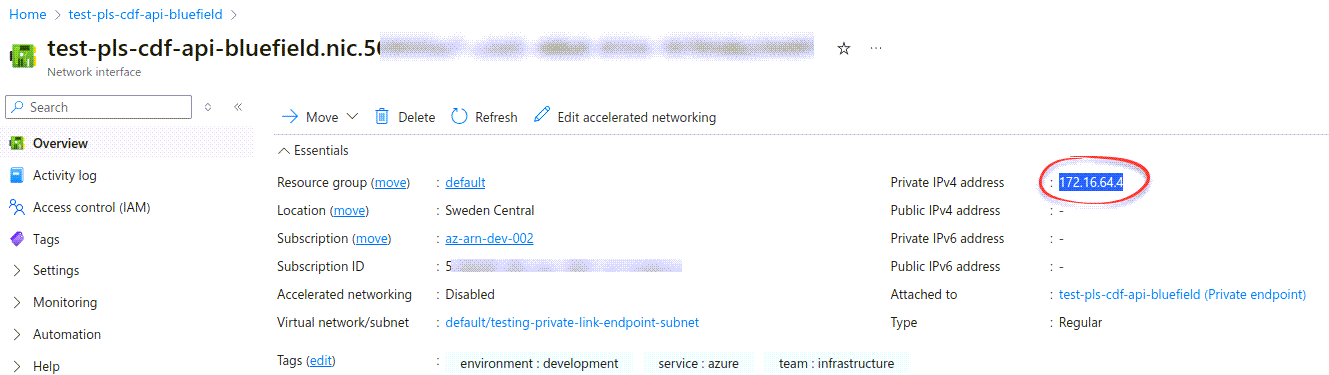
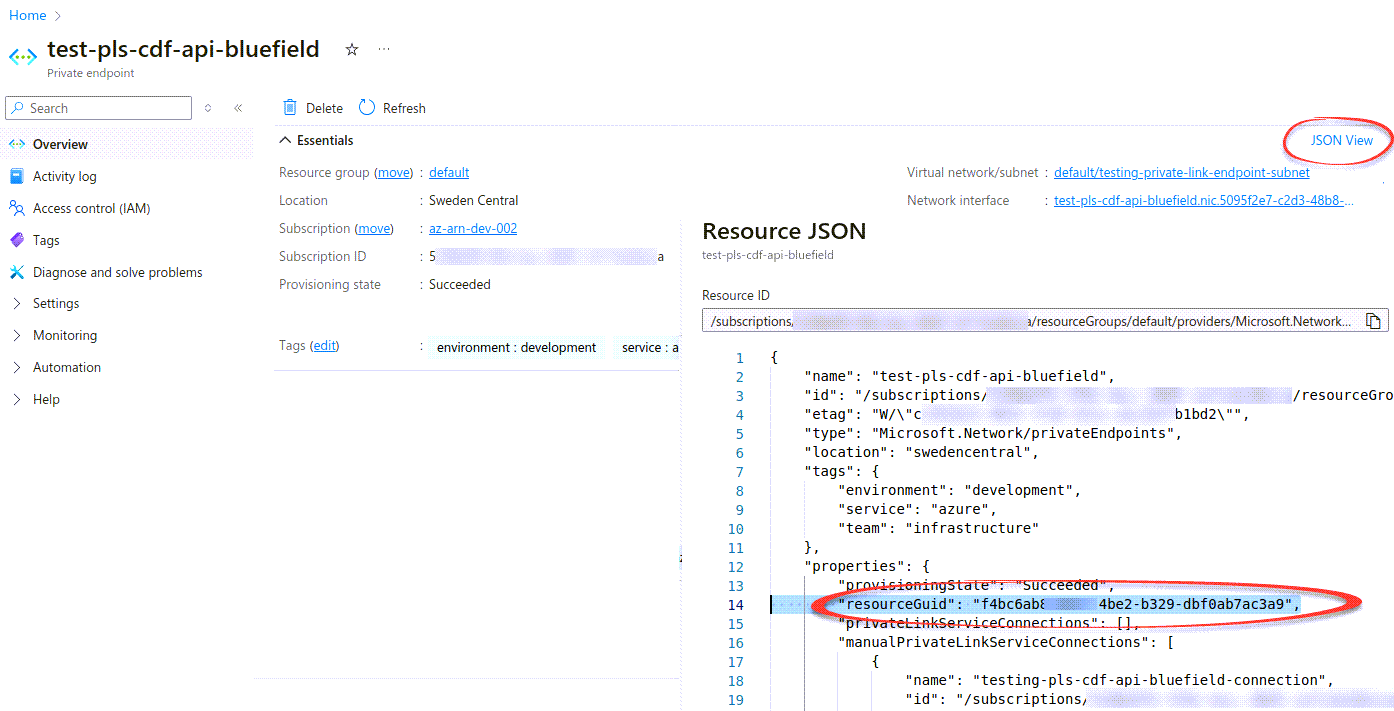 * The **Private IPv4 address** of the private endpoint network interface controller (NIC):
 ## Step 4: Receive the base URL from Cognite
Make a note of the **base URL** you receive from Cognite. It'll be in this format:
`pNNN.plink..cognitedata.com`
Use the base URL to register [the Cognite API and applications](/cdf/access/entra/guides/configure_cdf_azure_oidc) and to register and configure [other applications and components](/cdf/access/entra/guides/configure_apps_oidc).
## Step 4: Receive the base URL from Cognite
Make a note of the **base URL** you receive from Cognite. It'll be in this format:
`pNNN.plink..cognitedata.com`
Use the base URL to register [the Cognite API and applications](/cdf/access/entra/guides/configure_cdf_azure_oidc) and to register and configure [other applications and components](/cdf/access/entra/guides/configure_apps_oidc).