> ## Documentation Index
> Fetch the complete documentation index at: https://docs.cognite.com/llms.txt
> Use this file to discover all available pages before exploring further.
# Configure CDF 3D Visual in Power BI
> Display and interact with 3D CAD models from Cognite Data Fusion (CDF) directly in Power BI reports.
The **Cognite Data Fusion 3D Visual** uses Cognite's [Reveal 3D](https://cognitedata.github.io/reveal-docs/docs) library to embed industrial asset models in your dashboards.
To use this visual, your 3D models must be stored in CDF using Cognite's **asset-centric data models**. Models stored in CDF core data models are not yet supported.
You can navigate and select model components to connect your Power BI data with physical asset locations for enhanced spatial analysis.
 ## Before you start
Make sure you have:
* Access to a **CDF project** with permissions to view 3D models
* An active **CDF license** that allows token acquisition
* [Power BI Desktop](https://powerbi.microsoft.com/desktop/) installed.
## Step 1: Configure Microsoft Entra ID permissions
This allows the Power BI visual to securely connect to your CDF project.
This step requires administrator permissions and is a one-time setup per tenant.
* Replace **TENANTID** with your tenant ID (found in Azure Portal > Microsoft Entra ID > Overview)
* Replace **CLUSTER** with your Cognite cluster name
First URL:
```
https://login.microsoftonline.com//adminconsent?client_id=https://powerbivisual.cognitedata.com
```
Second URL:
```
https://powerbivisual.cogniteapp.com/consent?tenantid=&cluster=
```
Open both URLs in your browser and sign in with an admin account to grant permissions.
## Step 2: Add data to your report
Prepare a data set that you'll connect to your Power BI report. It should include the following 3D model information:
* **Model name** (string) — the name of the 3D model
* **Model ID** (number) — the unique identifier for the model in CDF
* **Revision ID** (number) — the revision identifier for the model
Select **Get data** from the **Home** ribbon in Power BI to connect to data. Once you load the data to the report, it's visible in the **Data** pane.
## Step 3: Add the 3D visual to your report
In your Power BI report, select **More options (...)** in the **Visualizations** pane.
Import the visual from a local *.pbiviz* file.
1. Select **Import a visual from a file**.
2. Browse to your file location and select it.
3. Confirm the import when prompted.
Download the visual directly from AppSource.
1. Select **Get more visuals**.
2. Search for **Cognite Data Fusion 3D Visual** in the AppSource marketplace.
3. Add the visual and confirm the import.
Select the new visual icon in the **Visualizations** pane to use this visual in the report.
## Step 4: Authenticate with CDF
Connect the visual to your CDF project.
Select **Get Started** on the landing page.
In the authentication dialog, enter your **CDF project name** and **cluster name**.
Select **OK** to authenticate.
If authentication fails, verify that your CDF project name and cluster name are correct, and that your access token is valid.
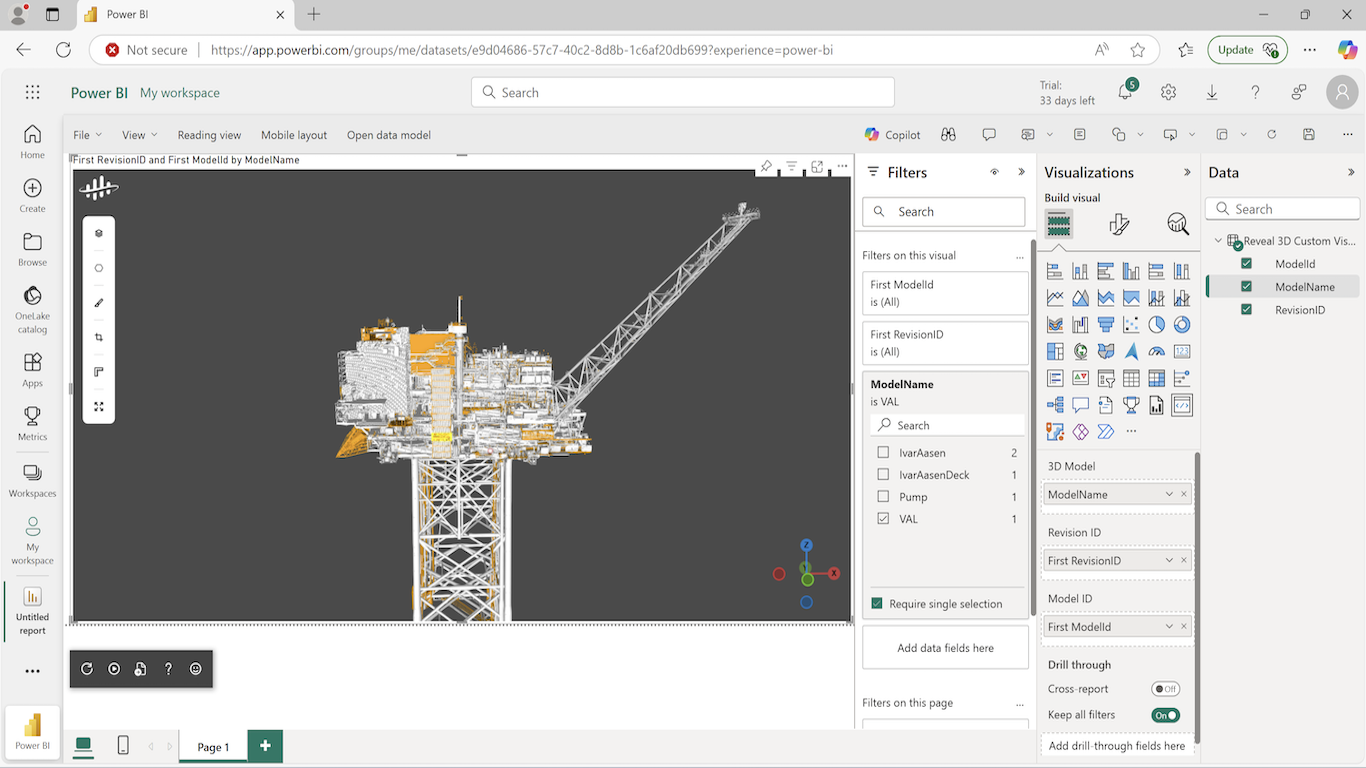
## Step 5: Bind the data
From the **Data** pane, drag **Model name**, **Model ID**, and **Revision ID** to the visual's **Filters** section.
If your data set doesn't have these fields, or they are incomplete, you can browse and select models manually using the **Show model list** icon in the 3D toolbar.
After binding the data, verify that the visual loads the specified 3D model in the viewer.
## Step 6: Interact with the 3D viewer
Once a 3D model is loaded, you can navigate and interact with it using the viewer's toolbar.
**Toolbar features**
* Filter the list of available 3D models
* Analyze and measure objects
* View node properties of the selected CAD model components
## Troubleshooting
Find information to help you troubleshoot common issues.
If the authentication fails or you cannot acquire a token:
Verify your CDF license includes token acquisition permissions.
Check if your access token has expired:
1. Sign out of Power BI.
2. Sign back in to generate a new token.
If the visual displays **No data available**:
Check that your data set includes **Model ID** and **Revision ID** columns.
Ensure the data is bound to the visual.
If you see a server error message:
Verify the CDF cluster is operational.
1. Select **Get Started** in the visual.
2. Enter your credentials again.
## More information
* [About 3D models](./3dmodels_intro)
* [Upload 3D models in the browser](./3dmodels_upload)
* [Reveal 3D Web Viewer SDK](https://cognitedata.github.io/reveal-docs/docs)
## Before you start
Make sure you have:
* Access to a **CDF project** with permissions to view 3D models
* An active **CDF license** that allows token acquisition
* [Power BI Desktop](https://powerbi.microsoft.com/desktop/) installed.
## Step 1: Configure Microsoft Entra ID permissions
This allows the Power BI visual to securely connect to your CDF project.
This step requires administrator permissions and is a one-time setup per tenant.
* Replace **TENANTID** with your tenant ID (found in Azure Portal > Microsoft Entra ID > Overview)
* Replace **CLUSTER** with your Cognite cluster name
First URL:
```
https://login.microsoftonline.com//adminconsent?client_id=https://powerbivisual.cognitedata.com
```
Second URL:
```
https://powerbivisual.cogniteapp.com/consent?tenantid=&cluster=
```
Open both URLs in your browser and sign in with an admin account to grant permissions.
## Step 2: Add data to your report
Prepare a data set that you'll connect to your Power BI report. It should include the following 3D model information:
* **Model name** (string) — the name of the 3D model
* **Model ID** (number) — the unique identifier for the model in CDF
* **Revision ID** (number) — the revision identifier for the model
Select **Get data** from the **Home** ribbon in Power BI to connect to data. Once you load the data to the report, it's visible in the **Data** pane.
## Step 3: Add the 3D visual to your report
In your Power BI report, select **More options (...)** in the **Visualizations** pane.
Import the visual from a local *.pbiviz* file.
1. Select **Import a visual from a file**.
2. Browse to your file location and select it.
3. Confirm the import when prompted.
Download the visual directly from AppSource.
1. Select **Get more visuals**.
2. Search for **Cognite Data Fusion 3D Visual** in the AppSource marketplace.
3. Add the visual and confirm the import.
Select the new visual icon in the **Visualizations** pane to use this visual in the report.
## Step 4: Authenticate with CDF
Connect the visual to your CDF project.
Select **Get Started** on the landing page.
In the authentication dialog, enter your **CDF project name** and **cluster name**.
Select **OK** to authenticate.
If authentication fails, verify that your CDF project name and cluster name are correct, and that your access token is valid.
## Step 5: Bind the data
From the **Data** pane, drag **Model name**, **Model ID**, and **Revision ID** to the visual's **Filters** section.
If your data set doesn't have these fields, or they are incomplete, you can browse and select models manually using the **Show model list** icon in the 3D toolbar.
After binding the data, verify that the visual loads the specified 3D model in the viewer.
## Step 6: Interact with the 3D viewer
Once a 3D model is loaded, you can navigate and interact with it using the viewer's toolbar.
**Toolbar features**
* Filter the list of available 3D models
* Analyze and measure objects
* View node properties of the selected CAD model components
## Troubleshooting
Find information to help you troubleshoot common issues.
If the authentication fails or you cannot acquire a token:
Verify your CDF license includes token acquisition permissions.
Check if your access token has expired:
1. Sign out of Power BI.
2. Sign back in to generate a new token.
If the visual displays **No data available**:
Check that your data set includes **Model ID** and **Revision ID** columns.
Ensure the data is bound to the visual.
If you see a server error message:
Verify the CDF cluster is operational.
1. Select **Get Started** in the visual.
2. Enter your credentials again.
## More information
* [About 3D models](./3dmodels_intro)
* [Upload 3D models in the browser](./3dmodels_upload)
* [Reveal 3D Web Viewer SDK](https://cognitedata.github.io/reveal-docs/docs)