> ## Documentation Index
> Fetch the complete documentation index at: https://docs.cognite.com/llms.txt
> Use this file to discover all available pages before exploring further.
# Upload 360° images
> You can upload 360° images to Cognite Data Fusion (CDF) and display them in various applications with the Reveal 3D viewer.
360° images can be captured as part of a point cloud scan, such as an E57 format file, but you can also capture and upload them manually or using robots.
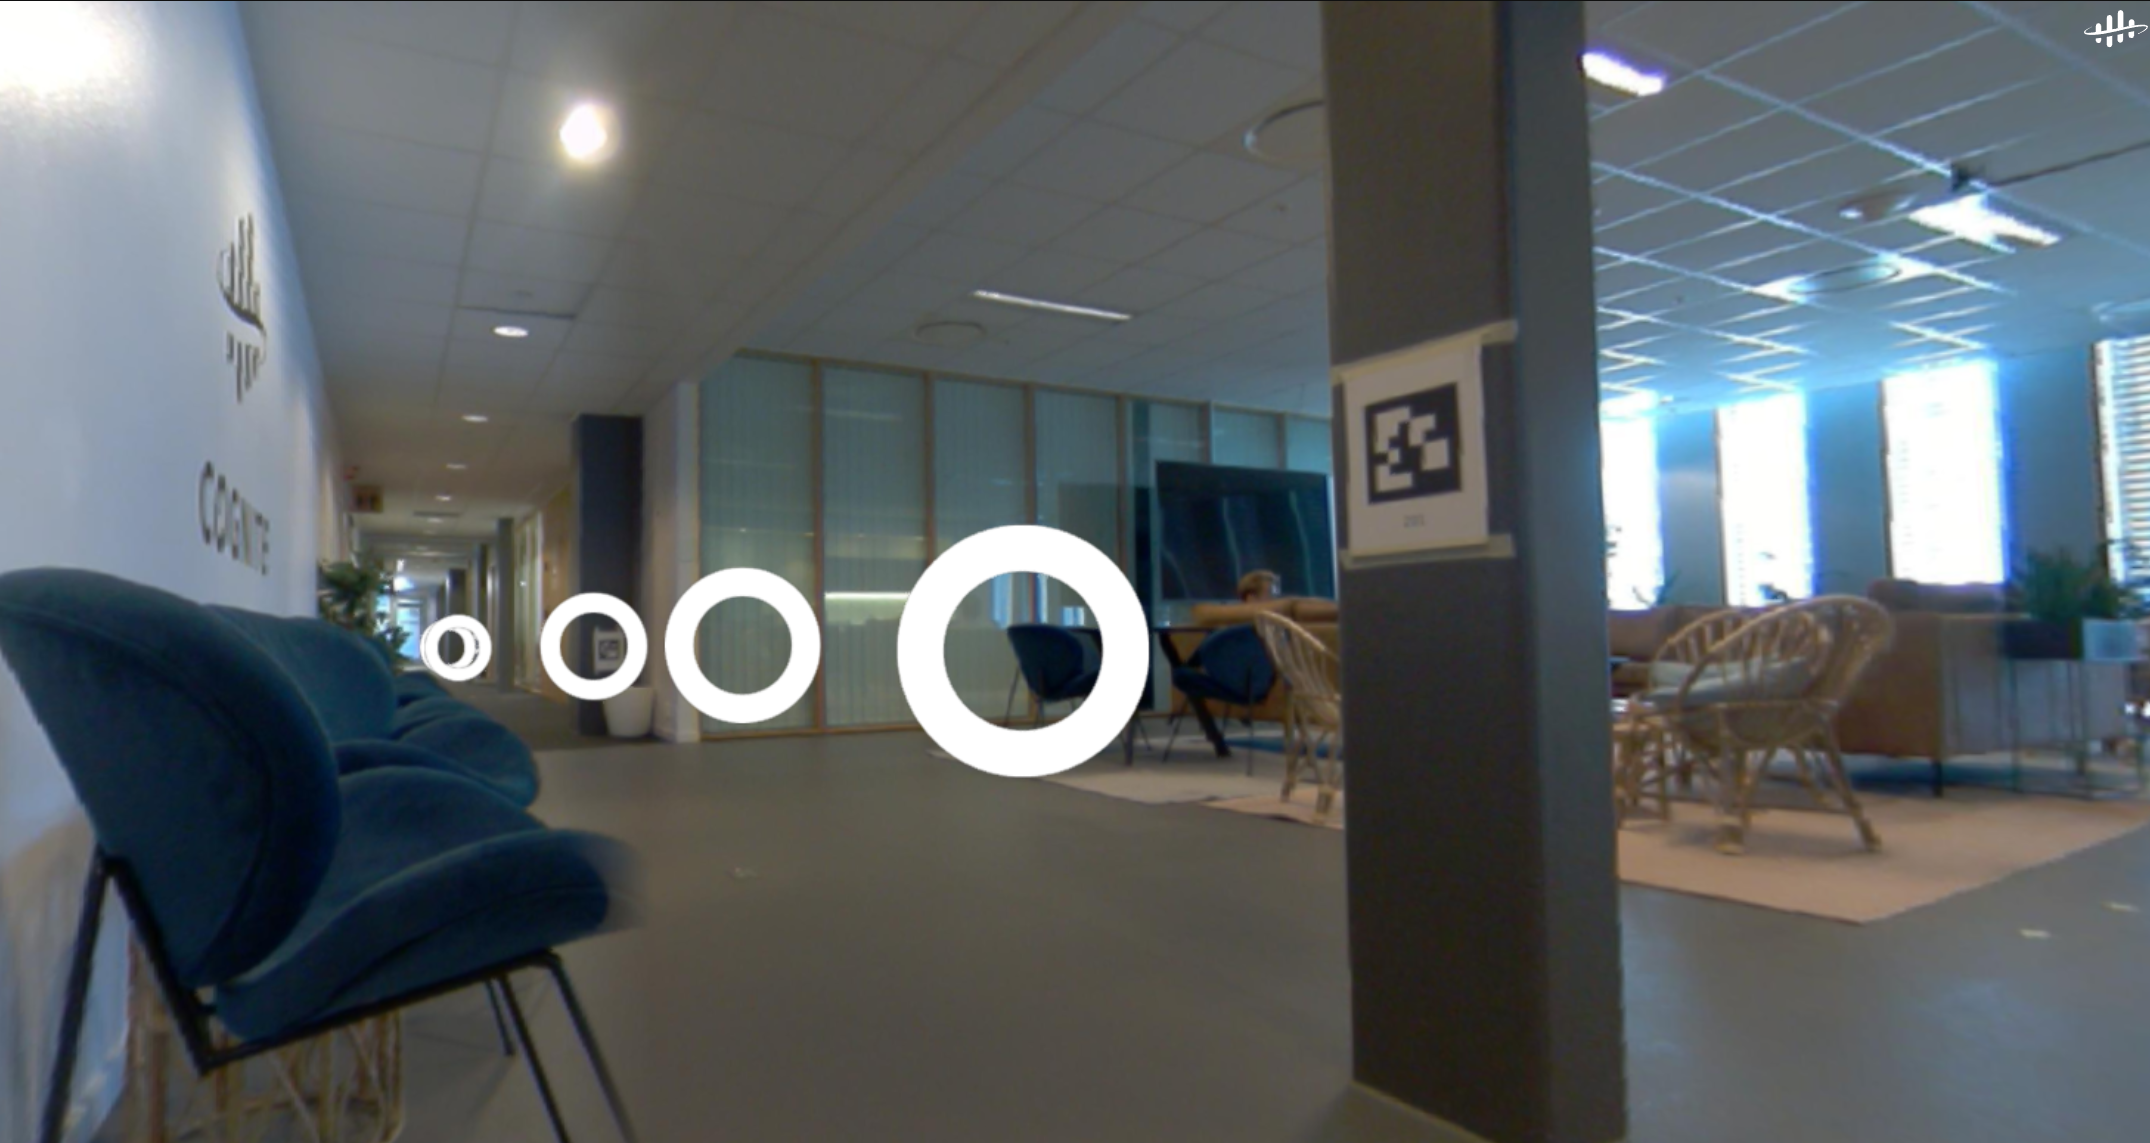
In Reveal 3D viewer, 360° image locations appear as **round markers**. Select a marker to enter the 360° image, and use your mouse to rotate the camera in any direction.
In the 360° image, select round markers on the floor to move between images, or click to move to the nearest station in that direction. If the scene includes a reference point cloud model, a **directional cursor** shows where you're pointing. Smooth transitions help you keep orientation when moving between stations, and an elevation indicator helps you distinguish stations on different floor levels.
 You need to **upload** the image files to CDF. Each station has six **cube map images** with a specific set of **metadata**. These cube map images together form a 360° image, representing six directions (left, front, right, back, top, and bottom). You can access the cube map images separately through file exports from the lidar scanning software or in E57 point cloud files.
 ### Automatic conversion for E57 files
E57 files can contain 360° images in various formats, including **cube maps** and **equirectangular** (spherical) projections.
If a 360° image is in a format other than a cube map, the extraction process will try to convert it to the cube map format. This conversion may require additional processing time and result in a slight quality loss compared to images that are already in cube map format.
See [E57 files with 360° images](#e57-files-with-360-images) for upload instructions.
### Manual conversion for other file formats
If you have equirectangular images in other file formats (not E57), convert them to cube maps before uploading to CDF:
1. Use a conversion tool such as [py360convert](https://github.com/sunset1995/py360convert) to convert your images to cube map format.
2. Upload the converted cube maps following the steps in [Upload 360° images programmatically](/cdf/3d/guides/api_asset_centric/upload_360#custom-script-for-other-formatted-360-images).
## Get started
You can upload 360° images to CDF in two ways:
* [By uploading E57 files with 360° images](/cdf/3d/guides/360images_upload#e57-files-with-360-images), if you have a point cloud file in the E57 file format that includes both 360° images and point cloud data. A zip file of E57 files is also supported. This is only supported for the asset-centric 3D models.
* [By uploading other formatted 360° images](/cdf/3d/guides/api_asset_centric/upload_360#custom-script-for-other-formatted-360-images), if you have 360° images and related custom metadata in separate, other (not E57) formatted files.
After uploading in the user interface or using a custom script, you can view 360° images in Search by adding the 360° image collection to a [scene](#add-360-images-to-the-scene). To view 360° images in custom Reveal applications, see [Reveal documentation](https://cognitedata.github.io/reveal-docs/docs).
Uploading the 360° image metadata (pose information) to the [Events API](/api-reference/concepts/20230101/events) is no longer possible. This functionality has been deprecated and will stop working in the future.
## Access capabilities
See [access capabilities](/cdf/access/guides/capabilities#upload-3d-models) to add the necessary capabilities to upload and view 360° images.
## Limitations
3D API processing now supports extracting 360° images from E57 files for a 3D model with a `data set` when starting from a script.
The CDF user interface currently doesn't support triggering extraction 360° images when either the source `fileId` or `modelId` has a data set.
The extracted 360° image files will be stored in the same data set as the 3D model. If the 3D model doesn't have a `data set`, the 3D API will also check and use any data set associated with the source file specified for the revision.
If you want the extracted 360° images to be available in a different data set, change the `data set` association for the files after processing is complete using file update requests.
If a data set is used in a `modelId` or source `fileId`, specify a `dmsInstancesSpaceId` value in the *indexingOptions* for the revision's request body. See [Upload 360° images programmatically](/cdf/3d/guides/api_asset_centric/upload_360#trigger-360-image-extraction-from-e57-files-using-python) for how to trigger extraction from a script. This specifies the `space` where the data model instances for 360° images are stored.
## E57 files with 360° images
Follow the steps to upload the E57 files to CDF, trigger point cloud filtering and indexing, and opt-in to 360° image extraction.
If these files are large:
* Upload the files in the ZIP format using the [file extractor](/cdf/3d/guides/3d_file_extractor_guide).
* Or, upload them as individual E57 files, referenced through a JSON file using [a custom Python script](/cdf/3d/guides/api_asset_centric/upload_pointcloud).
Individual E57, ZIP, or JSON.
Navigate to **Data fusion** > **Configure** > **3D** > **Upload model**.
Enter a model name, leave the data set field empty, and then select Upload new model.
Upload the file, if needed, or select *Choose existing uploaded file to process to create a 3D model* and enter the file ID (from step 2).
Select **Upload and process**.
For smaller files, this can take a few minutes. For larger files, this might take several hours or days. Refresh the page if necessary.
1. Once the model's status changes to *Done*, select the model > ... > Filtering and indexing.
2. Select Use the file ID from the previous revision.
3. Select Extract 360° images and clear Generate tiles option.
4. **Optional**: Expand the Filtering section and manage more settings.
5. Select **OK** to start the point cloud processing.
You can view the processed point cloud model once the processing is complete.
To trigger 360° image extraction from E57 files with a script, or to upload and register other 360° formats (for example, cube maps) via the API, see [Upload 360° images programmatically](/cdf/3d/guides/api_asset_centric/upload_360).
## Add 360 images to the scene
To see the 360° images in CDF programs and applications using the Reveal 3D viewer, [add 360° images to the scene](/cdf/3d/guides/scene).
For the E57 file (set) with both point cloud and 360° images, add 3D data when you configure or edit the scene. See [Unified 3D contextualization](/cdf/3d/guides/scene#unified-3d-contextualization) for more information.
The 360° images extracted from the E57 file set will be put in a 360° image collection named `site--`. For example, `site-111-222`, where 111 is the model ID and 222 is the revision ID.
### Automatic conversion for E57 files
E57 files can contain 360° images in various formats, including **cube maps** and **equirectangular** (spherical) projections.
If a 360° image is in a format other than a cube map, the extraction process will try to convert it to the cube map format. This conversion may require additional processing time and result in a slight quality loss compared to images that are already in cube map format.
See [E57 files with 360° images](#e57-files-with-360-images) for upload instructions.
### Manual conversion for other file formats
If you have equirectangular images in other file formats (not E57), convert them to cube maps before uploading to CDF:
1. Use a conversion tool such as [py360convert](https://github.com/sunset1995/py360convert) to convert your images to cube map format.
2. Upload the converted cube maps following the steps in [Upload 360° images programmatically](/cdf/3d/guides/api_asset_centric/upload_360#custom-script-for-other-formatted-360-images).
## Get started
You can upload 360° images to CDF in two ways:
* [By uploading E57 files with 360° images](/cdf/3d/guides/360images_upload#e57-files-with-360-images), if you have a point cloud file in the E57 file format that includes both 360° images and point cloud data. A zip file of E57 files is also supported. This is only supported for the asset-centric 3D models.
* [By uploading other formatted 360° images](/cdf/3d/guides/api_asset_centric/upload_360#custom-script-for-other-formatted-360-images), if you have 360° images and related custom metadata in separate, other (not E57) formatted files.
After uploading in the user interface or using a custom script, you can view 360° images in Search by adding the 360° image collection to a [scene](#add-360-images-to-the-scene). To view 360° images in custom Reveal applications, see [Reveal documentation](https://cognitedata.github.io/reveal-docs/docs).
Uploading the 360° image metadata (pose information) to the [Events API](/api-reference/concepts/20230101/events) is no longer possible. This functionality has been deprecated and will stop working in the future.
## Access capabilities
See [access capabilities](/cdf/access/guides/capabilities#upload-3d-models) to add the necessary capabilities to upload and view 360° images.
## Limitations
3D API processing now supports extracting 360° images from E57 files for a 3D model with a `data set` when starting from a script.
The CDF user interface currently doesn't support triggering extraction 360° images when either the source `fileId` or `modelId` has a data set.
The extracted 360° image files will be stored in the same data set as the 3D model. If the 3D model doesn't have a `data set`, the 3D API will also check and use any data set associated with the source file specified for the revision.
If you want the extracted 360° images to be available in a different data set, change the `data set` association for the files after processing is complete using file update requests.
If a data set is used in a `modelId` or source `fileId`, specify a `dmsInstancesSpaceId` value in the *indexingOptions* for the revision's request body. See [Upload 360° images programmatically](/cdf/3d/guides/api_asset_centric/upload_360#trigger-360-image-extraction-from-e57-files-using-python) for how to trigger extraction from a script. This specifies the `space` where the data model instances for 360° images are stored.
## E57 files with 360° images
Follow the steps to upload the E57 files to CDF, trigger point cloud filtering and indexing, and opt-in to 360° image extraction.
If these files are large:
* Upload the files in the ZIP format using the [file extractor](/cdf/3d/guides/3d_file_extractor_guide).
* Or, upload them as individual E57 files, referenced through a JSON file using [a custom Python script](/cdf/3d/guides/api_asset_centric/upload_pointcloud).
Individual E57, ZIP, or JSON.
Navigate to **Data fusion** > **Configure** > **3D** > **Upload model**.
Enter a model name, leave the data set field empty, and then select Upload new model.
Upload the file, if needed, or select *Choose existing uploaded file to process to create a 3D model* and enter the file ID (from step 2).
Select **Upload and process**.
For smaller files, this can take a few minutes. For larger files, this might take several hours or days. Refresh the page if necessary.
1. Once the model's status changes to *Done*, select the model > ... > Filtering and indexing.
2. Select Use the file ID from the previous revision.
3. Select Extract 360° images and clear Generate tiles option.
4. **Optional**: Expand the Filtering section and manage more settings.
5. Select **OK** to start the point cloud processing.
You can view the processed point cloud model once the processing is complete.
To trigger 360° image extraction from E57 files with a script, or to upload and register other 360° formats (for example, cube maps) via the API, see [Upload 360° images programmatically](/cdf/3d/guides/api_asset_centric/upload_360).
## Add 360 images to the scene
To see the 360° images in CDF programs and applications using the Reveal 3D viewer, [add 360° images to the scene](/cdf/3d/guides/scene).
For the E57 file (set) with both point cloud and 360° images, add 3D data when you configure or edit the scene. See [Unified 3D contextualization](/cdf/3d/guides/scene#unified-3d-contextualization) for more information.
The 360° images extracted from the E57 file set will be put in a 360° image collection named `site--`. For example, `site-111-222`, where 111 is the model ID and 222 is the revision ID.